CTU Tutorial: Body meshing with Milkshape: Toddler Frankenstein.
CTU Tutorial: Body meshing with Milkshape : Toddler Frankenstein.
==========================================================
What This Tutorial Will Do:
-Show you how to make a new mesh, combining parts from different meshes
-Show you some Milkshape basics
-Show you how to use some of the MilkShape tools
-Show you how to use some of the MilkShape plug-ins
-Show you some basics about the UVmap and Texture Coordinate Editor
-Show you how to work with morphs: scroll down to post 13
What This Tutorial Will Not Do:
-Show you how to install a program
-Show you how to use your graphicsprogram, TSRW or Blender
-Show you how to mesh objects
-Show you how it works on a Mac
Introduction
==========================================================
Looking for an easy project to get you started at body meshing for The Sims 3, I thought about cutting parts from different gamemeshes and put them together again (a la Frankenstein).
In this tutorial I will explain step-by-step, how to contruct a new toddler top mesh, by adding a different pair of sleeves to a basegame top mesh.
With carefull reading the instructions, and some perseverence from your side, I hope this tutorial can be a start for you in creating your own new body meshes for The Sims3. Please, do not be intimidated by the size. It only looks so much because I wanted to include all information, that I thought could be important for your first project.
Step 1 Preparation
The Tools.
Download everything from the linked threads or sites, follow the installation requirements and read all provided information. You need to already have your tools installed and working, I will only explain what is used in this tutorial.
-CTU
http://www.modthesims.info/download.php?t=364926
-Milkshape 1.8.5
http://chumbalum.swissquake.ch/ms3d/download.html
Milkshape plug-ins from Weshowe:
-GEOM importer and exporter:
http://www.modthesims.info/showthread.php?t=357403
-Unimesh plugins
http://www.modthesims.info/showthread.php?t=122399
-UV templates from Tiggerypum:
http://www.modthesims.info/showthread.php?t=135136
-A graphicsprogram that can handle DDS files
-Framework to put packages in the game
Workfolder
Make a workfolder for this project, and collect everything you extract/export in a separate labeled sub-folder or you will end up with a mess, and not with a mesh.
Put the 2 downloaded UVtemplates from Tiggerypum, and the Black UVtemplate that you can download at the bottom of this tutorial, in a subfolder Materials in your workfolder.
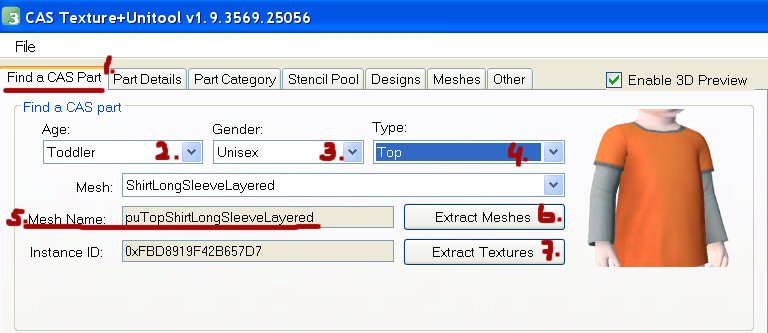
In this tutorial we will work with
puTopShirtLongSleeveLayered-basegame
picture1
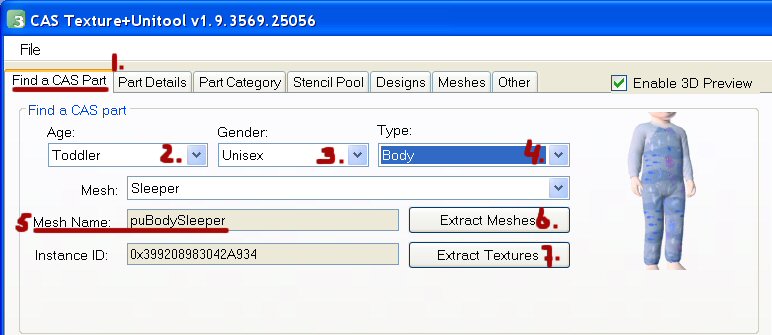
puBodySleeper-basegame
picture2
Start CTU-find the meshes-make for each mesh a subfolder with its name in the workfolder, and extract the meshes and textures each in a separate subfolder CTUmesh, CTUtextures or something like that.
No need for morphmeshes here, Sims3 toddlers do not change bodyshape.
Both meshes are also from the same agegroup and unisex (both genders), so no need to extract Bonefiles (.skcon), the Geom importer will provide a default toddler skeleton at import.
Milkshape preparating
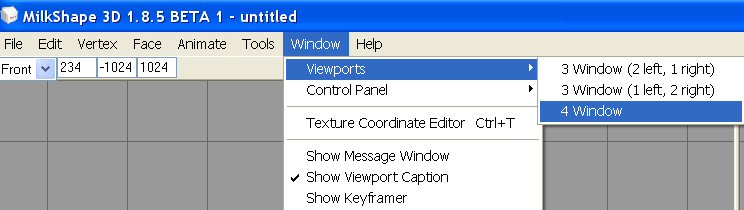
1-Start Milkshape, change to the following settings:
-in the menu bar in the top left
Window->Viewport->4 windows,
Window->Show Viewport Caption checked,
Window->Show Keyframer unchecked
picture 3
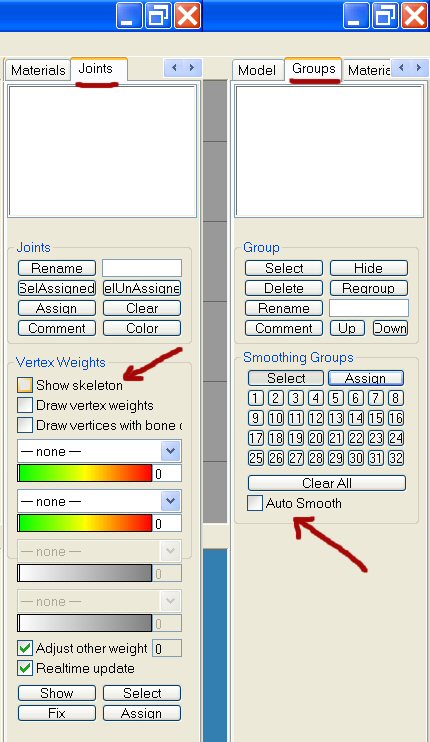
-under the Tools tabs on the top right
Groups->Autosmooth unticked,
Joints->Show Skeleton unticked.
picture4
If you make a mistake use Edit->Undo ...(shortcut CTRL+Z) to go 1 or more steps back. (max about 50 steps!)
Do not forget to make regular saves in Milkshape format with File->Save As, so you do not have to start all over again, or have to stop to do something else, like sleeping.
Include in the name the number of the LOD and the step number or something like that, otherwise you will have no clue which save to Open if you had to start over or closed Milkshape.
If you have stopped and closed Milkshape, or you want to start from one of your Milkshape saves, you have to use File->Open from the menu bar.
============================================================
Step 2 Milkshape Meshing
In this step we will remove the sleeves of the puTopShirtLongSleeveLayered.simgeom, and delete everything but the sleeves from the puBodySleeper.simgeom.
2-Use File->Import->Q-mesh Sims 3 GEOM Importer V0.16 - by Wesley Howe
Navigate to subfolder CTUmesh- in your puTopShirtLongSleeveLayered subfolder- in the workfolder and import the first mesh: puTopShirtLongSleeveLayered_lod1_0x00000000C4AB29FC.simgeom.
picture5
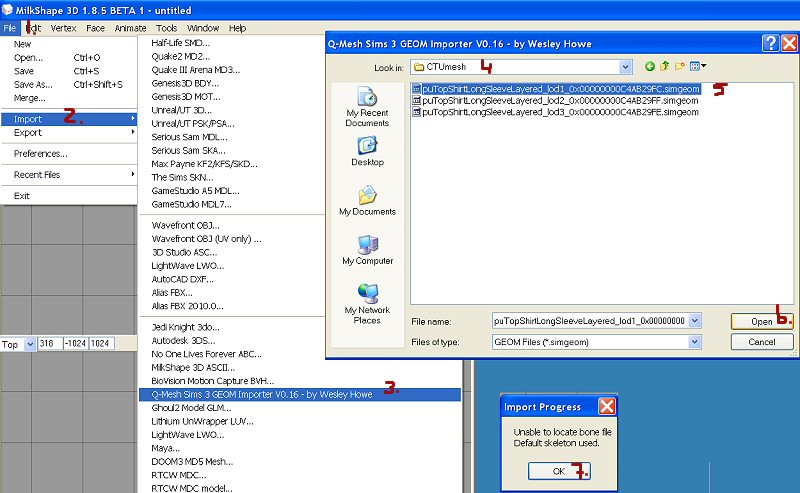
You can click OK this time when the Import Progress pop-up reports: "Unable to locate bone file Default skeleton used."
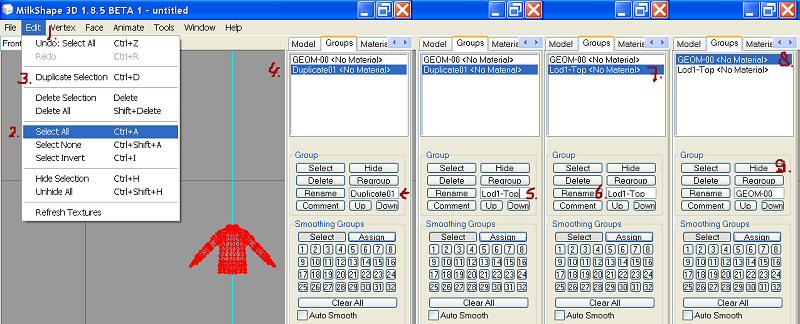
3-The mesh will appear in the Groups window under the tab Groups with the name Geom00<No Material>.
Make a duplicate from it to work with:
In the menu bar click Edit->Select All (shortcut=CTRL+A) and Edit->Duplicate All (shortcut=CTRL+D)
This will create an exact duplicate meshgroup from the GEOM00 mesh with the name Duplicate01<No Material>.
Under the tab Groups is a button Rename, in the little box to the right of that is the name of the group that is now active 'duplicate01'.
Overwrite that name in the box with 'Lod1-Top' and click the Rename button in front of it.
In the Groupswindow you can see that the 'duplicate01' name of the group was changed to 'Lod1-Top'
In the Groupswindow click on the group Geom00<No Material> to make it the active (=hightlighted) group, and click the Hide button under the Groupswindow.
If the colour of your mesh in the views (Milkshape windows) changes to white now, you have hidden the wrong mesh group.
Go to the menu and click Edit->Undo Hide Group or use the shortcut CTRL+Z to go one step back and try again.
picture 6
Only the group Lod1-Top should be visible now. Check this please; make group Lod1-Top<No Material> the active group in the Groupswindow by clicking on it and click the Hide button.
All views empty? OK, now click the Hide button again untill your Lod1-Top group is back.
Its all in white now, but thats OK. If you click the Select button under the Groupswindow while your Lod1-Top group is the active group, it will turn all red again.
4-From this Lod1-Top group we will delete the sleeves, but first we will zoom in a bit to have a better view on what we are doing.
As long as your whole meshgroup is selected (all dots and lines red) a real quick way is:
Rightclick somewhere in one of the views - and from the pop-up menu choose Frame Selection. You can do that in each of the views, even the 3D view.
You could use Edit->Select None to deselect everything, but that is not nessecairy now.
Another way of zooming in even closer is using the scroll wheel on your mouse, and because you will need to know how to do a selection anyway:
From the Tool tabs on the right, click the Model tab and the button Select under it.
In the front, left and top Milkshape views:
(left)click with your mousepointer a bit left and above the mesh, hold the mousebutton down and with your mousepointer draw/drag a box over the complete mesh to the bottom right of the mesh and release the mousebutton.
Rightclick somewhere in the window- and from the pop-up menu choose Frame Selection.
Your mesh is now changed into a white wireframe covered with little red dots.
The little dots are the vertices (single=Vertex) the white lines that connect them outline the faces (single=Face) or polygons.
If you want to select 1 vertex only, draw/drag a little box over that 1 vertex. To add 1 or more vertices to that selection, hold down the SHIFT key on your keyboard while drawing a box over the vertices you want to add, use the SHIFT key, rightclick and dragging to remove from the selection.
Zooming and Model->Select works different in the 3D window:
To move and turn the mesh: (left)click in the 3D view, hold the mousebutton down and move your mousepointer in the 3D view.
To zoom in and out: hold down the Shift key on your keyboard, click+hold and move your mousepointer in the 3D view.
To move up and down: hold down the CTRL key on your keyboard, click+hold and move your mousepointer in the 3D view.
To make a very precise selection in the 3D view:
Change to Wireframe if it is not already: Righclick somewhere in the 3D view and choose Wireframe from the pop-up menu.
Hold down the ALT key on your keyboard, (left)click in the 3D view with your mousepointer a bit left and above the part of the mesh or single vertex you want to select, hold the mousebutton down and with your mousepointer draw/drag a little box to the bottom right of what you want to select.
Use ALT+SHIFT to add to this selection, use ALT+SHIFT+rightclick and dragging to remove from the selection.
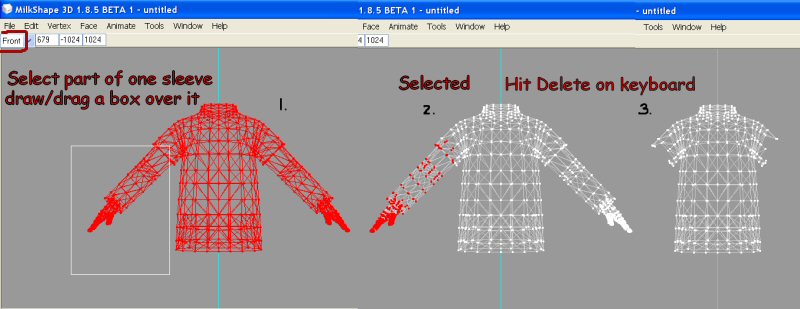
Now back to deleting the sleeves after this rather long explanation.
Look in the Front view up on the left side of the screen.
Select the main part of one of the sleeves+hand by click and hold down your mousepointer and draw/drag a box over that part of the mesh. Click the Delete button on your keyboard and the part that was selected is gone.
Do the same to the other sleeve. If you have deleted to much, use Edit->Undo.
Groups->Hide group Lod1-Top. All views (windows) should be all empty again.
picture 7
5-Import the second mesh, File->Import->Q-mesh Sims 3 GEOM Importer V0.16 - by Wesley Howe
A warning will pop-up 'You are importing over another model. Do you want to continue? Click OK, because that is exactly what we want.
Navigate to subfolder CTUmesh- in your puBodySleeper subfolder- in the workfolder and import the puBodySleeper_lod1_0x00000000970C2C1D.simgeom.
You can click OK again when the Import Progress pop-up reports: "Unable to locate bone file Default skeleton used."
This mesh will appear in the Groups window under the tab Groups with the name Geom02<No Material>.
Groups->Rename this from GEOM02 to 02Sleeper or something like that, to avoid confusing it with the GEOM00.
Make a duplicate from it to work with.
In the menu bar click Edit->Select All (CTRL+A), Edit-Duplicate All (CTRL+D) and under the Tools tab Groups->Rename the resulting Duplicate02 to Sleeves or something like that.
Groups->Hide the original GEOM02 group that you've renamed to Sleeper.
Zoom in a bit in the Front and Top view: select the whole mesh and rightclick somewhere in the view, not on your mesh, choose Frame Selection from the pop-up menu.
I am not going to repeat all commands again, you can read it back in point 3 and look at the picture there.
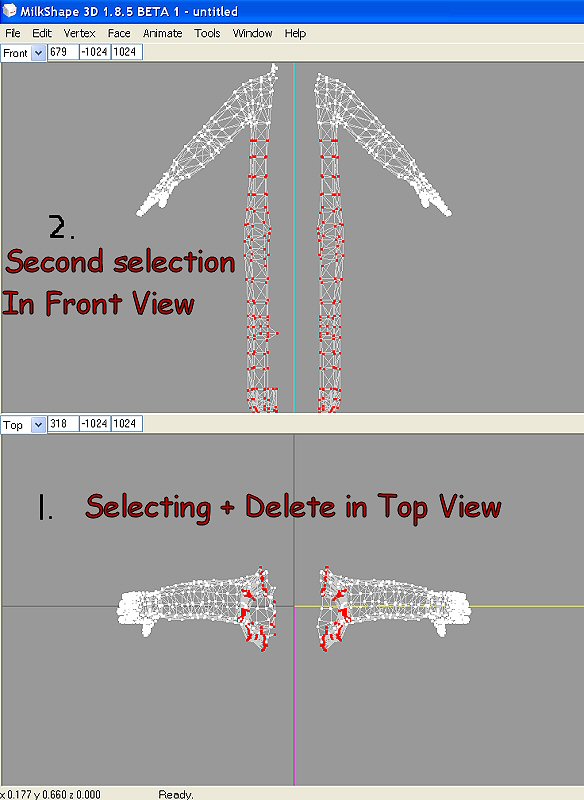
Check if you have only the group Sleeves visible in the views, use Model->Select to select and delete about everything but the sleeves.
I first have made a selection in the Top view + Delete button on keyboard, than switched to the Front view, made another selection there + Delete.
picture 8
------------------------------------------------------------------
In the next step we will delete the leftovers, to end up with a clean sleeve and armhole to connect it to.
6-Unhide the roughly cut Lod1-Top: click on the Lod1-Top group in the Groupswindow to make it the active (hightlighted) group and click the hide button under the Groupswindow untill both the Lod1-Top and the Sleeves Group are visible in the views.
If you are not sure, wether you have the right groups in view,(if you got legs, something is wrong!), just hide them both untill your views are empty and try again. Make the groups active in turn and click the Hide button.
With both groups in view, click Edit->SelectAll, both groups are now selected.
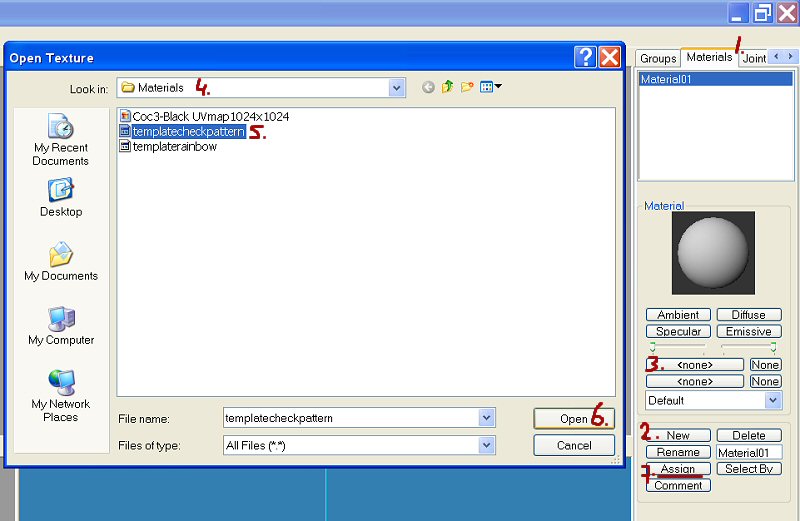
Look on the right with the Tools tabs, there is a tab called Material, click it, and the options for the Material will appear.
Assign the templatecheckpattern from Tiggerypum that you have downloaded and put in a subfolder called Materials material to the selection.
Click the button New-> click the top button with <none> on it->navigate to the subfolder Materials in the workfolder and select templatecheckpattern from Tiggerypum-> click the Assign button.
picture 9
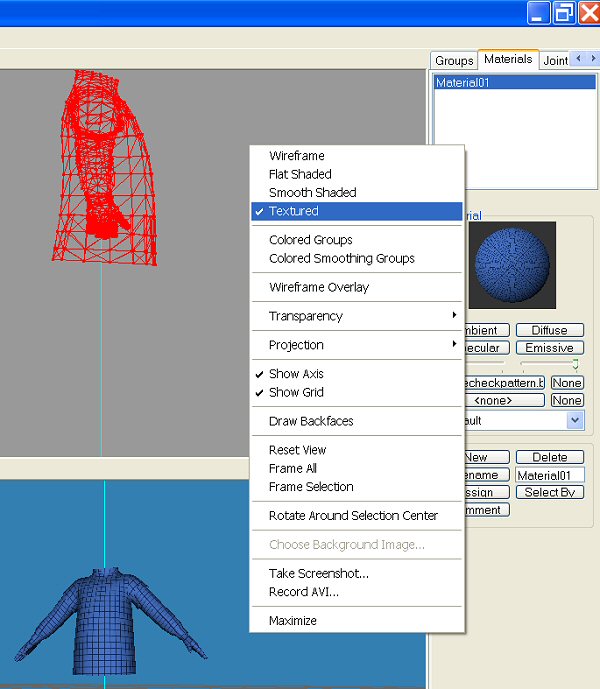
Right click in the 3D view and from the pop-up menu choose Textured. Now there is a blue checkered texture applied over the mesh.
I love to work with this material, Tiggerypum provided it to us when she wrote the bodymeshing + UVmapping for TS2 tutorials.
We do not have to do it with this mesh, but this texture can be a great help,
in adjusting the UVmap, and make the base texture and the patterns in the game to be applied correct to your mesh.
picture 10
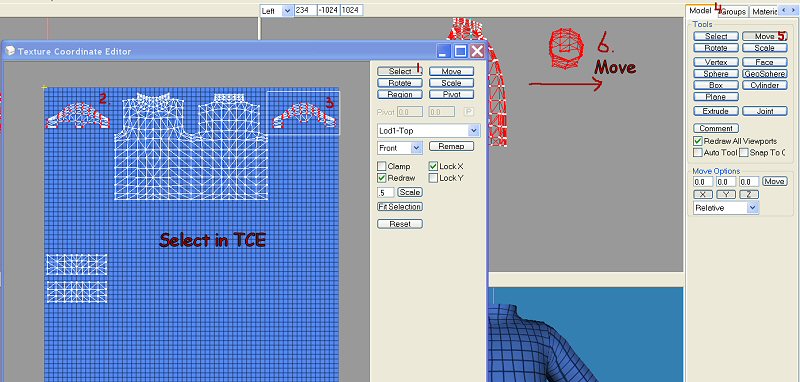
7-With your groups still selected-Use shortcut CTRL+T or Window->Texture Coordinate Editor to open the TCE window. You probably see a big blue-checkered window.
The TCE has its own menu with tools for selecting etc.
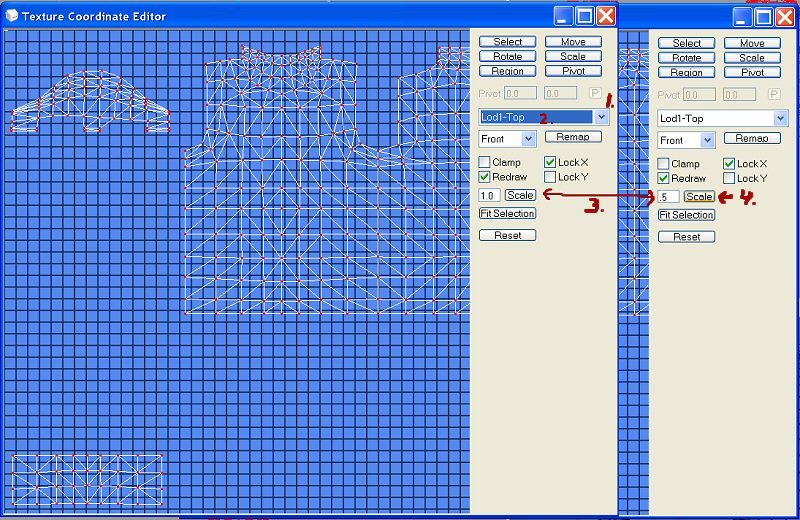
Use the dropdown menu on the little box where it says 'GEOM00' to scroll through the groups, and pick the Lod1-Top group first.
To see the whole mesh in the TCE window we need to scale the window view.
Please notice that I say scale the window view, NOT scale the mesh itself. Change/overwrite the numbers in the little box in front of the little Scale button to 0.5 or .5
picture 11
Now the whole mesh is in view. Hold down your CTRL button on your keyboard, and with your mousepointer, move the texture including the mesh to the middle of the window.
If only the mesh parts move, use CTRL+Z to undo this step, make sure that none of the tool buttons in the TCE menu are active (not active is blue rim, active is no blue rim) and try again.
Click the Select button IN THE Texture Coordinate Editor menu and draw/drag with your mousepointer a box around the loose pieces, use the SHIFT key to add to the selection and the SHIFT key+rightclick to remove
from the selection, selecting in the TCE works the same as in the main Milkshape views.
With all little loose ends selected in TCE, switch/look/go to the main Milkshape views.
In the Tools tabs from the main Milkshape windows, click the Model tab and click the Move button.
Look in the Milkshape view named 'Left' and use your mousepointer to move the (in the TCE) selected loose parts away from the body.
In the main Milkshape view named 'Left': with Model-> Select make a selection of the parts you previously have moved away from the bodymesh, and hit the Delete button on your keyboard.
picture 12
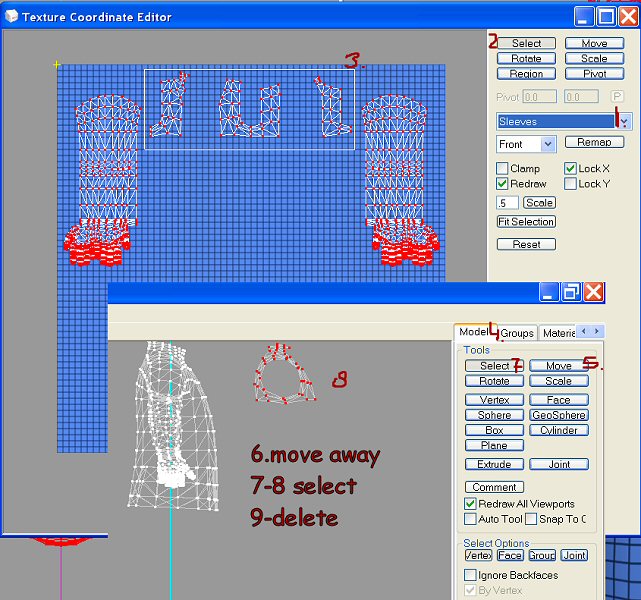
Now do the same with the loose parts on the Sleeves group:
Edit->Select All and open the TCE:
shortcut CTRL+T or Window->Texture Coordinate Editor
Scroll to change from the Lod1-Top group to the Sleeves group, select the loose pieces in the TCE.
Switch/look/go to the main Milkshape views
In the Tools tabs from the main Milkshape windows, click the Model tab and click the Move button.
Look in the Milkshape view named 'Left' and use your mousepointer to move the (in the TCE) selected loose parts away from the body.
With Model-> Select make a selection of the parts you just have moved away from the bodymesh, in the main Milkshape view named 'Left', and hit the Delete button on your keyboard.
picture 13
Time to save your progress again in Milkshape format with File->Save As. Include in the name the number of the LOD and the step number or something like that, or you will have no clue which file to Open if you had to start over or closed Milkshape.
=============================================================
 Sign in to Mod The Sims
 28th Mar 2010 at 12:07 AM
Last edited by Cocomama : 25th Jul 2011 at 9:02 AM.
Reason: adding info
28th Mar 2010 at 12:07 AM
Last edited by Cocomama : 25th Jul 2011 at 9:02 AM.
Reason: adding info
 for making such a clearly written tutorial. It really made getting my feet wet with meshing fun and easy.
  Sewing is exactly what went though my mind when I was breaking part the pieces and stitching them back together. The first LOD file was a little slow, the second much faster and the third I just whipped though because you took the time explain the details. :lovestruc