Yes..it's meant to have a large glassed frame
 I assume using a two door clone means that if a Sim approached from the left or right toward the door, the door would at best hinge on either side..not normal for doors, I think. I wondered about a single tile door with a larger frame though - and import the wallmasks from the colonial..but I am sure there will be some internal procedure that will freak out about it..plus I have no idea about how to include Material data for the glass in the frame.. I assume using a two door clone means that if a Sim approached from the left or right toward the door, the door would at best hinge on either side..not normal for doors, I think. I wondered about a single tile door with a larger frame though - and import the wallmasks from the colonial..but I am sure there will be some internal procedure that will freak out about it..plus I have no idea about how to include Material data for the glass in the frame..Addendum: I've been looking at a two door clone..now..fingers crossed..it has two extra files each for GDMC, GMND, SHAPE and TEXTURE, to cater for a right and left door..if I were to prune out all the entries for say, the left side door...and this is getting away from what this thread is for..sorry |
If you use a double door, the door animation will be a lot more to the side of the door than in the colonial door, where it's close to the middle. It might be possible to move the door animation, I think by editing the Resource Node, but I couldn't tell you how to do that!
Edited to add: But even if you move the door animations, the sims will still walk through as if it were a wider door. I'm not sure if there is a way to fix that. |
I just pulled my mesh into a single tile door clone..really roughly - just the mesh and the GUID - it's bright blue and flashing (I know there is a cure for that somewhere i have seen it) but it is there..of course..I picked the only door there that doesn't have a texture file - just a wall mask (the Gone Legit Business door)
|
A good single-tile door for cloning is the ValueWood Lumber's "Justa Door"
 . I don't think there is any existing one-tile door that has two subsets in the frame, so you will have to add the glass subset no matter which door you clone. I can help you with that if needed . . I don't think there is any existing one-tile door that has two subsets in the frame, so you will have to add the glass subset no matter which door you clone. I can help you with that if needed . |
Thank you - I'd hate to have throw away this mesh..
Btw, I just did some comparisons and I am pretty sure based on sizes that the Colonial was made from a single door in the first place. It sits differently from the others and it is the only one where the North/South frames are reversed. It's just an odd one out. Sooo..a different approach and maybe we can come up with something that will ease the way for others |
Numenor, Thank you for the advice.
|
I never did this before. I need help, I cant even open my sims 2 body shop. :'(
|
Quote: Originally posted by PlyrGoth
If you're making Bodyshop items, like clothing or hair, I suggest you post in/ take a look at the Bodyshop creation forums instead, this thread is for discussing problems with objects . |
It didn't occur to me before but I tested a standard Colonial Door and the same problem occurs with the standard UNCLONED door as occurs with mine. It's just a faulty original object. I am really surprised it hasn't been picked up on before now.
|
Yes, I think the other person who reported the problem with the cloned door also said the original door didn't work correctly, either. I don't think I've ever used it on a diagonal wall, so I didn't notice.
|
I'm running into "1-tile' issues with trying to use my mesh on the Justa-door. eg, the wallmask placement insists on one tile only..stuff like that. Do you think that would be correctable?
|
If only a solid part of the frame extends a bit to nearby tiles, you won't necessarily need wallmasks for them. But if the glass parts extend there, as well, then there is a problem. I'm not sure if it's possible to add extra wallmasks. I think that would require adding new tiles to your object. Adding new tiles is possible with certain kind of objects, but it might be different with doors and the wallmasks. I don't know, I've never tried it!
|
I think it is a bigger problem than it is worth. I haven't tried it yet but unless I move the door itself to midway between two tiles, it essentially becomes a 3-tile object (door plus frame on either side). I put in a hack request to see if someone can tackle the bug in the original. I may just use the one I did, but not offer the diagonal option. It's not ideal but modifying anything else seems to be a headache.
|
I saw your hack request. I think you should specify the problem occurs with the diagonal version only. It doesn't happen with the straight one, right?
|
It does sometimes..I had the poor little sim running in and out constantly on both versions. It doesn't happen as often on the straight one because they tend to approach the door from the centre, but if you specify a 'go here' to the outside right of the door near the wall, they walk to the door to their left and walk through the frame..
|
hi all,
after creating a right gate and a 2 tile gate I decided I to do a left gate as well as the north and south of the gate look different. so I compared the longbranch 1 and 2tile gates to figure out what might be needed. the diffs I could find were the second tile and the existence of left and right transformnodes. looking some further I noticed that the parameters of the blocks 'door_trans' and 'door_rot' are not identical. as I couldn't find anything else instead of editing the 2 tile package I thought I could go and rename block 0xb and 0xc of the 1 tile gate and get away with it. only after setting up the new mesh that way the animation is not working at all ingame. my simmie is walking right through the gate although the joint previews in GMDC looks alright. could u pls have a look? |
To make a matching left gate, wouldn't it be easier to just make another "right" gate and just switch around the north and south side, if they look different?
|
Quote: Originally posted by IgnorantBliss
well yes the gmdc is a mirror image of the right gate, yet the animation should be the other way round to make it work properly. and I think I figured that a left gate requires the l_door transformnodes as opposed to the r_door transformnodes in the right gate... unless of cause I'm wrong here... |
But the gates open both ways, in any case, don't they? I tested the original 1-tile gate that you had cloned, and it opens both ways depending on which way the sim is going. Or is it something else you're talking about regarding the animations?
|
Quote: Originally posted by IgnorantBliss
well yes the default does certainly open both ways. hmmm! not sure if I get what u mean right now... |
What I mean is, since the gate opens both ways, whether it's called "left" or "right", then why is there need to edit the left and right side of the animation, when you can just mirror the mesh for the other version of the gate and place the two gates next to each other in the game, one facing forward and one backward? Am I still missing on something you're trying to say?
|
IB - I think we are both probably sick of this whole Colonial Door situation by now but after looking at the options, I think I will stick with it, and offer a caveat to users that it has this small bug (since it doesn't affect game play at all). Thank you for your input though on alternatives
Following on from that, the original (real) design of that door I made calls for stained glass on the side windows. The Colonial door doesn't have a glass texture file, since it relies on the MatDef. Would you be willing to help me with adding that stained glass option? (I guess it means adding a texture file to cater for the glass?) And now I am wayyyyyyyy off topic..lol |
Quote: Originally posted by IgnorantBliss
ohhh now it triggers. didn't think of that solution... what I had in mind was that as the ingame gates come with a default placement on the right I could create a gate with one on the left. maybe I was thinking too complicated missing on an easier solution? |
Quote: Originally posted by darylmarkloc
Yes, I can help you with that. If you're interested in trying to add it yourself, you can follow steps 2 and 3 in this tutorial I wrote for adding subsets. Clone the texture like I say in step 2 and do everything else in that step. Since the Material Definition of subsets that have a texture are different from the ones that don't have one, it's probably the easiest to extract a TXMT from another package that has textured glass (for example, the Chiclettina stained glass door), import it into your window package (instead of cloning a TXMT which I talk about also in step 3), and rename it to match the original glass TXMT, then delete the old TXMT. Then make sure to refer the new TXMT to your new textures, as explained in step 3. And make sure to Fix Integrity and save afterwards. Let me know if you have any problems . |
Quote: Originally posted by darylmarkloc
for the texture: export the TXTR of any other package and import it into your mesh rename the TXTR choose DXT3 as file format use build dxt if u need to change the size of the texture right click on the texture and import your texture again right click again and import the alpha export the combined texture import the combined texture , update all sizes and commit as for the MATD u will need to amend it with the basetexture props whereas the basetexturename needs to be the filename of your TXTR excluding the extension. this filename also needs to be added to the filelist |
OK..I'll set to it and see if I come up with stained glass or stained doorframe... Thank you again. Be sure, if I screw it up, I shall be back..
|
Exporting the alpha layer separately is not necessary if you import you image as a .png, since the alpha layer is included in it. That is, if you edited the texture and transparency in the same texture image in your paint program, like I usually do. But if you prefer working on them separately, it works to also import them separately, too
. |
Quote: Originally posted by IgnorantBliss
thanx for the input IBliss! looks like I keep choosing the more complex methods... |
Hello-
I'm working on an object for the community that is "almost" working. Is it possible to have it "fixed" or looked at privately so as not to spoil the surpise for those that may be waiting for it. |
Quote: Originally posted by darylmarkloc
I was gone for awhile and just found your posts about this project. I think I am the person Ignorant Bliss was refering to who ran into the same problems. In the end I decided if the original Maxis object was good enough with the diagonal door not opening problem then my clone was probably good enough too. I think a lot of us play with the walls partially down anyway... I also added a texture so I could make the glass "stained." My mesh is pretty simple, but it if you'd care to see it, it's here I'd like to see yours. |
Mage - very nice effect
I'm redoing the clone at the moment because I played around with it so much I am not sure of the integrity of it anymore. I'll post a link when done |
This door is evil
I knew I'd be back...this one is jinxed from the start. Again, I have rechecked the values as per the tutorial, but the new texture file for the glass isn't working. I don't think I missed anything, and everything seems to be in the right place. I don't drink, but right now I wish I did...
|
You have a small misspelling in the texture reference in the TXMT: the end of the texture filename is "-glass" and not "_glass". That seems to be the problem
. |
I'm sorry IB - I fixed the typo and checked the other entries again (there were two typos, omg) but still no go
|
When you have corrected the typos, have you also clicked the "Fix TGI" every time?
Just to be sure, run a "Fix Integrity", that will fix all the TGIs altogether. |
Quote: Originally posted by sims_guy
You can upload you package to www.yousendit.com (use a fake email address) and then PM me or IgnorantBliss, providing the download link and the details about the problem. |
Done. Hopefully you can help me figure it out.
|
Numenor - Yes, I went through, checked the names were the same, did the committ and fix integrity. The glass is showing up as glass just fine, what it is not showing up as is MY glass - it's ignoring the texture file altogether and refering to the MatDef for the glass texture although that points to my texture file.
|
darylmarkloc, is the glass uv-mapped? If it's not, the texture may not show properly even if it's linked just fine. The glass may just be using one pixel in a corner of the texture if it's not mapped. In your texture, a corner would be a completely transparent area, and so the whole glass would show up transparent.
To uv-map the glass, export the glass mesh to your mesh editor, then uv-map it like any other mesh, then import it back into your package. |
IB - yes..I thought of that too, since the original didn't need UV. I just did the whole thing all over again and still nothing
|
can i noe where can i find object recolour catolog in sims 2 game?
|
darylmarkloc, your TXMT for the glass has no reference to normal texture at all, which would be called stdMatBaseTextureName. You have, instead, put your new texture name as a value to stdMatEnvCubeTextureName which is different.
I suggest that you extract the TXMT from the glass for the stained glass door like I suggested in post #424 and rename it like I mentioned instead of editing the existing TXMT. The original glass TXMT has no references to normal textures. It's easier than adding the missing lines by hand, in my opinion .
Quote: Originally posted by civic999
You where can you find the recolor options for objects in the game? When you click on an object in the catalog, in the window that pops up you should see the color options. |
IB - OK. I re-did it using an imported TXMT rather than the one in the package. It works up to a point..because it was a one tile object, half the glass is coloured. Of course, if I had followed your instructions I could have been at this point yesterday. *bends over* You get a free kick..
|
It's not always necessary to import a TXMT from another object when you add a texture to an object, there are alternatives, but in this case it seemed like the simplest thing to do
. It's also possible to add and remove lines from the original TXMT to make it anything you want, but it may get complicated if it's more than a couple of lines. Or, at least for a lazy person like myself, it's easier to use an existing, similar TXMT instead  . . |
I fixed the one tile/two tile problem. The original had two "sheets' of glass, one front and one back. The donor door for the TXMT had only one. I took one out, and also resized the texture file (I don;t think that makes a lot of difference?) and changed cullClockwise to None. But anyway..when I reloaded, I had the correct image. As far as what I tried to do, I guess take a short cut and use the existing TXMT..it made sense at the time. I want to thank you for all your help in this. It's been a pain from the start with having a faulty donor object to begin with. I'm quite ragged now..
|
Congratulations for finishing the project! I'm glad you didn't give up
. |
Just an odd note..when I had the two sheets of glass and an image only on the left side of the front piece..about one tile back from the door, the other half of the image was hanging in mid air in miniature..I just had a quick look to see if the original mesh had been moved or damged but no..that is really wierd..anyway..all fixed now
|
Hi again everyone! :wave:
Just another question. I've been researching and reading info on the site with respect to the Object Functions Table and looking at the editor in SimPE and trying to understand the relationship with the object files. What I am looking to see (if it's possible) is to add more tiles to an object. Looking at what I'm reading, it looks like you can add more tiles? Thought I would ask if it is indeed possible, and if so, how it can be done. Thanks again, I really appreciate all the help I have received here!!  Simnuts |
For adding tiles to an object, see Echo's tutorial here. There are two parts to it: adding the tile, and then making sims aware of it so they won't just walk through it. But this doesn't yet make the new tiles functional: for example, when adding a tile to the table, this method still doesn't make the new tile useable by the sims.
|
Quote: Originally posted by IgnorantBliss
Thanks IgnorantBliss!! :baloons: Te oikeastaan aari Parhaiten!! :nod: (I hope my Finish makes sense!!) Thanks for the link!! Regards |
Quote: Originally posted by IgnorantBliss
Then if I want to make a 2x2 tiles coffee table instead of 1x2, I won't be able to place objects on both new tiles ? |
It might be possible to do, but not with this method, though. I made three-tile coffee tables with the help of Echo's tutorial, but the extra tile is not useable. However, there might be ways to cheat around it. For example, you could maybe place an invisible coffee table (with the moveobjects cheat) to where the unuseable tiles are, and make them functional that way. I've never tried that myself, though, so I'm not 100% sure it's possible.
|
The problem that IgnorantBliss points out is related to the slots connected to the mesh: a 1x1 table has 4 "dining" slots plus a central "decorative" slot; if you modify the mesh, so to add a second tile, you also need to add the needed additional slots.
This is a very brief explanations, though; tables have even more slots, to allocate the chairs, for example, and to let the sims know the route they have to run in order to reach each slot... All this problem about slots is still partly obscure to me... |
Yes, sorry, I keep confusing "tiles" with "slots"!
|
No, you have not confused the two things: making a 1x2 table out of a 1x1 one involves adding both a tile and multiple slots
|
In fact we can place objects on a 2x2-tile coffee table with the help of the moveobjects on/off cheat (I realized it while logging out
Is it possible to simply add a "slot" to a (coffee) table ? I suppose that's more difficult than I think it is ! |
I have not been able to place items on the third, extra tile with the moveobjects cheat, either
. I think even the moveobjects cheat needs a slot that the game recognizes as a slot. Well, that's just my theory .It might be possible to add a slot, but I'm not sure exactly how. |
There's an interesting thread about slots:
http://www.modthesims2.com/showthread.php?t=97779 As for the need of using the moveobjects cheat, I've discovered that there are several tipe of slots: a "decorative" slot can host only small decorative object, while a standard slot can host even large objects. And the weight of the object is relevant too: most surfaces have a limit to the weight that they can hold; this way, the game can prevent - for instance - that a large object is placed on a small end table... |
The Invisible Typewriter
I'm not having much luck searching for this, but I made a mesh for a typewriter and cloned the Moneywell Computer as a base for it (I followed J Woods's tutorial). Anyway, at first I couldn't get it to even show up in the game, but now it is.
Except it's totally invisible! I can places it on the lot and use the options for it, but you can't see it at all! Is there a reason for this? Can it be fixed? Right now it's reminding me of a Simpsons episode "I'll just type it up on my invisible typewriter!" :insane: :moose: |
Did you change the mesh name to something else than what the original subsets (on the Models list in Geometric Data Container) were called? If you renamed the mesh to a "typewriter" or anything else it originally was, the object is going to be invisible unless you change all the subset name references inside the package, as well. Usually it's easier to stick to the original names.
at the Simpsons quote |
Numenor thanks for the link, I'll take a look to it... I had made a search with "add a slot" but I didn't find any threads with the exact expression...
george_mcfly_au Well, I'm often mistaken when I try to help someone edit : IB you're always on the forum !! Go to bed ! Right now ! :D |
Success!
It took me a while to figure out what I'd done wrong (since I wasn't quite sure what you meant be renaming the mesh), but when I finally figured it out I got the typewriter working! :D
I had to tweak with it a bit more because it was too big and so on, but now I think it's good enough to make available on the board. Thanks very much for your help! :moose: Here's a pic of the typewriter in action: 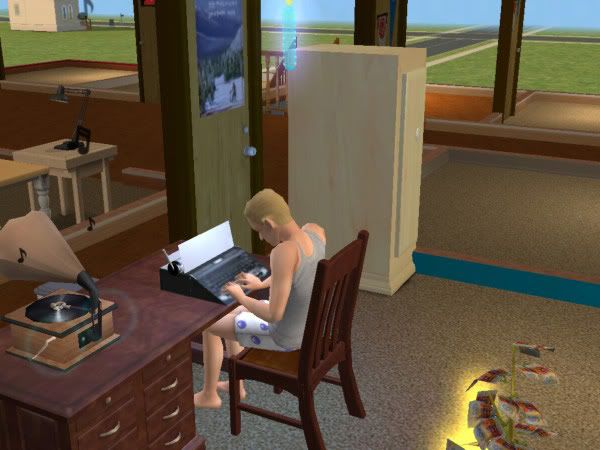 |
Good job with the typewriter!
|
Yeah, it's a clever idea and it looks great.
|
The materials (i.e. the colours) that are shown into Milkshape aren't imported in SimPE in any case; so, beside having a good visual reference for the UVmap, you basically need to adjust correctly the mesh, in Milkshape, without worrying of the colour.
Anyway, those black wheels make me thing to a bad smoothing... Do you keep the "Auto Smoothing" off in Milkshape? You should: it is known to give the mesh a bad looking, when imported in SimPE. Personally, I never rely on the UVmapping and smoothing "capabilities" of Milkshape: I use a personal (and longer) method, that allows me to work the mesh in Wings, create the UVmap (and apply a correct smoothing) with UVmapper and reassigning the vertices to the joints in Milkshape... To make short a long story: unless someone more experienced than me can help you using only the .ms3d file you have provided, I'd need a full package (complete with its texture) to fix your barbecue grill |
this is driving me mad, im sure there is somwhere where somone had this prob but im desperate, i took a tutorial on how to create a new mesh ingame, via blender etc, but when i finished the tutorial and played the game in the custom content screen which shows when i start the game it says my object overrides semi global, and the object is invisible but its a desk and i can place things on it etc, i need help lol
|
Quote: Originally posted by Light shadow
Did you follow JWoods' object tutorial's Blender version, or something else? If you did follow that one, look at the tutorial post itself and posts #3 and #4 specifically. I don't know which desk you cloned, but if it's the same cheap desk that other person used, you will have to name your mesh "desk". If it's another desk, then I can't tell without knowing which desk exactly you cloned. I suggest you download the latest version of the Blender tutorial in that link that I posted, following that should help avoid the invisible object problem. Blender has a habit of naming the mesh into "SimPEGlobal" or something similar, which will for sure make it invisible, because it's not the same as what the original mesh name was. I don't think it's your desk that's causing the message about a semi-global override, if all you did was a normal clone. You can turn off that custom content warning in your game settings unless you want it to pop up every time you enter the game. |
whoops actually its not a desk but a dining table, it was the talking table, i used blender, but i used cinema 4d to make the table then blender to export it properly, but SimPEGlobal, what do i do about that? how do i change it just wondering, because when i import it it comes up with that name
also i folowed the tutorial step by step |
YES! got it working, because i renamed the thing, Thank you for your help
|
Hi all!
I just downloaded somebody elses gates, checked out the package and figured that while my first gates are working alright the way I set up the packages they shouldn't :gonemad: when creating the gates I followed Numenor's instructions about the GMDC plugin in this thread: http://www.modthesims2.com/showthread.php?t=99056 I have milkshape 1.7.7a and wes_h latest plugin version installed the final step says to replace the existing GMDC in my package with the new one exported from milkshape. if I simply do that without any manual changes to the GMDC the joint tab displays the following figures: joint 2: 0,0 joint 4: 5,6 previewing the joints shows that the only part thats assigned is the groundshadow. ingame the animation is not working. the previews should display: the immobile metal part (joint 2), the groundshadow, wood and animated metal part (joint 4) to get the animation to work I would need to press the rebuild link. then the displayed figures are: joint 2:2184,576 joint 4:2184,1608 now the joint previews look fine and the animation works ingame. only as far as I understand Numenor further down the above mentioned thread that link is supposed to screw up my package. also the other creator didn't seem to apply that step either... :confused: could u please tell my what I am missing? |
Chrissy, which version of the GMDC plugin are you using? If you're using older ones, I recommend you try the latest UniMesh plugin from here (and the latest version of Milkshape). I had a problem with some objects when using the older versions. There seemed to be no vertices assigned to some joints with certain objects. No problems with the latest version so far, though.
|
Quote: Originally posted by IgnorantBliss
thats exactly what I have installed. updated both last week . latest version of milkshape and exactly this plugin... and this is how the assignments look in milkshape: |
Quote: Originally posted by IgnorantBliss
I just played around some further and got at least 'something else'. its not a solution just a partial success in figuring what the prob is or rather might be... so first off: I have milkshape 1.7.7 and wes_h plugin v4.05 installed my gate comes with 3 subsets: groundshadow, metal and wood all in one GMDC. metal and wood are recolorable. its cloned from the longbranch gate which comes as both 1 and 2 tile which is why I have chosen it in the first place. when following Numenors instructions all I can see after replacing the GMDC is the groundshadow if I now delete the groundshadow in milkshape and import the GMDC with only 2 subsets I get a partial success: the wooden part of joint 4 shows up perfectly fine. yet joint 2 is still 'empty'. looks like the subset listed first is the one thats being displayed properly only why would that be? would I possibly need to have each subset in its own GMDC? |
I think you should report this problem to wes in the thread where you downloaded the plugin from. There might still be problems with the plugin itself and certain objects.
|
Quote: Originally posted by IgnorantBliss
okidoke! thanx IBliss! |
2 Attachment(s)
HI everyone.
I have a bit of a problem today and it's really got me stumped. I have created quite a few lamps and this has never happened before. I've cloned most ceiling lamps from the very same Maxis one I used this time as well (4 x4 designer Chandelier) but this is an issue I have not come across and no matter what i do I can't seem to be able to fix it. I made a regular sized hanging lamp chandelier and then a very large one meant to be used in high ceilings and large staircases. the larger one draws the texture from the small one. All of this works perfectly, until I create recolors. For some strange reason if I place the lights in the default mesh color, everything is great. if I try and place it in a recolor or change the original one to a recolor with the design tool it goes completely dark and looses all the crystal shine. And even if I select the mesh color via design tool again after that it stays dark and dull?? newly placed lights with the defualt mesh color will always be fine though. here are some images, if the files are needed let me know thanks so much in advance for any help you can offer. Alex |
I suspect a problem with the normals smoothing (i.e. in the mesh), but examining the packages (both the meshes and one faulty recolour) I could give a more appropriate answer
|
As in the weld and unweld? That seems to make no difference except the shape is then very choppy. Also then why does it only do this when recolors are applied?well i shall try anything, but here are the files for now- mesh plus one recolor
edit: guess it'd be better to give you both mesh files and a recolor edit: Sort of solved. still not sure what's causing this but I recloned them again (4th time now ), same Maxis lamp (4x4) this time I didn't rename my mesh groups or textures etc. left everything in the Maxis names. Now the lit chandelier and recolors always work, but when it's unlit it's still this dark, which it wasn't originally without recolors. this makes no sense to me as it's the same texture as the lit one. Now granted it shouldn't "glow as there is no emmissive coef values, but even if i change them to match the lit MATD it doesn't work. it just turns blue-white. i tried using my texture on a differnet mesh, where the MATD has the identical values for everything as the unlit MATD of this lamp, the texture shows correctly. so i'm guessing it must be something to do with the lighting values int he file iteself? Strange though cause I've never had this happen before with lamps, at least not that I was able to notice this kind of difference/darkness in the texture. |
Simaddict99 - Lamps rely on some specific Text Lists in order to correctly apply the lit/unlit texture:
Text List 0x87 -> It lists the models (groups) that the mesh is made of (you must keep the original order!). In your packages, you renamed the "shade" model to "crystals", but in the TextList 0x87 still was included the original name "shade". Text List 0x88 -> It lists the default MATDs that are to be applied to the various mesh groups (again, respect the original order). In the "large" chandelier, the MATD references were correct, but a couple of them lacked the needed ##0x1c050000! prefix: this is a problem usually due to SimPE, that deletes the prefix whenever you do the Fix Integrity (the problem only occurs in objects that borrow textures from outer packages, like the large chandelier). |
Thanks Numenor.
I new about the instance 88 needing to be changed, but didn't realize it removed the prefix with fix interity. The instance 87 is new to me, and i have created lamps where I changed the name and they work, guess i was just lucky. Thanks so much Numenor!! You are the best! Edit. I just checked the fixed files, they are now the same as my last cloned ones (no renaming). I still don't understand why the unlit state is so much darker than the texture though. Guess it looks like i'll have to live with it. |
Hi :wave:
I'm having a problem with shadows :  In fact I didn't "just" import the .png picture with the object's shadows once. I imported it twice or more... because the result wasn't satisfactory (can I say it ?) so I modified the pic several times. Can it be the reason of the problem showed ? Are there any hints about shadows I should know ? That's a shame, now I have to re-create the coffee table and re-make the recolors  Does anyone know ? Any help would be appreciated. |
Quote: Originally posted by Ben♣
could u pls check the format of your shadow texture? it looks like its DXT5 instead of extraw8bit. if thats what it is change the format on the left of the TXTR and then reimport your texture by right clicking on the texture, importing it and then click update all sizes... |
You're right chrissy ! Thanks ! It's DXT5 instead of extraw8bit because I imported it with the DDS utilities (I suppose that's due to it). I'll check the in-game result.
Then the hint I didn't know is that I shouldn't import the shadows pic with the DDS, isn't it ? |
If the texture of the new shadow has the same size than the original one, the bes option is to import it using the standard "Import" menu entry (after having checked that the format is correctly set to ExtRaw8bit). And then "Update all sizes" and commit.
If the new image has a different siza, use the DDS utlitilies to import it (setting the DXT5 format); then, in SimPE, change the format to ExtRaw8bit and update all sizes. |
Thanks Numenor for your explanations ! But I just changed the format, committed and saved. I didn't have to update all sizes
Everything works fine in the game. |
You're right! Silly me
 The format can be only one for all the mipmaps, obviously.... So, no need to update all sizes! :D The format can be only one for all the mipmaps, obviously.... So, no need to update all sizes! :D |
texture not the one I gave it.....
I made a cookie jar and it shows up great in the game...but the texture is not the one I gave it...why? (the texture I used) http://i47.photobucket.com/albums/f...byMissWendy.png (the texture that showed up) http://i47.photobucket.com/albums/f...2/CJtexture.jpg
|
MissWendy, when you open up your object in SimPE, which texture is included in the package? It's hard to tell what the problem is exactly without looking at the object itself, so, please, upload it as an attachment
. |
i need help coz i read the new creaters start-up center thead but i still dont get how to actuly make the objects plz help
if you could plz reply back to my email address whatever785@yahoo.com |
Quote: Originally posted by b-rad
Please, take a look at this tutorial. It'll tell you step-by-step in detail how to create an object . |
1 Attachment(s)
Hi everyone:
Someone is having some difficulties with my harpsicord I posted last week. They are getting the following error. They have activated the "boolProp testingCheatsEnabled true" (which I am not familiar with, what does this cheat actually do?). Anyway, below is a pic of the error. Does anyone know what this means?? Does this cheat cause this error?? Thanks for the help |
cookie jar file
1 Attachment(s)
ok here is my cookie jar with the messed up texture...thank you for your help.
|
MissWendy, the largest texture image (128 x 128) is the striped one in the package. Try re-importing the texture image
. |
cookie jar texture
1 Attachment(s)
But I didn't import a striped texture (where did it come from?)....this is the one I used.
|
The image must have gotten corrupted somehow when you imported it. If you're using the normal import like you said in the other post, the size of the texture you import has to be exactly the same as that of the original object. I'm not sure what it for this one, may have been 256 x 256 pixels.
|
Quote: Originally posted by simnuts101
Well firstly - No, that cheat does not 'cause' the error - it simply makes the error visible to the user (normally the game would 'reset' the object and move on without the user being even aware of it) Basically it is saying that there was a problem with a 'Bad Gosub tree number' (which I assume may be in one of the BHAVs) in 'Piano Upright 0,0 - Lead', and if you want some more detailed debugging information - take a look in 'C:/Documents......../Logs/ObjectError_N001_t496265.txt' Hope that in some way helps you track down the problem,. -- Calidan |
Hey,
I made a dresser with grapholas tutorial but when i went ingame it was the wrong way round. Could you please help me fix it? Thanks |
JucIEJ1991, you need to either change the Order to XYZ (instead of XZY, it's a setting in GMDC at the bottom of the Models list) before you export your mesh originally, or rotate the mesh in your mesh editor afterwards. Using the Mesh Tool without doing this will result in an object lying on its back. This is also mentioned in the tutorial, but you may have missed that part
. |
Will the animations still be there or do i have to do it agian?
|
You will have to take it through the Mesh Tool again, I believe.
|
| All times are GMT +1. The time now is 5:28 AM. |
Powered by: vBulletin Version 3.0.14 · Copyright ©2000 - 2025, Jelsoft Enterprises Ltd.