CLONE Templates - Kitchen Counters
7 Attachment(s)
CLONE TEMPLATES - KITCHEN COUNTERS
09 FEB 2008: UPDATE. The templates now include the modifications suggested and the files provided by MaryLou in Post #61: the cloned counters will have working shadows!  Why use a template? Kitchen Counters are very complex objects, both for the way the game update the mesh regarding their connection with other elements, and for their sharing the same textures between all the various models. SimPE, currently, is not able to clone correctly the kitchen counters, and anyway the adjustments needed to create a working counter are not very intuitive. Hence my ready-to-clone counter templates IMPORTANT WARNING - If you edit the "top" of a counter, the sinks will not place in the counter any more; so far, no one has found a good solution to this problem... Therefore, you are adviced not to edit the "countertop" mesh: just modify the "counterfinish" one. What template(s) to choose? First off, you have to decide what type of kichen set are you going to create:
HOW TO USE THE TEMPLATES? Follow these easy steps and you'll have a working counter set in a matter of clicks
OPTIONAL Step: how to set up an ISLAND to go with your counter(s). If you want to add a counter island that matches your counter set, dowload and unpack the Island template and follow these steps (very similar to the ones above )
That's all! It was not that difficult, was it? If you feel it was difficult, than think that if you would have cloned a Maxis counter, instead of this template, your work would have been way more difficult, and the result would have been "uncertain", to say the least... TERMS OF USAGE OF THE TEMPLATES Anyone can freely clone my Enhanced Templates to create his own objects, and can post his objects on any site. It's only required to state that "the object is based on an Enhanced Template by Numenor", and post a link to this thread. DO NOT REPOST OR REDISTRIBUITE THE TEMPLATES THEMSELVES! |
:comment: FREQUENTLY ASKED QUESTIONS :comment:
I understand that I can have only one MASTER, but can I create a set with more than one SLAVE islands? Yes, technically you can add as many island types as you want; all of them will share the same textures borrowed from the MASTER (i.e. the DoorsOnly or the Doors+Drawers counter). Will the counters cloned from these templates work in my game? The clones of these templates will work with any game configuration (base game, UNI and/or NL). Actually, from this point of view, these are the only counters that are granted to work in any game: infact, if you have only the base game, cloning a Maxis counter will produce a counter that will probably not work correctly with the Nightlife. On the contrary, these templates are carefully crafted, so to work with any game configuration. I have the base game only, and I can't place the island at corners, like in the title screenshot! This is a limitation (let's call it with its name: a bug |
I need help!!!!!!!!!!!!!!!!!!!
|
Quote: Originally posted by AnnaKat009
What do you need help with? You have to be more specific or it's very difficult for us to help you . |
hi, I have a question... what will I do with the extracted text list? do I need it to make the counter works in the game or just for reference?
|
If you only clone a counter and not an island, you won't need the text list. It's only needed for linking an island to the counter if you clone both
. |
This is awesome! I was just wondering how to go about making kitchen counters!
Two questions (Pardon my modding ignorance) : 1. Which of the 2 object data files do you have to update the MMATs for? (for both the main counter and the island) 2. When you open the first GMDC set, there's a mesh group called "backpanel". Its mesh is a small rectangular strip. Should it be left as is? Thank you in advance for any info anyone can provide |
The island doesn't contain any MMAT, because it borrows the recolours from the main counter; therefore, you don't have to "Update MMAT" when you register the GUID for the island.
On the other hand, the main counters need a MMAT update; I understand that you are using the "Doors+Drawers" template, because you talk about two Object Data files. The answer is that you have to click "Update MMAT and Commit" for both Object Data files: only, be sure that the option "Update all MMATs" is NOT checked. SimPE is very smart and when you click "Update MMAT", every occurrence of the old GUID is replaced by the new GUID; but the MMATs that don't contain the old GUID are not updated.After you have registered the two GUIDs, and clicked "Update MMAT" every time, check the MMATs: you should find 4 MMATs with the first new GUID, and 4 MMATs with the second new GUID. As for the "backpanel", leave it as is. |
Thank you so much for the valuable information! I'll be trying it out as soon as I finish texturing my counters :D
|
How do we clone objects?
|
Quote: Originally posted by eirate
In the tutorial section you can find many tutorials on cloning and making custom objects. JWoods' tutorial is a good one for beginners to start with. |
I'm confused. I made a new counter from the "Epikuros" Maxis counter. Then I cloned the "Epikuros" island. I deleted the textures and replaced the material definitions with the ones from my counter and that seemed to work - in my game the new island had the counter's textures. Then I read here that the island shouldn't have NMAT's so I deleted them. What else do I need to do?
I don't seem to have any string values in the "tsMaterilasMeshName" block... |
Mage, I recommend you use Numenor's counter templates as a base
. |
Thanks Inorant Bliss, and Numenor also.
|
Ah... sigh... thank you Numenor! I've only attempted one counter before and it had many problems because of the way the Maxis counters are cloned, the island wasn't recolorable, by some sheer miracle the counter does appear to work in all game versions but it took countless hours trying to get to recolour properly and I swore never again with the counters after that!
This I think has persuaded me I may yet try my hand at another kitchen with custom counters :D |
This is a stupid question but I have to ask because I don't know the answer.But Where do you put the template files at?Is it the downloads folder?
|
These are "Clone Templates": they are NOT usable as they are. Their only usage is to clone them, in order to create new, different counters.
Download these templates (and put them in a working folder outside the Downloads) only if you plan to create new counters. |
Just wondering... I notice the absence of "Fix Integrity" in your instructions.
It is usually stressed as being very important when making new objects... so should I not do the Fix Integrity step as I normally would? I don't want to mess anything up! |
thanks
 |
First...thanks for the great template.
I have a problem with my finished counters: when putting a sink/dishwasher/trash compactor into the counter it reverts back to the original mesh. (It will still show my texture though...a bit messed up) Did I do something wrong? I made sure not to export or import the backpanel and countertop meshes. Didn't even UV map them!  Thanks for the help. Reni |
I guess that there's something wrong in the Text List 0x85 (i.e. where the names of the alternative meshes are stored).
If you are in doubt whether you have made a mistake or not, try re-cloning and performing again the suggested steps. In some cases, starting again from scratch is easier than fixing a bad package. And if you really can't solve the problem by yourself, post your package(s) to the Repair Service forum. |
This is cool. Thanks Numenor, I'll put these templates too good use.
|
1 Attachment(s)
Quote: Originally posted by Numenor
Just wondering if there are any new updates on the ability of being able to edit the countertop mesh? I'm relatively new at creating objects, but I've spent a good deal of time on a quality dining table/chairs/barstool/bar set. The surfaces of the table and bar are tiled (the mesh, not the texture). I was hoping to make an Island Counter to add to the sides of the bar, but it sounds like if I try to match what I have I'll lose functionality.  Any suggestions? Dino's Rose |
1 Attachment(s)
DinosRose - First off, let's clear up that what follows applies only to the meshes, included in the counter package, that are used in conjunction with sinks, i.e. the "...nodrawer" and the "...nodoorsnodrawer" GMDCs.
Therefore, you could choose to edit the other counter tops, leaving unaltered the two mentioned meshes (the top will appear with its new custom look untilyou put a sink on it). That said, the real problem with the "nodrawer" counter tops is their UV-mapping: the "hole" in the top is cut relying on the map of the top itself, and therefore, if you re-map the top, you are likely to lose the sink hole. Look at the picture: it shows the original Maxis UVmap for the CounterCulture counter top. In the lower part of my picture, you can see the mesh: it is mapped outside the texture, but this doesn't cause problems, because the UVmaps are "tiled", i.e. when you exceed the lower limit of the texture, the map will start taking the same texture starting from the upper limit. This feature is shown in my picture by the upper red square: it represents the portion of the texture that is actually applied to the out-of-map portion of mesh (lower red square). The "secret" for NOT losing the sink hole is to avoid moving the map of the top from its original location, and avoid resizing it. In other words, you CAN edit the mesh and remap it, as long as the new mesh is mapped exactly inside the lower red square, like the Maxis ones. And, of course, remember that the lower red square corresponds to the portion of texture marked with the upper red square. I know that this is a heavy limitation to editing the mesh of a counter, but if you follow these instructions, you will be able to create a eorking counter top that accepts sinks. |
Quote: Originally posted by Numenor
So then the problem comes with how to map the top for a new mesh inside the lower red square when it doesn't show up on the UVMap screen? I've been playing around a bit with loading existing countertops into UVMapper Classic and it indicates there is out of range UV coordinate data - I'm guessing this is referring to the lower square you're speaking of. If I click yes to correct, the screen shows me the portion which matches the texture area. If I click no, the screen shows blank. Sorry for all the questions. I program in Visual Basic for Access, so it's in my nature to try to figure out how things work. Thanks for being patient with me. Dino's Rose |
You guessed right: if you click YES to UVmapper's request, the UVmap will be changed: you can see the mapping, but you will lose the sink
Unfortunately, UVmapper Classic isn't capable of handling such situation; most of the Maxis objects are mapped out-of-the-texture, so you should find another way to map the counters (for instance, Wings3D contains a not-so-bad UV editor. I said "not-so-bad"...  ) ) |
I've kinda gotten used to Milkshape and UVMapper (Classic). Do you happen to know if the higher end version of UVMapper (I forget what it's called) has the same issue with being unable to display areas mapped out-of-the-texture?
Also, this is slightly off-topic but... I've put myself out on a limb a bit here with attempting countertops. I haven't created any objects yet which use joints. What tutorial would provide a good overview on meshing objects with joints (is this where the Mesh Tool and the Creating a Chest of Drawers come into play?)? Thanks, Dino's Rose |
At first, I want to thank you for this great template. It's really easy to handle
I've got a problem with uv-mapping, too, but it is somehow different. All kind of meshes are linked to the same texture. That's normal, I know, but I don't understand, how to make a texture, which fits to ALL uv-maps. I have one uv-map for every state of the counter (_tslocator_gmdc, corner_tslocator_gmdc, counteronly_tslocator_gmdc, nodoors_tslocator_gmdc, nodoorsnodrawer_tslocator_gmdc and nodrawer_tslocator_gmdc). That's normal, too, or not? In order to fit all meshes to the texture, I have to make one great uvmap with all meshes in it, right? How can I do that, if I can't remap the countertop? Another possibility could be to link every mesh to a individual texture, but that isn't a good thing, I think, because of filesize and game performance. How did you (all people, who made a new counter, yet) fit all meshes to the texture? Would be great, if somebody could help me out. Thanks Blacky |
DinosRose - If you mean UVmapper Pro, yes, it displays correctly off-texture maps; but it's not a free program.
As for the joints, the tutorials you mention are about joints, yes. But if you are used to Milkshape, use that, instead of the MeshTool (that it's a bit outdated: still valid but not reliable 100%). Export the counter mesh in "Milkshape ASCII" format and load it in Milkshape: this format will keep intact all the joints and the joint assignments; so that you can edit the meshes without losing the animations. Only limitation: since you work in ASCII TXT format, and not in OBJ format, you can't use UVmapper. Blacky - It's easy Use, as template, any of the Maxis textures: see how the various parts of the counter are mapped on the texture, and keep the same type of mapping (i.e., the countertop mapped off-texture in the location displayed in my previous screenshot, the counterfinish mapped on the lower part of the texture).If you look at one of the "dirty" textures of an original counter, you will better understand where the various counter parts must be mapped. In other words, I'm saying that your new, custom texture must have the same structure and subdivision as a Maxis texture (the upper part reserved for the top and the handles, the lower part for the finish). You can find a couple of good "recolour templates", in this forum, that will help you to understand the usage of the various parts of the texture. |
Thank you very much
I thought it would be more complicated. |
Thank you for the response. I am aware that UVMapper Pro is not a free program, but I'd certainly look into it to see how much it costs knowing that it will display off-texture areas correctly. My trial is just about up on Milkshape as it is, so I'm going to have an investment to make anyway if I wish to continue using it. But that may have to wait a couple of months as I'm in the middle of house shopping and will be moving come January.
Thanks again for all of the info! Dino's Rose |
Just wanted to add that these counter templates work great
|
I love this template. Thanks so much Numenor. Is there any way to add glass to the doors? I wasn't sure since it already has 2 subsets.
|
You can add any number of not recolourable subsets to a mesh (on the other hand, you can't have more than two recolourable subsets).
Add the mesh in the GMDC, create a TXMT & Texture for it, and put a reference to the new TXMT into the Shape. |
Oh thank you so much, that worked great! You're the best!
|
My question is the same as Shannanisims, since we don't give the island it's own name during the scenegraph rename wizard, do we bother with fix integrity? Also, has anything changed now with PETS out? Perhaps I'm the only one who is having problems with the island not showing up at all?
kay |
The fix integrity is a powerful tool, and usually can be used as many times as you want. I said "usually" because it actually has a bug, that affects custom objects that borrow the texture from a maxis object (this is not the case: here, all the textures are included in the main custom counter).
Of course, I've double checked, and I did *not* forget to suggest a needed Fix Integrity in any step of the tutorial; but if you are in doubt, do the fix. If the island (or any other item) is invisible, there's a problem in the names of the internal files (the ones that appear listed in the scenegraph rename wizard) or there's a problem with the mesh: be sure that the mesh names are exactly as the original mesh (counterfinish and countertop). If you can't solve your problem, post your packages (all of them) here, or in the Object Repair forum. |
*of course* thank you so much for clearing that up. I appreciate your help very much. Unfortunately, I cannot post my package for repair since I was trying to create an island counter to go along with 4esf kitchen set 8 which I donated for. Although . . . would the entire 3 piece set need to be made from your templates to work? Perhaps that is the problem I'm running into? In any case, I'll try to figure something out. I've made an island counter before, one to match a Maxis kitchen counter but for some reason I cannot get anything I do now show up. *sigh*
And yet, it's so similar to the master/slave technique & all, I can do that in my sleep...and I know not to change the names...so what am I missing? Sorry, that was a rhetorical question kay |
No, you are not bound to use the Templates for all the three; but I've created the Templates because linking an island to its counter is not that easy, and the Templates are easier to use.
There are several possibilities of making a mistake, if you do the linkage by hand; and without seeing the actual packages, I can't know where the problem is... |
I know, thank you for endeavoring to assist me anyway, I know your busy and I appreciate your time. I'm sure I'm just missing something somewhere. I agree, the templates are easier to use. I tried to figure out why Maxis made it so that you can't recolor the brass for their value door yesterday--made the same door but it fits across 2 tiles. Got tired of 2-tile walls having 1-tile doors that didn't center across. I can re-make the door, of course, but wanted it to show up as original (overwrite the original). All was well until I used that "fix integrity", well, you know what happened then, bet you were smiling the whole time-right? Why do idiots like me keep trying to do what is clearly too complicated? Cause I'm not going to bother every one out there for every little thing I want. "Hey, can you make this...?" "Hey, can you fix this luxury tv that was an exclusive from Best Buy that I'm clearly not to share?..." I really don't like that whole gimmick with EA Games. Seems unfair not to make the luxury tv a gift at the main site available to everyone, especially since it uses the same textures as the stereo and all--BUT, it can't be recolored because. . . I'm guessing it has something to do with the material overrides being in a separate package, tv chattels or something like that. Posted a help thread in the appropriate forum, nobody answered. You see my point about trying to get others to do things for me? I'm not really particularly good at smoozing. . .LOL
kay |
I'm not sure if I understand this correct. Is it right that I can't make a new uv-map with the free version of UVMapper because then the sinks won't fit in the counters? If this is right, is there a free programm, which can do this?
And is there a tut, that explain how to make new kitchens? This is my first try and I don't realy understand how to make identical knob (for example) for each counter. Sorry for my English, I hope you understand me.... |
You guessed right: UVmapper classic is not good to remap the counter tops; but please note that, technically speaking, only the countertop can't be remapped, while the "counterfinish" can be remapped at will. But again, since both part use the same texture, remapping the counterfinish with UVmapper classic without modifying the texture would only lead to ugly results.
Wings is a 3D editor that has UV-mapping capabilities (but it only works with OBJ files, and therefore you need Milkshape in order to restore the animations for the doors and drawers); if anyone has other suggestions for a free UV-mapping program, please tell us. |
Oh, I work with wings 3D. Then I better take Milkshape for my kitchen.
I realise, kitchens are very difficult to do... And thanks for you answer! |
Thank you Numenor! :D
|
First of all: Thanks for these great templates. Your time and efforts are very much appreciated, Numenor.
Second: I have a problem with not remapping the countertop too. When I open my modified mesh in UV Mapper to remap the counterfinish the countertop has been moved to the bottom half of the UV map, which kind of messes everything up. Could the problem be that I have completely deleted the counterfinish that came with the template and redrawn a new one? Thanks in advance for any help. |
Thankyou so very much for your fantastic templates Numenor i made my counters and their working . i am just wondering if i make new counters again do you have to use the templates or just clone maxis ones but don;t edit the countertop flat part or remap it
 |
I always suggest to use the templates: the problems that you have when cloning the Maxis counters are not related only to the top UVmap...
|
Sorry Numenor i was trying and meat to say when i clone the maxis counters my sink has no hole on top of the counter or the top disappears is that because i edited the countertop .So you have to use the templates for every new counters you want to make . When i use your templates but the recolor only shows up on the one with the doors not on the draws .i use the template for draws & doors .
|
If you don't want to lose the sink hole, you shouldn't edit the top, whether you are cloning a maxis counter od these templates.
As for the recolour not showing on the drawers counter, be sure that - when cloning the templates - the option "make stand-alone object" is always deactivated. |
Quote: Originally posted by
OOPS thankyou Numenor i think i had stand alone ticked i will make them again . Thankyou Numenor for explaining about the maxis counter , but i must say you templates for the counter are really fantastic and make it easy to do custom ones without the standalone tick in clone options silly me  I will make sure its not tick. I will make sure its not tick. |
Numenor, you say "leave all the cloning option to their default state" in Object Workshop... Not to sound stupid, but what are the default states? I think, since version 0,58 of SimPE there has been a "set default" option that I have used, now I have no idea what they were in the begining before I changed everything to my liking >_<
|
1 Attachment(s)
Look at the screen for the default options.
|
molto grazie, MaryLou; now I will finally be able to make counters (yay!)
|
BBB, thanks for asking, and MaryLou, thanks for answering
When I first wrote this tutorial, SimPE *did* have an automatic default state for the cloning options; now SimPE remembers the last settings, and the default options can only be set by hand, by clicking the "Set Default" link in the Cloning window. Now I've edited the tutorial to include a screenshot and more accurate info. |
Okay 2 questions:
1. Ive been at this for almost 9hrs now, it just WONT WORK!! How exactly do I change the mesh of the counter finish and not the top, without changing the UV map and still get a diffrent color on the top? If I do a new counter finish with the top there, but never touching it or moving it, it still wont look like the original UV map. The counter top pieces ends up at the bottom instead of the top in the UV map. And if I choose to only export the counter finish from simPE and not the top, the tops texture is all messed up. And if I dont even open UV Mapper and just change the texture, it will look right exept from the pattern on the originals counter finish showing thru my texture. Gaah!! Please help. 2. If/when I get this working, can I use my finnished counters on my site for selling? And last but not least Thank you very much for these, I dont even want to think about how hard it would be if I had to clone the Maxis Counters all by myself! LOL |
This is a great tutorial!! Thank you!
But I have a question / problem. Everything is fine until step 5. The Scenegraph Renaming Wizard never pops up. Do I need to download something else? Or am I just missing something in the directions? Thank you for your help!! |
Double check that the cloning options are exactly like the ones shown in step 3; don't rely on the "set default" link, check them by yourself. In particular, if the first (set custom group id) or the second (fix cloned files) are NOT checked, then the Scenegraph Rename wizard may not show up.
If the cloning options are exactly as shown, and still the wizard doesn't open up, you can force it open using the Fix Integrity function. |
I'm sure this is something I should already know, but I just can't work it out. The shadows on my counters are white.
I'm talking about the shadows on the handles which are in the tslocator GMDC. Once I've edited them so they fit my new counterfinish, UV mapped them and reimported them with the joints in place and all they turn up white instead of black. Why? I can't find a texture map or a material definition for them anywhere in the package. What am I missing or doing wrong? Please. Tiara07, I know this is a little late, but in case you or any one else is still looking here's how I managed to keep the countertop UV map in place: Export the original mesh (both countertop and counterfinish) and import it into your 3D editor. Edit the countertop the way you want it (leaving the flat area intact like Numenor mentioned), but don't touch the counterfinish. When finished export it and give it a name like 'CountertopEdited', so you know what it is. Import it into SimPE and replace the original countertop. Now draw up your new counterfinish. You can use the original mesh as a base, just make sure to delete the countertop part before exporting and UV mapping. Give it a name like 'NewCounterfinish' when you export it from your 3D editor. When you UV map it make sure it only takes up room on the bottom half of the map and on the sides of the top half of the map (i.e. around the countertop). Then import it into SimPE only replacing the counterfinish. In short: Import the countertop and the counterfinish separately, making sure that the countertop is inherently the same as the original countertop, whereas the counterfinish can be a completely new one. That should do it. |
Those damn shadows! Yes, I know well the problem you describe; unfortunately, I don't know a solution for it...
Every time I tried and edit the mesh of a shadow, it turned white... In the end, I usually decided to get rid of the shadow at all (for example, by painting the handle shadow directly over the counter texture). I know that MaryLou has spent countless hours battling with the white shadows when we were creating the CounterCulture/Groovy/Colonial kitchen sets (lol! I used to call her "Mistress of the Shadows" ); perhaps she has some good advice to give us... - |
That's okay, Numenor. I'll work it out with the textures instead like you suggest. And it reassures me that you've had the same problem. If even you can't work it out then I don't have to be embarrassed about it either.
Thanks for taking your time to answer. (And for making those templates in the first place. They are simply lifesavers  ) ) |
5 Attachment(s)
Quote: Originally posted by Numenor
LOL The shodws: these terrible unknowns
Quote:
This can be a easy solution when the shadows are in the same GMDC, but is not always the best solution because often the shadows are in a own separate GDMC, and is not easy to delete them at all, without get the game crashing.... they are managed by the files cres.... About the counters the easy way should be don't touch them in anyway, but this is more limited when we make a new shape for the counters and they need also custom shadows. Shadows on the counterfinish and the coutertop, shadows on the walls (right, left, behind) and on the ground (floor) We have to edit the shadows and make their autonomous txmt and texture. When we clone a counter the shadows borrow the orginal TXMT, as you can see inside the shape, that often is not include a texture for the shadows, also if you use these template the shadows use the original TXMT that do NOT include a texture. We have to add them: texture and txmt. This is not a simple addition to make, and I can suggest to Numenor to update their templates to include its own txmt and texture, so none will have this problem in the future, or if he prefers, to add these my files as attachment with the relative instructions. In the meantime I try to explain how, to make easy the work I have provided the two files that are required. - Download the files attached - Import them inside your package: right click on the space bar "Name" (in the Resource List) -> Add (look at the screen) - Edit the TXMT: 1) you have to change its name, is most important because each TXMT must have its unique instance to prevent conflicts. Change the name in the "Filename" for the TXMT and also in the Tab "Content" -> Description ; click Fix TGI and then Commit and Save (look at the screen) 2) you have to change the name of the texture: in the Tab "Properties" edit the string "stdMatBaseTextureName" change its value with your new texture name, commit and save ( the name must be the same, of course, you'll give to your new shadows texture) Then go to the Tab "File List" and change the name in the Filename with yours texture, commit and save (Look at the screen) - Edit the texture: change the name in the "Filename", click Fix TGI and then Commit and save again look at the screen. Now export the texture, you have to edit it for your shape, and "Import": DON'T use the DDSutilites, instead use "right click on the texture" ->and than "Update all Sizes" and Commit and save again. - Edit all the Shape files that should use this your custom txmt: in the tab "Parts" change the "Material Definition File" for the subset of the shadow that use the custom material. Commit and save. (EDIT - attachment removed: now included in the templates downloadable from the first post) |
Update!
09 FEB 2008: UPDATE. The templates now include the modifications suggested and the files provided by MaryLou in Post #61: the cloned counters will have working shadows!
Thanks a million to our Mistress of the Shadows |
1 Attachment(s)
Hi, thank you for the great templates
But I seem to having some problems, the sink bowl seems to disappear into the countertop and when ever you put applicanaces under the counter, it has a strange line going up the side of the counter top I don't recal ever editing the counter top but I can't work out what else could cause the issue, I have a bad feeling I must have and now I have ruined it! http://i225.photobucket.com/albums/...blemkitchen.jpg |
As for the sink hole, you probably have edited the mesh of the countertop, or remapped it. You must not change anything in the countertop: I suggest that you extract the original countertop from the template and import it again in your new counter (in the nodrawer gmdc), replacing the faulty one.
Regarding the line in the top when you place an appliance, the suggestion is the same: I think that the countertop in the mesh counteronly has been modified. Replace it reimporting the originl from the template. |
thanks Numenor,
I am pretty sure I did not edit the mesh, so it must be the UVMap, I will let you know how I go with this, Thanks Heaps |
I want to download a kitchen and for it works in my game, I need the (your) Numenor's Clone Templates for kitchen counter. I download it but the kitchen's objects still blue. Can you help me please? ( the kitchen is here : http://modthesims2.com/showthread.php?t=278085)
Thank you! |
there is a misunderstanding: if you just want to use that kitchen set by Bubbybooz, you DON'T NEED to download these templates. The templates have just been used by Buggybooz for creating his counters, and for this reason he credited me; but you don't need it (remove the templates from your downloads folder!).
If some or all the items included in Buggybooz' set flash blue, be sure to have the file "BB_KitchenBasic_Counter.package" in your downloads folder: it's required for the entire set to work properly. If this suggestion doesn't solve your problem, you have to ask directly to Buggybooz for assistance. |
Thank you Numenor!
|
Hi Numenor. Thanks for this tutorial, I just started making my first counter set, finally took the courage to do it, but I'm having a glare problem when I see my objects in game. The counters have a glare inside and outside a house, could you point me to the right direction on how to fix this?
Thanks, I'm attaching an image so you can see what I'm talking about. Any help is welcome. thank you. 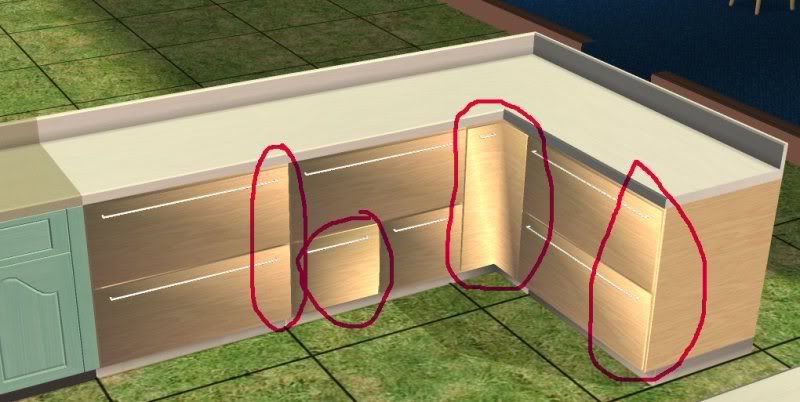 |
One word: smoothing
Milkshape is reknown for its ability to mess up the smoothing (a.k.a. the normals), rearranging them in a very personal way. I usually try fixing the smoothing with UVmapper Pro, as last step before reimporting in Milkshape. But UVmapper Pro only works in OBJ format, thus losing all the joint assignments, and you can't use it with animated meshes. I have two suggestions: 1) *IF* you have UVmapper pro, and *IF* those big drawers are not going to actually open, then you could export (as OBJ) the counterfinish only from Milkshape, import it in UVmapper, apply the correct smoothing, and lastly import the counterfinish in the GMDC using the "update" option from the drop-down importing menu. 2) If, on the other hand, those counterfinish meshes are animated, or you don't have UVmapper, then you can use the Milkshape menu "Vertex -> Unweld"; this will force Milkshape (and the game) consider each face as a separate face, thus solving the smoothing problem; the flat surfaces will look fine, BUT the round parts will not be smoothed any more (in this case, the handles may look less rounded on a very close inspect, though I think it will be mostly unnoticeable). Probably there are other solutions, but I'm not a great mesher, and use Milkshape the least I can |
Thanks for the info Numenor
I use 3ds Max to make my meshes, so I will check my smoothing options and try it again. I will let you know the result. Thanks a lot! |
Need advice on how to proceed with my counters
4 Attachment(s)
I am attempting to build a specific cottage cabin plan that has some really cool counters in it. I have the mesh completed but am not sure, after reading your tutorial through if it will work. A render of the two counters side by side is attached.
What I did was extract the epicurious cabinet mesh, remove the back peice from the counter top, duplicate each of the peices of the mesh to create the back section. The back section will need no animations but it does cut through part of the counter top. I would prefer to have both counter top peices - the main and the extra on the back side use the same texture as well as the counter finishes using the same texture. There will be a left and a right counter that would be used only as such. I would prefer to set it up so that both left and right revert to the epicurious counter corner - if placed in a corner. I am very curious too, if what I have done will screw with the sink placing abilities. Any thoughts? Latest news: I got the texture worked out and the sink placement working properly, but I did not use the meshtool so the cabinet doors and drawers do not open. Is there a way to fix this without losing my current meshing? |
1 Attachment(s)
I seem to have a problem with my counter the corner cabinet didn't show up, the templete did. As you can see from the picture it really looks funky. I tried to do exectly as the tutorial said but I must have missed something.
I did not ajust the countertop but it still looks wrong Oh yes thank you for the tutorial, I'm sure I'll figure out what I'm doing wrong. (maybe) http://upload.modthesims2.com/newattachment.php |
I see that the corner is NOT the only problematic piece. The one with sink is wrong, too; and in the picture I can't see the "drawers" counter (if it exists). I tried downloading the package from the link you've posted, but it doesn't work; will you please attach it to your post, instead of posting a link?
|
My counter
1 Attachment(s)
As you can see all is working now execpt the sink. And this I don't know what the problem is since it had been working before. Any help will be appriceated. Thank you.
I wasn't sure of which files to send so I sent the milkshape one also. |
You probably missed this part of the tutorial:
Quote: Originally posted by Numenor
This means that also the texture can't be modified, for the part related to the countertop. In your texture, the layout is completely different, as well as the UVmap for the countertop. |
Thank you for your quick answer, and I will put the correct countertop back in simPE. Of course I know there are many people out there that would like to re-color the countertop, so maybe one day they will find the solution and let all of us know. Anyway when I get the counter up and working I'll put up a picture for you to see. Thank you once again. Peggy
Numenor I took the 2 zips out. |
Recolouring the countertop is perfectly fine. Changing the colour of a texture, without moving the texture parts around, doesn't break the sink hole. But you reorganized the entire texture layout, according to you new mesh and UVmap (it's the new UVmap that broke the sink).
|
1 Attachment(s)
Numenor I got the kitchen counter done with your help and another mesher to explain some of the words and where to go.
Thank you once again for the tutorial and your posts to me. Here is a picture of the finished counter PS I think it turned out beautifully |
Wonderful!
Did you have the anti-alias turned off while creating the snapshot? I see plenty of jagged lines... |
No I didn't mess with the anti-alias. So thats why the picture is not as good as it should be. Thank you for all your help Numenor
and the wonderful tutorial. |
Hi, I know this thread is a few years old, but I've just started meshing and was looking for a tutorial like this. I've managed the first few steps, but when it comes to changing the GMND's, my SimPE screen doesn't look anything like the picture, so I'm a bit stuck.
 Any help would be very gratefully received. 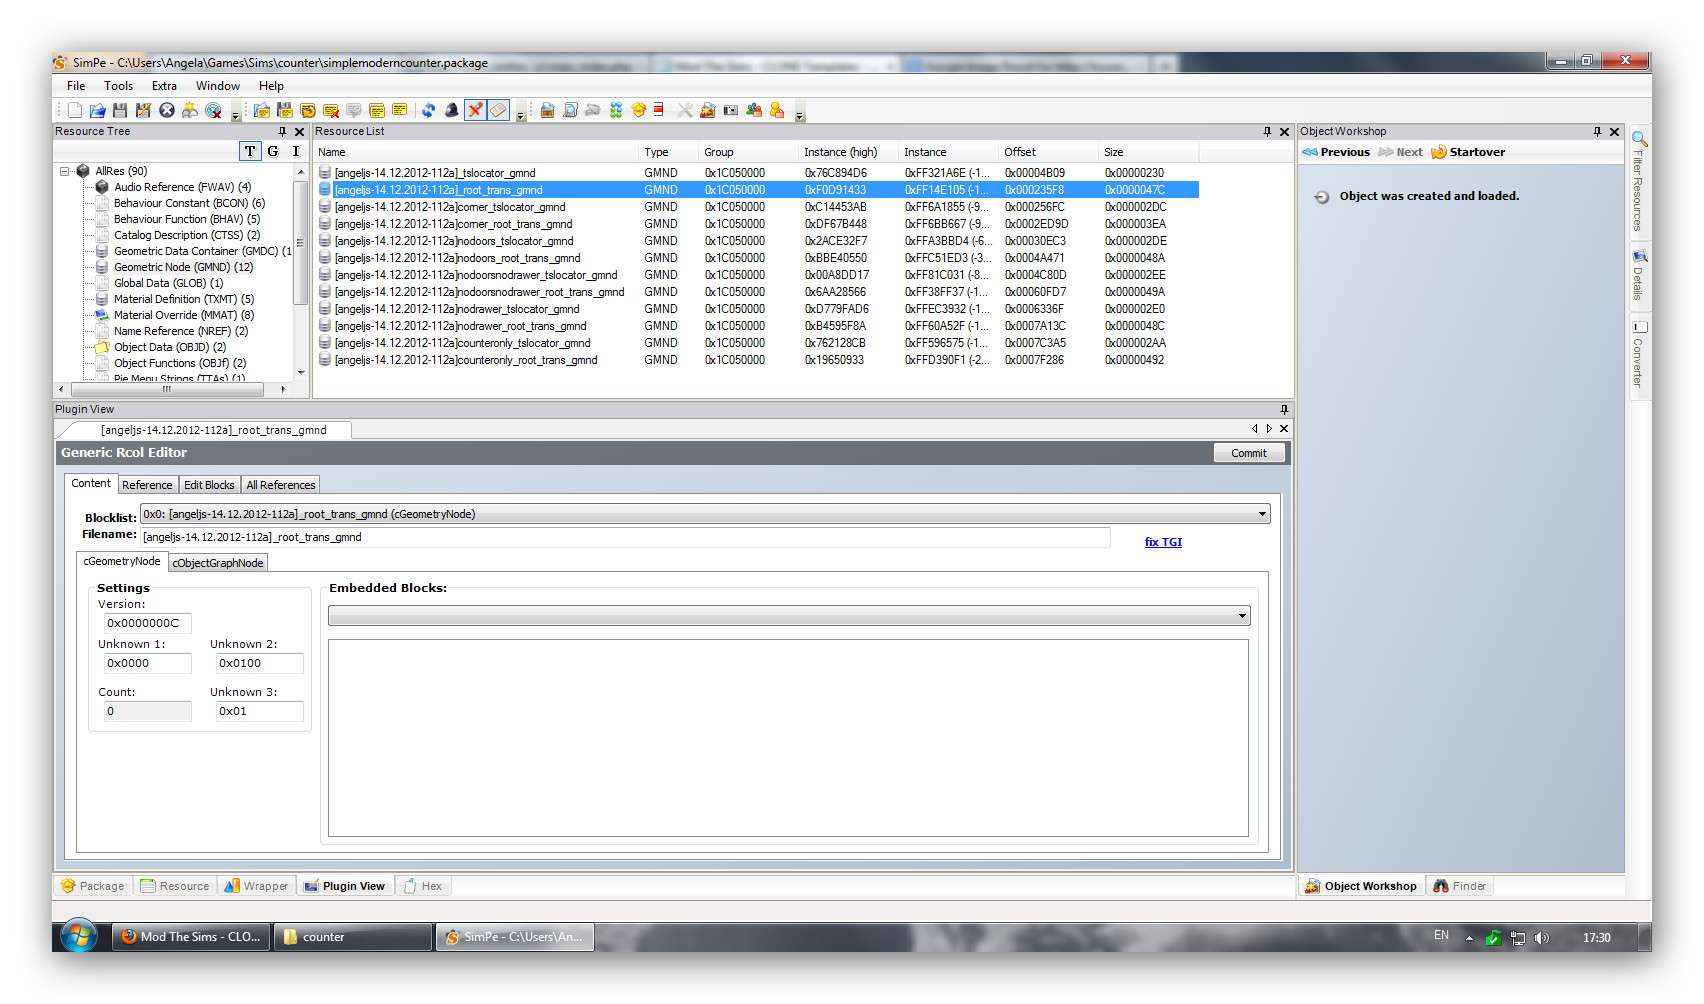 |
LadyAngel, based on your picture you are selecting the incorrect lines.
You have to select a line containing 'tslocator' in the name (except for the one at the top of the list). Then you can use the drop down list called 'Blocklist' and select the one with 'tsMaterialsMeshName' in it. When you do that the window will look the same. Hope that helps. |
You're right, I managed to find it, thanks. However, I think I'll give counter creation a miss for the time being, at least until I'm a bit more experienced in meshing.
|
hi. i think i really shouldn't bother asking, but, anyway, exactly why aren't the SimPE counter clones good for cloning? something about the scripts? I'd like to learn how to fix them manually for my enjoyment.
|
There are no scripts, SimPE simply doesn't pull all the required resources and link them properly.
|
| All times are GMT +1. The time now is 1:56 PM. |
Powered by: vBulletin Version 3.0.14 · Copyright ©2000 - 2025, Jelsoft Enterprises Ltd.