Page 1 of 3
|
Page 1 of 3
|
Questions about the UniMesh hair Meshing Tutorial
This thread is strictly for questions about the UniMesh hair mesh editing tutorial found here:
http://www.modthesims2.com/showthread.php?t=158048 Please keep the questions related to things covered in that tutorial. Off-topic questions will be ignored, post them in their own threads. |
Absolutely excellent tutorial! I finally created my first mesh! I have only one question. How do I get the thumbnail in Bodyshop to show the mesh correctly? It shows a different in game mesh but when I select it my mesh appears on the mannequin. Thank you for this great tutorial!!
 |
If you are talking about the original BodyShop project you exported at the beginning, it probably will never work right.
That first project is a "throwaway", it is only to get the mesh to show up at all. I always export it as a new project with a new name, even if I am making no changes at all to the hair color. Then import it back into the game - it's thumbnail should be correct. Then delete the first project with the bad thumbnail. |
Actually, I believe you should be able to delete cigen.package and possibly the contents of the Thumbnails folder and it'll regenerate new thumbnails for your stuff - it may take longer to load Body Shop the first time as it'll have to make new ones. But Dr Pixel's way is probably easier and tells you you're able to make working recolours properly.
|
Yes, HP's suggestion would work too. I usually have made so many changes to the uv_mapping that the original "recolor" .pcakage doesn't look right anyway, so I'm in the habit of automatically re-doing it and throwing the first one away.
|
Thank you both for the help! It was so nice to be able to go through this tutorial, and actually create a WORKING mesh. Now I've really got the bug! Runs off to create more...
|
Quote:
is this the glitch you're talking about? (part of the hair shows through head)  if so, how can i fix it? i don't really get the alpha description... sorry. you talked of "two alpha groups for each part of the mesh" and how you should edit them simultaneously. i only have two groups in milkshape, hair and hair_alpha3 (pink and yellow respectively):  this is the male teen ponytail hanging down. i lifted the parts up, including the alpha group, rescaled, moved vertices, etc. nothing else, nothing added or deleted. and still, the glitch. anything i have missed? thank you and i hope you can clarify this for me. |
That looks like a bone assignment glitch.
http://www.modthesims2.com/article.php?t=131417 and the fix in detail is covered in the tutorial here in message 6: Unimesh Vertex Assignments |
The whole "alpha" thing seems to be a difficult concept for people to understand.
Maybe it helps to think of each alpha layer as a transparent piece of plastic, on which the hair is drawn? And yes, there are a few hair meshes that have only one alpha-group, and this will work because there is nothing layered over it. More complicated meshes, with more than one alpha layer, will have the paired alpha groups like in the tutorial. Anyway, in this case it is not the problem. It could be the vertex assignments, or it could be some vertices moved to the wrong place. The original teen male ponytail has the hair all drawn to the back, nothing hanging over the forehead at all. It looks like you may have moved vertices of the "hair" group down over the forehead - either accidentally or on purpose, in such a way that part of the mesh is now going inside the forehead and then sticking out in front of it. If you are going to do that, you have to be very careful - the vertices all around the edges of the "hair" group are the points where the hair mesh meets up with the face mesh and they must never be moved or altered in any way. For doing that sort of thing, you must move other vertices, or better yet create new parts or use parts from another hair mesh. And it is a good idea to use one of the example face meshes found here http://www.modthesims2.com/article.php?t=135300 as a reference to make sure the parts aren't sticking through parts of the Sim's face. Also make sure to allow extra space because most parts of a Sim's face can be altered. |
i think i sort of "get" what you're getting at. as for the alpha, i know about the black and white thing and how the white parts show the texture, per experience from bodyshop skinning.
anyway, a little experimentation won't hurt. i'm still familiarizing myself with all this, as this is my first hair mesh (and i'm glad it even showed up at all!). thanks. |
This might be stupid, but I can't find the Geometric data container. The only things that show up are the things that were there originally such as the binary index, property text, ect.
Can you help? |
You are looking at the recolor .package that you made in BodyShop - there is no mesh in that, you must extract the mesh files from the game and create a new mesh .package just like you do for making a clothing mesh, then link it up to the recolor .package.
This is all explained in parts II, III, and IV, of the Body Meshing tutorial. http://www.modthesims2.com/showthread.php?t=142305 If you haven't done a body mesh edit, you really should do a few of those first before attempting hair - hair meshes are more complicated, so it's best to have a few successful body mesh edits under your belt first. |
First of all, thanks; I fixed my above problem. It had to do with bone assignment; I assigned the ponytail vertices to the head; I had no idea that causes problems. I successfully made my first few hair meshes now.
I have another question. Actually this is more of a Milkshape one, but it's still relevant. While doing this hair mesh, I realized too late (upon testing in-game) that I accidentally moved the bottommost vertex at the back of the neck. Meaning a hole is visible at certain angles (nothing to do with the 50-50 hair-neck assignment). So I opened my edited mesh, imported the original over it, and returned the misplaced vertex by using the original as guide. I zoomed as close as possible, until I was sure they were really in the same position. Then deleted the original mesh. In the game, it still has the faintest trace of a thin hole near that vertex. Sorry for the lengthy intro, but mine's a simple question actually. Is there a way in Milkshape to snap or place a vertex into the *exact* position of a second one? The "snap" command doesn't work as I want it to; it apparently just snaps the two points at the midpoint. EDIT: Yeah so I've found "manual edit". A bit tedious but it did the job (I checked the original's coordinates), and neck looks fine now. Though I weren't able to change the values directly properly; I had to use the "move" command and move the appropriate tiny difference in distance (which I had to calculate). Is this a bug? |
Use demon's gmdc plugins - the extended manual edit. For the moment, assign a value of 100% head (or arm for that matter) to one of the 2 vertices, just so you can tell them apart.
Select both vertices Do extended manual edit Make sure you can see the x y z and bone assignments (there are various options to click on) Find the one that is your reference (remember I told you to change the assignment of one of them) Copy the x value, paste it into the one to be fixed repeat for y and z. Hit 'accept' Dr Pixel uses this to realign the edges of a top - his mini tutorial for it is in the first page of demon's plugins thread. |
Nice! Looks like the tool I need. And I was pleased with coming up with almost the same solution, that is, importing a non-edited mesh over your work for alignment reference. I'm thinking of using the same trick for making my hair compatible with all ages (rescaling first, moving, then manual vertex aligning of the edges).
P.S. If it's not too much to ask, what are the U and V coordinates for, and what exactly are "normals"? I have no idea how they're used, and couldn't be bothered with them when I encounter them. |
Continuing this discussion here: http://www.modthesims2.com/showthread.php?t=164022
We're well beyond the _tutorial_ which is what this thread is for |
Here's a question about the "hair" group.
In the tutorial, you said that the transparent parts of the "hair" group "will show the Sim's flesh color". Does that mean that it will show a flat, uniform color or that it shows a bitmap texture of a bare scalp? In other words, is it safe to alter the UV mapping of the "hair" group or do you need to keep it the same as the original mesh in places where there is transparency? |
You can alter the uv mapping of the hair group any way you want.
The places where the alpha image of the hair group is black will show the Sim's skintone texture image which is just a solid color that matches the chosen skintone, it has no details at all. |
Usually. The 'hair' group on the Maxis barrette hair mesh does NOT alpha to skin. It doesn't alpha at all, it just ignores it. Some other hair meshes also have this issue, at least that's what HP discovered, and she's done funkier hair mesh things than I have.
|
Alpha-ing the "hair" group is USUALLY pretty straightforward... where it's black on your alpha, you get skin texture (btw, not ALL of the scalp textures are 100% solid - SimCribbling's scalp texture has a bit of a gradient - it gets darker toward the back of the neck - really not noticeable but if you re-map the scalp and have a lot of it showing, it may be a little odd). But yeah, the barrette hair and at least a couple others aren't set up to alpha... I think this may be due to the material definitions just not being set up right...
Although I have had weirdness occur with the alpha from bone assignments... For some reason, for a while in doing my Cherub hair, in trying to fix the back of the neck gap and get the assignments just right there, if I set up the assignments in a certain way (it's been a while so I can't remember the exact numbers, but it was probably close to a 50/50 neck/head or head/neck just along the gap) the "hair" group would completely forget it had an alpha - there would be no nice fuzzy hairline whatsoever, just my entire texture slapped on the "hair" group. Removing the multiple assignments and reassigning everything 100% to head would make the alpha start working again. One of the weirder problems I ran into in meshing. Just thought I'd share, in case any newbies are trying stuff with assignments and go, "Whaaa? This doesn't make sense!" No, it doesn't, but it happens. |
3 Attachment(s)
The material definition files are in fact where you set how the alpha of each mesh group will be used. It is important to correct any errors in the original BodyShop color .package, once it is corrected all future recolors will be correct.
If you are having "skin" problems, like no flesh color showing on the "hair" group, or flesh color is showing on an alpha group, find the Material Definition file of that group in SimPE. Then check the "cMaterialDefinition" tab. If it says : SimSkin then the flesh color will show on the black areas of your alpha image. If it says SimStandardMaterial, the black areas of the alpha will show as transparent. If it is wrong, just change it and it should correct the problem. As far as I know, these two are the only ones recognized by the game, so make sure the spelling is exactly correct. ================================ The other thing to check for hair mesh groups are these lines on the "Properties" tab: stdMatAlphaBlendMode <- for hair mesh groups, always should be "blend" stdMatAlpahTestEnabled <- for hair mesh groups, always should be "0" |
SimPE
 What version of SimPE did you required in this tutorial? What version of SimPE did you required in this tutorial? |
Quote: Originally posted by ScullyFan
I used version .58 of SimPE - but as far as the tutorial goes, any version of SimPE will work. I would recommend using one of the more recent versions of SimPE because they have the "finder" which makes creating your mesh .package much easier. |
On the first part. I was very confused. It seemed like you were leaving out parts of what to do in SimPE and you were just explaining other stuff. I don't understand what you're supposed to do in SimPE to get the picture up.
|
Quote: Originally posted by Swat_Reaper
Okay, What I was confused on wasn't really clear. I don't know what to do with the property set thing. Do you just click on it? (I'm guessing not) I don't know what to do with all of those things that appear when you click on it once. Please help. |
Swat Reaper have you successfully done one of the beginning body meshing tutorials? Hair meshing is an advanced topic and it is expected that you know how to do basic body edits before you try this tutorial. You should know how to use SimPE for modifying meshes before trying this hair tutorial.
|
I have a question about hair animations. How do you make it more bouncy? Do you assign certain vertices to different bones? Also, When I tried, it messed up, and I think it may have caused a bit of corrupt on my bodyshop program (Not loading the hair and freezing up). However, I could be wrong. If you could get me a tutorial on how to fix hair animations, or tell me how to fix this, that would be great. Thank you in advance! :D
|
1) Making hair bouncy is NOT part of this tutorial, and this thread is really for questions about _doing the tutorial as written_
2) If your bodyshop, etc, is no longer loading, try moving your files from the saved sims and downloads folder to a folder on your desktop. If that doesn't help, try moving the stuff from your projects folder to a folder on your desktop. If that doesn't help - did you download *anything* for the game while doing your project, try removing that also. 3) There is no tutorial for hair animations, it's still something people are experimenting with with mixed results. Here's the thread discussing it. Some people have gotten good results, some not so... This is an advanced technique that you can try (on your own, no tutorial or handholding) http://www.modthesims2.com/showthread.php?t=151722 |
i get confused when you go from the tuturial and then switch to another about converting adult stuff. i'm trying to do a teen hair mesh and i can't get past that part.
|
nadascreations - I'm wondering if you are looking at the infocenter _articles_ which are a collection of 5 separate articles which give various bits of information about meshing hair, specifically focusing on the differences or specific questions people have asked -- http://www.modthesims2.com/article.php?t=139819
The first article there, for instance - gives an overview and some specifics about the details of what in a hair file is different (and confusing - finding the right 3dir). It's expected that you know how to find your hair meshes, edit them, update the mesh file, etc. The article format was designed to handle an assortment of articles - in this case 'converting hair meshes for different ages' is not a continuation, but a separate article about working with hair files. There is a very basic tutorial available here: http://www.modthesims2.com/showthread.php?t=158048 it was not available when the hair articles in the infocenter were first created Basically, it doesn't matter much which age(s) you are editing; the recolor file has references to ALL ages - FOR EACH AGE you wish to edit, you need to find the 4 pieces and build a mesh file, link the modified cres and shape to the correct 3dirs, edit the mesh, test. Then repeat the process. |
This is probably a silly question but I've made my mesh - it works great, thank you for the tutorial. But how do I upload it - if I upload only the simpe file from downloads it doesn't show up in game - I think because there is no pointer a bodyshop file. It only works if there is a file in saved sims and in downloads. How do I make just one simpe file for my mesh?
|
If you made up your MESH_ .package and linked it correctly to the BodyShop recolor .package it should work fine. A common beginner's mistake is to leave the Resource Node and the Shape file in the first BodyShop recolor .package - you should check for that if you are having problems. After linking the BodyShop .package to the MESH_ .package you must delete the Resource Node and the Shape file you added to the BodyShop .package. They should both only be found in the Mesh_ .package, otherwise BodyShop gets confused and there can be problems.
You will need both files to have the mesh show up in the game - the MESH_ .package, and at least one BodyShop recolor .package. They can both be in SavedSims\, both in Downloads\, or one in each folder, it shouldn't matter as long as both are in the game. |
Thanks it was just the last bit I didn't know - about both files! I normally do objects lol.
|
Yeah, umm... Kind of a dumb question but... what if I followed all of the instructions correctly (to the best of my knowledge...) with a DIFFERENT mesh though, and as soon as I open the Custom Bin in BodyShop to look at it, the application crashes?
I was trying to make the "amhairmessy" thingy spikey, like a punk. Eheheh... |
Without knowing exactly what you did, all I can tell you from your post is that you definately did do something wrong.
Since this is a tutorial I am going to assume this is your first mesh edit. A tutorial is just for learning, you should go back and try it again - but this time do use the same mesh that I showed. Every hair mesh is different, and your problem could be due to something in the mesh you edited, the tools themselves, or a mistake on your part. There is no way to tell. If you use the same mesh I showed, problems other than user-error can be eliminated because obviously what I did worked on this particular mesh. Once you understand how to do it, then you can go on to making your own edits on other meshes and if something does go wrong at least you will have an idea where to look. |
Oh and Solanum - go to your downloads folder and saved sims folder and projects folder and DELETE all the new files you created. That should fix your bodyshop problem.
|
Alright, I will try that. Thanks!
And I deleted the "error-mesh" and everything works fine now. Except.. the mesh. Haha. |
I didn't expect it would be easy.
Okay, I did Tiggerypum's body meshing tutorial and breezed through it with no problems.
Now, however, I just can't seem to get through this hair meshing tutorial. When I'm at the point where I load Body Shop to see if it works (before MilkShape)- it does. All seems well at that point. But then at the end of the tutorial when I load Body Shop again to see my lovely new hair it just looks the same as it ever did. I do delete the extra Resource Node and SHPE file. I use the bone assignments in the tutorial and I'm using the same hair as in the tutorial. I make sure that I add my edited container back in and give it it's original name back, etc, etc. ANY advice, thoughts, etc. would be most appreciated. I refuse to give up but I'm on about my 5th or 6th try. |
Some things to check:
* In SimPE, after replacing the GMDC with your edited one, make sure you click [Commit] after putting the name back. Then checkmark all the mesh groups, and use the Preview feature to confirm that it is your edited mesh. If it still looks like the original, you may have brought back in the wrong mesh. * In BodyShop, do not try to look at the original project that you exported - that will usualy not work. Instead, to look at your new mesh either go to the New Project section and export it as a new project to have a look. Or else go to the Create-A-Sim section and try to find it there. Also don't expect the Thumbnail in BodyShop to look correct - find the mesh, then actually click on the thumbnail to put it on the mannequin for a look. * Did you link the mesh to the correct three ages? There are three Hairtone XML files in your BodyShop .package that are labeled "af...." (adult female) - or two if you don't have University. One is for the Adult Female, one is for the Elder Female, and if you have University the third is for the Young Adult Female. If you only linked up one of them, the mesh will only show on one of those ages and you may be looking at a different age in BodyShop. Also make sure you have linked to the correct 3D Referencing file by comparing the instance number of the HairTone XML file and the 3D Referencing file - they must match. For a quick check, in BodyShop try also looking in the Elder and Young Adult sections. ======================================== If none of this helps, you could post the files here and I will look at them. I would need both the MESH_ .package, and the BodyShop .package that it is linked to. |
Thank-you for the tips- they are appreciated. :D
I DID manage to make the toddler hair completely disappear. That's it. *headdesk* I think I'm going to start over yet again. I'll let you know how it goes. |
I Did It!
I just wanted to pop in and say thank-you and show you the end result.
THIS is what I missed:
Quote:
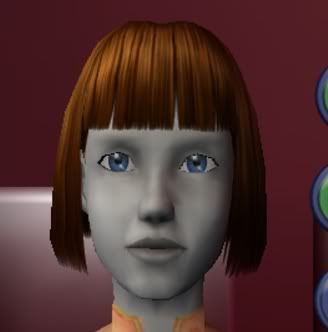
I was adding the modified cres and shape files ONE time- and using that one add to change them all- then deleting/saving ONE time. Made all the difference when I realized it- I also felt a little dumb. *headdesk* Original TS2 Hair:  My End Result:  This last try I changed to the long hair from the ponytail just because I was really tired of that hairdo after so many days of looking at it. Also, I was trying to give the hair a wavy look- not great but it's okay I think for a first try I think.  |
I have question. I created mesh,but in Bodyshop I don't see changes.Why?
Thanks |
Do you see the changed mesh in the preview in SimPE?
|
Hm,i think yes,but it was wrong.I notice one thing-in plugin-view is bad order-XZY...My mesh in SimPe is with changes, but in bed position.Can I correct this mistake?
Thanks a lot |
If your mesh is laying down in SimPE, you didn't follow the tutorial.
The XYZ shouldn't matter, because you would not use Import or Export. You use extract and replace up on the file listing in SimPE. The tutorial is for the UniMesh plugins and MilkShape only. |
Yes,i also think that. But which steps I should repeat?
Thanks |
That would depend on exactly what you did.
Was your mesh was right-side up when you imported it into MilkShape? And still standing up when you finished? If it was, go back to MilkShape and export it again, being sure that you are using the Sims2 Unimesh Exporter option. Then open up your SimPE MESH .package, right-click on the GMDC line, choose "replace", and bring the new GMDC in. If it was not standing up when you imported it into MilkShape, you will have to go back to where you extracted the original GMDC from the SimPE .package you made. Because if it came into MilkShape laying down, it means you used one of the [Export] options in SimPE rather than "Extract" and you will not be able to go on as explained in the tutorial. See this post: http://www.modthesims2.com/showthre...290#post1220290 |
My mesh was right when I imported and exported in Milkshape.I try to export (in Milkshape) again,but my mesh was without changes. I go back to where I extracted the orginal GMDC from the SimPe .package, but my mesh in BodyShop still show without changes.I try to creat new mesh.
Also I should to tell one thing. I use in Milkshape face and body examples(http://www.modthesims2.com/article.php?t=135300), but before my mesh saving I delete all face and body examples(in groups tab). Thanks a lot |
I seem to have a problem assigning bones in milkshape. Whenever I try to change the bone it will be assigned to, or the weight, milkshape just shutsdown with no warning or message. Can you help me with this?
|
Rashia, make sure you have the latest version of Milkshape, and the latest version of Unimesh. If you do have both, reinstall them both - I was having that exact problem when I'd upgraded one to the latest version, but not the other.
|
I have both latest versions, and also I noticed that assigning bones works just fine on a limited user account, but not an administrator account. I'm not really sure whats the cause...
I have updated my drivers and it now works with my admin account. Another question, is it supposed to make a sound when pressing the commit button? |
Please help i dident see how you made the mesh package in the thing can you show screen shots how to get the mesh package i can do eveything but geting the mesh package
 |
wazza, go back and reread that part at the beginning that you're confused about - it links you to information on how to do that. Also, considering your past questions and when they were asked, I really don't think you're quite ready to work on hair yet. Hair is rather difficult, and there's a lot of fiddly bits that can go weird. I think you'll be a lot better prepared to tackle a project of this magnitude once you've gone back and successfully made several body meshes, and gotten really comfortable using Milkshape. Go back to the first Unimesh tutorial, do the tutorial as written, keep messing with small changes like that, experimenting and seeing what you can do and what problems you run into - then go on to the other Unimesh body tutorials and again, do as written, then fiddle and play and see what happens. When you're a lot more comfortable with those, then come back here.
|
I followed your tutorial, but I have the same problem most people here have; my new mesh doesn't show up in Bodyshop.
When I open the mesh-file in SimPE, and check the preview of the gmdc Only the "hair" is checked and visible. When I also check the "hair_alpha's" the preview shows my new and customized mesh. After committing, I reloaded the fil in SimPE, and the "alpha's" are unchecked again. I did this twice, and even replaced the gmdc again (with proper copy + paste of the original name) but I don't see any changes in BodyShop, whatever age I pick. I deleted the Resource + Shapefiles for sure. Do you have any idea what my problem might be? |
Those checkboxes in SimPE are only for what the preview will show if you hit the 'preview' button and have nothing to do with anything else. All the parts of your mesh are there.
When you are looking to view your modified hair, did you modify the file in your SAVED SIMS folder (not in your projects folder) When you are trying to view your new hair, are you saying 'new project' in bodyshop and then looking for the hair? Are you clicking on the thumbnail and actually viewing it on the head of your sim? Viewing your old project won't do it. |
Thanks
Quote: Originally posted by HystericalParoxysm
thanks HystericalParoxysm you been helping me to mesh thanks! i will try that.  |
@Tiggerypum: I figured out I forgot to copy the file I made with bodyshop (and copied to my work-folder) back into the savedsims-folder. Now I have a working mesh! Thanks for your very quick answer!
|
2 Attachment(s)
Thanks for the tutorials and all the help. I have a problem that I've actually had and and solved before when I was using the Mesh Tool method. But it was a long time ago and now I can't remember or figure out what iis wrong. When moving the vertices around I was carefull to alter both alphas together, and I didn't change the texture at all. I have tried redoing everything with the same result: there is an area of invisability around some of the edges which makes the hair behind it invisible as well. Thanks.
Oh! The answer is here. Thanks Pinhead and everyone! |
Hey I've been following your tutorial and i (finally!) finished my mod on the bobcut hair making it longer, but now it looks all funny in bodyshop like only one alpha layer is showing up, i checked it through and the preview for it in simPE looked fine but I don't know what's gone wrong
  See that's the base hair (it's on teen) 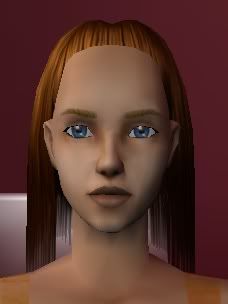 This is the adult version, see the fringe is invisible aswell as others when you turn it - 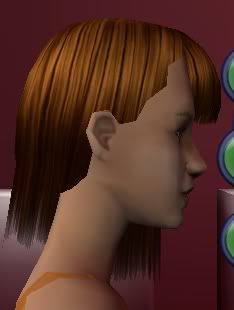 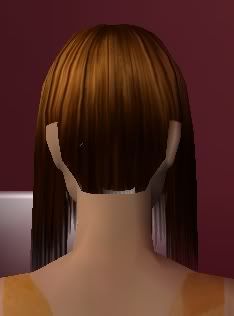 and when you zoom out it dissappears.  any suggestions? Any particular steps i should repeat or things to look over? Or is my problem the same as mage's?...????????????????...???????????????????????????????????????????! Someone help meeeeeeeeeeeeeee... |
Bone assignments are not at 100%. Or you left them assigned to the animation vertices.
Look at message #6 in the hair tutorial - MilkShape UniMesh Vertex Assignments There's also an article about it in the infocenter: http://www.modthesims2.com/article.php?t=131417 (which I'm updating, we didn't have the more advanced tutorials when it was first written) |
Hey thanks Tig! I made a typo in the bone assignments and didn't commit all on one of them
  Hooray |
my problem
Hey there! first off, this was a great tut and after a bit of trying i've got it to work (mostly!) Well, here's the prob: I've got everything all nice and i've got the gmdc replaced and everything. only thing is, when i have it in bodyshop it's invisible although when i preview it in simpe it shows the right model but it's all black. Is it a problem that I completely replaced the model and did my own uvmap? (it's a helmet) the original hair was all one piece and ive used milkshape b4 so that was no problem. also all my textures are right (though what's the third gray one for? (amhair_Casual1~hair~stdMatNormalMapTextureName))
thanks for your patience. Edit: also in milkshape it looks fine with the texture added, but black without. |
your new hair probably has no normals. It might also be 'inside out'. The backside or mesh w/o normals will look black or very dark in milkshape, and the backside of a mesh is invisible in bodyshop.
Try grabbing a group in your mesh and using the align normals tool on it and see if the color brightens a lot - export that gmdc and see if you get any changes. Also you do understand that your new hair (new uvmap or not) must have the same number of groups with the same names and same comments and all that as the mesh you based it on. |
where?
ok, but where is the normals tool? i tried face to front but nothin' doing...
is it that i imported from 3ds max? |
did you do unimesh tutorial #3? link to demon's normal tool there.
|
awesome! now everythings perfect!
|
High, everyone! I've been following Hair mesh tutorial by Dr Pixel (thanks a lot, it helped me so much to start meshing
), but I didn't get how to link 3DIR files for elder and young adult. I've done my mesh, but it shows only for adult, so aparently I'haven't linked the 3DIR files. Please would you explain it to stupid me step by step? And also I wanted to ask if their any tutorials about assignment of longer hair, as well as for converting hair for different ages? Thank you for your help. |
natef005 - You can use the same mesh for adult, elder, and young adult, as they use the same skeleton and are all exactly the same size (at least when it comes to the head/hair). Open your recolour file and click on the "Instance" header in the resource list to sort by instance number. Scroll through and look for Property Sets that start with "af" if you're doing a female hair, "am" if you're doing a male hair. Note the instance number of the first property set like that, and then replace the CRES and SHPE in the 3DIR that matches the same instance number. There will be two that have a standard colour bin name in the text (i.e. "afhairfuzzylongcp_black" which are for adult and young adult) and a third that ends in _grey (i.e. "afhairfuzzylongcp_grey" which is the adult). If you want the mesh to work for adult, young adult, and elder, you'll look for the 3DIRs that have the same instance number as all three of those Property Sets and replace the CRES and SHPE in all three of those.
|
Oh, thank you soooooooo much!!!
I've done it and it works. I'm so happy cause I've moved a bit further thanks to you and people like you who help us creating.....) |
hey dr pixel! this is such a good tutorial! i really appreciate your hard work! but i have three questions:
1) when i edited that short pony tail, it also replaced the original one and now i don't have the short pony tail anymore instead i have a long one. was that understandable? :/ 2) why can't we delete the vertexes and other stuff or why not add them? and can't we merge some groups together? like in photoshop which says merge down. 3) and one last question, i could only get a new mesh from the pony tail and my other meshes never ever show up in the game, even though i do not delete anything in milkshape. help me plz, thankyou! ~ Mandy |
Mandymand:
1) You didn't do Fix Integrity when you put your mesh parts together. Fix Integrity gives your mesh a new name and makes it unique (not a default replacement, which is what you've created). That's covered in the Unimesh body tutorials and pretty standard - if you've done body meshing (as you should have before attempting hair) you should be familiar with that. 2) You can delete and add vertices in hair meshing using Unimesh. However, this tutorial was more geared toward showing you the basic steps involved in creating a hair mesh, not making/mapping/editing shapes beyond a little pull of vertices. When you get into adding or removing parts things get a LOT more complicated. You cannot merge groups together, however, unless you'd like there to be a bunch of ugly transparency issues around the edges of your alpha cutouts. Groups need to be arranged in a precise order, number, and with the right settings or you'll end up with a very yucky looking mesh, therefore it was kept the same as the original for this tutorial. There is information on groups and layering for hair meshes in the Infocenter. 3) Meshes not showing up are generally due to one or more of several factors... If you have the recolour package showing up but not your correct mesh, it's most likely due to your mesh not being linked correctly to the recolour package, the mesh not being in the Downloads folder, or the mesh being otherwise messed up (wrong group names or missing comments on groups). Hair is one of the hardest Body Shop Meshing creations you can make - the layering, assignments, and transparency settings make even experienced hair meshers stare blankly at the screen and pop more aspirin than is probably healthy. If you are not already very experienced with body meshing, you will likely find hair meshing extremely difficult, and your first and third questions suggest that perhaps you need more body meshing experience. Check out Tiggerypum's Unimesh tutorials (1-3) for lots of great info on meshing as it relates to Body Shop meshes. I think once you go through those and experiment a lot more with body meshing on your own, you'll be more prepared to make a good hair mesh. |
Quote: Originally posted by HystericalParoxysm
wow thanks! that was alot of info. I sure need to get more experience on body meshing then get myself started on hairmeshing. i will sure learn things better with your help, HystericalParoxysm. |
I need help, I really do not understand how to connect all of the same meshes for different ages into one package.
|
Bonita!, that's not really what the Unimesh hair tutoorial is about... But there is full instructions on how to do that here: http://www.modthesims2.com/article.php?p=1109813
It looks complicated, but basically, you just get your meshes for all ages working perfectly in separate packages. Then go into the toddler, child, and teen packages and extract all the parts to a separate folder, then import all the other age parts into the adult package. Don't do fix integrity at any point, and then just save your new mesh package with all your parts with a new name that reflects its new all-age-having-ness. Pretty darn easy, actually. |
O, sorry, but I didn't know where to post questions for that.
|
Bonita, if you have a question that's not about a specific tutorial or a related to a thread you see, then the answer is to go to the bottom of the main bodyshop meshing forum (not in tutorials or infocenter) and click 'new thread' and post your question there. Simply include as much information as possible so that people might be able to answer, which you did do. Thanks
|
Raincandy, that's not really related to this tutorial - it's hair, but it's not what this tutorial is about. Thank you for posting pictures, but please, if it's not something directly related to the tutorial itself, please post questions in the main Body Shop Meshing area.
There's really not enough of a pic there of your actual mesh that I can tell how you have the braids set up... Ideally, for a style like that, you would want the braids as part of the "hair" group, making for a remarkably simple mesh in terms of layering - but that is also going to make it very difficult to actually model in braids and also have the "hair" group match up properly on the seams. I'm guessing you started with the Maxis mesh that's set up like that already? You should be able to see how the braids are actually part of the hair group... you'd want to end up with something like that, but to be quite honest, I don't see any easy way to scale the braids already in there and add more... It could be done on a separate layer but that would be... non-ideal, and putting them as part of the "hair" layer would be... an extremely advanced project, duplicating the braid pieces, moving them into place, and then working to fill and properly map the areas in between. Braids as cylinders laid on top of the "hair" group would probably be the easiest... To do it better, similar to the Maxis original, as a single group... well... um... I'll just say that it's a project I wouldn't do personally, with my level of skill. |
When you said: "Next, create a new mesh .package for the adult version of the mesh, and link it up to the BodyShop .package as explained here : http://www.modthesims2.com/article.php?t=139819" this link didn't give very clear instructions. Is there a clearer set of instructions? Your tutorial was very helpful, except for that step. Without it, i can't do it at all.
 |
tomasz, have you done the _three_ unimesh body tutorials? If not, start there. By the end of that you should understand what those words mean.
|
1 Attachment(s)
Thank you Tiggerypum, i realized that right after i posted the message here. I followed the tutorial, and this is what came of my creation once i put it back in the game. The one part is moving around and i can see through the sims head. I went back and tried to figure out what i did wrong, and i really don't know what i did wrong. the only thing i did inn milkshape in terms of changing the mesh was using scale tool with a few points to make part of the hair longer.
*edit* i fixed the see-through area... but i tried 8 different times, and that one area is still floating around, and i tried changing a different part of the mesh, and not touching the odd moving part, and that part still floats.... so...please help! |
What are the bone assignments - if you are just using unimesh, making bone assignments to _animation_ bones on the head will cause bad displays like the one you show. Also underweight bones will cause the same problem. Article about that is in the infocenter: Hair: Strange Transparency or Holes http://www.modthesims2.com/article.php?t=131417
|
okay, thank you. i changed all the bone assignments and it works great, just a few touch ups and Davey Havoks hair will be ready to upload, thanks a bunch
|
I have a quetion, I made a hair mesh before, the only problem is I would like to animate it or atleast make it work correctly. It's a long hair and when my sim looks up the hair flies through the chest, which is kind of strange. I know it has something to do with assigning bone vertices. I would be very greatfull if you could help me, or point me to a tutorial that explains the different vertices and how to use them. Thank you
|
Yes, you need to assign your hair vertices to appropriate bone assignments...
http://www.modthesims2.com/showthre...9353#post999353 http://www.modthesims2.com/showthre...219#post1000219 basically, the bones you're interested in are hair, neck, and spine2 |
Quote: Originally posted by tiggerypum
Thank you, you've been such a great help, you rock lol. Seriously though thanks for everything |
Should have asked this before, I have hair falling over the chest, is there away to assign that hair to a certain bone so when they move the hair doesn't fall through the chest. I wish for it to stay on top thanks. If you need pics let me know, thanks again
|
Phoenix please go experiment and check what the joints are that are near the upper body. The 'shoulder' joint is 'spine2', and is located in the center of your sim, and anchoring the hair in the front to it would probably mostly do the trick.
You can also load up a sim body and look at what the bone assignments are on the body around those areas. |
Okay thanks, thats a good idea, I'll look at my body mesh now. Also I tried testing before it kind of ended up funny, I thought maybe the middle joint would be near the chest and then in game when I checked it out the hair flew everywhere lol. Also thanks for your tips before I was able to assign the back of the hair and now it doesnt fly through the front :D
Update: It worked!!!! It worked thanks so much for your help with the bone assignments, I really appreciate it :D. Also thanks to everyone who wrote the body and hair meshing tutorials, you are all so talented and I aspire to one day be as talented as you guys(which is a very long way off lol). Next thing to experiment, animations(now that will be an adventure  |
Hey!
Firstly, thank you for the tutorial! I -almost - got it... except for the part where bodyshop crashed when I tried to open my new mesh...I'm not sure where I went wrong, but I think it has something to do with mixing up the files and maybe putting something in the wrong folder? Please tell me what I'm doing wrong? Thank you! |
Sishiluv, no way to tell you based on your description. Go and find all the files you made for this project and delete them... including the recolor in saved sims and start over.
Also, I noticed you posted a 'thank you' in the Meshtool tutorial. Before attempting the unimesh hair tutorial, I recommend doing the *three* UNIMESH body tutorials. Seems unlikely you managed that. A bit more practice before trying to modify the hair files might be a good idea. |
Thanks, Tig. I tried again (before you replied), and I managed to modify the file without any problems, except a couple of minor glitches. I'll probably just go back and sort them out after doing the other tutorials.
Thanks. |
I always get confused at this part: Export it as a BodyShop project, then import it back into the game with no changes. Close BodyShop, then go to your Saved Sims folder and copy the new .package file into the work folder. Next, create a new mesh .package for the adult version of the mesh, and link it up to the BodyShop .package as explained here : http://www.modthesims2.com/article.php?t=139819
I click on the link but I don't understand! |
vio1ette, have you done the unimesh tutorials for body changes as is stated as the prerequisite for doing this tutorial?
The two differences are dr pixel suggests copying out the file from saved sims to your work folder, changing it, and copying it back (which I don't do for body meshes, I just leave it in the saved sims folder) But he does this to make sure he didn't leave any modified shapes or cres' in the file the other part is that you need to find the correct 3dirs to do that modified shape and cres thing to... which he shows a picture of below, and which is also pictured in the section of that linked article about 'Attaching the Hair to the Recolor File' which is about half-way into the article. |
How Do Link The Files Into The Bodyshop
|
SimKiller do the prerequisite tutorials. Then you would know.
|
Please help, everytime I try to assign this one particular mesh, with the sims 2 unimesh bone tool. I get an error message and then milkshape closes. Is there anyway else I can do assignments without this tool. Thanks
 UPDATE: Problem fixed, I ended up exported the hair mesh as an object file, starting a new milkeshape and opening up the gmdc. I deleted the hair and left the obj, then I just copied and pasted the comments and saved a new fle. Still it was weird how it didnt work with the original file.... |
I want to thank you for making such a great tutorial. This tutorial also answers other questions I have just working on clothing meshes.
|
Having trouble...
My new mesh comes up in the bodyshop very strange looking. Can you please tell what I did wrong?
 |
Wow.
Bone assignments. I don't know what you assigned the hair to, but you need to fix the bone assignments. |
My problem is, that after importing the hair mesh into Milkshape the screen fills up with these huge blue squirling lines and the actual mesh is tiny in the middle of them all. Admittedly I didn't try the exact mesh in the tutorial, I used that one with the spikes. Anyway what are the blue lines?
|
| All times are GMT +1. The time now is 10:29 AM. |
Page 1 of 3
|
Powered by: vBulletin Version 3.0.14 · Copyright ©2000 - 2025, Jelsoft Enterprises Ltd.