Page 1 of 2
|
Page 1 of 2
|
Recolour Templates for COMFORT objects
4 Attachment(s)
IMPORTANT: All new templates for "Comfort" objects should be added to this thread reather than starting a new one. Thanks. RG
-------------------------------------------------------------- Bedding (all beds) and Club Distress Sofa/Loveseat/Chair set I don't know if these will be useful to anyone, but they took me a lot of hit-and-miss to get right, and there's no reason for anyone else to have to go through this process. These are texture templates for the Club Distress sofa, loveseat and chair and for the bedding that goes on all double and single beds. They are guides for texture artists, not furniture for circus-folk. Included in the zips are: The template in PSD format with layers, for anyone with a graphics program that can read them. The template in BMP format for those who don't have a graphics program that can read the PSDs. And a package file where the template is applied to the object so you can see what goes where on the 3D model. If you find any flaws in these templates, please upload a corrected image. PLEASE any other texture creators who have made templates or some sort of guide for themselves on an object, share it so we don't all have to do the same things again. Cheers, RG |
1 Attachment(s)
I know of 2 flaws already in the sofa/loveseat/chair set. These are flaws in the way the 3d object is mapped. There's not a thing that can be done in the template to fix them. They are circled in the image below.
1. On the sofa, left arm when you're facing it, there's a block that comes out of the fabric for the middle seat back. This doesn't happen on the loveseat or chair. 2. On the loveseat and chair, there's a flaw on the small circle that makes up the back of the arm. There's a ring made up of the fabric from the front of the arm. Can't be fixed, either of them. RG |
1 Attachment(s)
The Soma "Sleep Well"
I've just managed my first Sims2 Object recolor, thanks to Pinhead, the creators of SimPE, the plug-in programmers, and everyone else who participated.  In gratitude, I'd like to offer the "template" for that bed.  The "insert" is mirrored from the center once applied to the bed frame. The "insert" is mirrored from the center once applied to the bed frame. THANK YOU!! ~Hairfish |
Colonial Chair Template
2 Attachment(s)
Colonial Chair Template
This isn't as nice as RGiles bed template... but I'm not sure if there's an easy way to do this one. Anyway... here's a go at it. If it's too confusing, let me know and I'll see if I can make it easier... what's difficult really is the pattern runs horizontal for part and vertical for the rest. ~k the zip file contains the .psd with the parts on all different layers for your recoloring convenience. |
Courtly Sleeper Day Dreamer Template Explanation
Courtly Sleeper Day Dreamer Template
Here's the explanation for the 4-poster bed... can be more detailed, but this is a start... enough to get some nice stuff done I bet Deedee 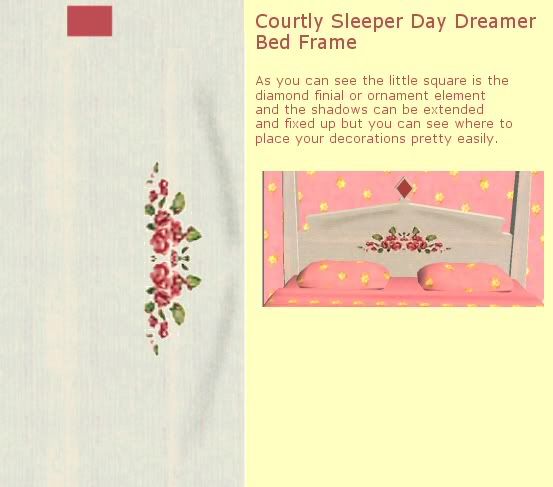 |
Template for the Teaparty in Teak Chair
2 Attachment(s)
Teaparty in teak chair
Just thought I'd post this, it's the template for the Teaparty in teak chair, I wanted to recolour the legs and spindles a different colour to the back rest and seat, the spindles and legs were a pain because they are mapped weird. Here you go hope it helps someone. hippi |
1 Attachment(s)
Colonial Chair Template
I hadn't seen this before making my template. I got slightly different readings for the parts? |
Candy Coated Sofa
2 Attachment(s)
Candy Coated Sofa template
|
Lap Of Luxury Sofa Template
|
2 Attachment(s)
Beddings (all beds) - Alternate version
This is just an altered version of Rgiles bedding template that I created for a friend and figured I would post it here. It's saved as a .psd file so it can be used in PSP and PS. It has a layer that includes the sheetfold, sheets, and pillow shadowing, along with added text and selections saved to the alpha channel that very well might cause you to bang your head against the wall. (and this is the cleaned up version) :smash: But for those that have been asking for the shadows, this might serve that purpose, if nothing else. |
Shading for the Cheap Easy Puffy Recliner
1 Attachment(s)
Hi there, Whie trying to do a recolor for SnowStorms Sectionals, i ran into a shading problem!! I didn't know how to make the shadows that go onto the objects!! :argh: While running through my dilemma in my head, I came up with a solution! Attached you will find a pattern (in psp9 format) for the recliner. The top layer is a burn layer that will burn the shadows into your image! You can lighten it or darken it to get the effect that you want. All you should have to do is re color the bottom layer and voila, you've got your shadows!! (i hope!!) i'm testing out some of them in the game right now and i'll post pics of them as soon as i'm done .... makes a recolor SUPER easy!!!
Hope this can help someone!!! :D  |
2 Attachment(s)
Beddings (all beds) - Alternate version
Hello! Well I see a template or two for bedding, but they don't always do the job for some of us. Anyway I ended up doing this a while ago because I couldn't figure out how to get the picture to show up right on a single and double bedding. So here for all the others out there who have trouble getting the pictures to center for the single bed. Ok one thing that can be changed is On my template there a few layers for the fancy part of the sheet. But if you don't want them it's easy to take them off and then still keep the orginal template. Just delete them then do a copy merge. Once you are done when you close the template don't save any changes and it's back how it was. Then when you are ready to add your picture to the bedding I have a layer just for that. You will see that I have left part of the bedding showing that is because you well need to center you pictuer on both ends of that. As I have done. I also have a layer called blanket foor of bed for those of you who like blankets there. I hope this helps someone else. I know it helps me to have it there all the time and makes it faster to do bedding. |
More bedding design goodies
I have added a very visual bedding design mini-tutorial with many examples to the site, you can find it here: http://www.modthesims2.com/showthread.php?p=711641
|
Majestically Medieval Double Bed Frame
2 Attachment(s)
Just made a quick template for myself for this bed frame and i thought i would share, Uploaded in PSP and JPG format (both in 1 zip) Choose your Poison
|
For an easy way to recolor bedding, Luxiary Chair, and Curtains, there is a program here: http://www.aussietopenders-sims2.com/Programs.htm It's helped me a lot, and saves time!
|
4 Attachment(s)
Bakonmi chair, lounge, and sofa for the Pillows only. You have to make seperate files for the sofa and the chairs, but they take the same images.
~*~ Diamond |
Another bedding template...
2 Attachment(s)
Hi everyone! After trying the many bedding tutorials out there, I was just never able to get it seamed right.. The single bed always had a gap for me, no matter what I tried. I like to know the exact pixel by pixel placement.
So I made up a short and sweet tutorial, along with 2 templates. In the .rar file is: template 1, plain for placement; template 2 has the directions on it. Also, I have the sheets, pillows, and all 4 of the Maxis sheet toppers, ready to go. I'll add those as well. All in white, for ease of recoloring. This is not an explanation on how to recolor, but how to get a 99.9% seamless bedding. (I'm convinced 100% perfect isn't possible.. I think 1 pixel gets shared in an odd way. Even Maxis single beds have a small center seam near the top. Believe me, I tried!) This is also not for centered designs, more for all over. I haven't figured the centered thing out, yet. But this will look good on single, and double beds, when done right! If you can, keep the pictures in GIF format, so you don't lose any clarity. Then open them in your art program to begin. Directions.. 1. 1. Place your design over sections A, B, and C. Cover all the yellow lines with your design. (512x512) If you are using a wallpaper, (256x512) simply paste it twice to fit. 2. Now add your matching top sheet section. Line it up to the top of your design, and on the left of your design. Don’t worry if it’s a bit short on section D, we’ll cover that in the next step. (Delete any black area in the topper from me first, then paste as a new layer. Then flatten.) 3. Pick up the image in section B, up to and including, the white guide lines separating B from A & C, (185x512). Copy that and paste into section D, placing on the right of the yellow line in C, up to the small white line between D and F. Don’t worry that it covers part of section E. 4. Next, add your recolored sheets to section F. 5. Add pillows to section E, covering each exactly. E should overlap D, if you line it up with the top right of E. (Make sure you deleted the black square from pillow image I sent you before you add to the image. Paste the pillows in as a new layer, then flatten once in position.) 6. Personally, I always color all the white section and the black on the pillows a complimentary color now, in case, but not necessary.. 7. Now, starting from the bottom left, copy a section that should be 1024x512. Paste that onto your template you extracted from simPe, or wizards of simPe. 8. That’s it! Import that into SimPe, or wizards of simPe, save, and enjoy your hard work! TIP* the black on the pillows is to allow you to add edging to a pillowcase. The top pillow will be on the left, so place your decorative edge on the left side of that pillow, after where the black was. (9 pixels in). The lower pillow is the right pillow, so place edging to the right. Place all edging up to where I had the black sections, that you colored. (Recommend a width of at least 35 -40 pixels,) Also, if you want a more decorative edge on your topper, (step 2), add it BEFORE step 3, so all lines up in the end. Have fun!! Sorry... I don't have it in zip format, I lack that program..  DO NOT use the preview template, please get the .rar... The size and clarity is wrong for the preview shot, due to image size restrictions here on MTS2. |
2 Attachment(s)
I'm adding templates for the Hellacious Headboard Double bed from the Bon Voyage expansion pack as well as the the single version the Ergonomizer. They're in psd format and each one has three layers. One original, one with the headboard bit cut out (I also saved the selection itself), and one with a texture I used to recolor it as an example, but feel free to use it yourself should you so desire. It should all be fairly self explanatory, but if anyone has a question about it feel free to PM me.
|
Layered .psd for "Molded Sectional" sofa [NL]
2 Attachment(s)
Layered psd attached -- I haven't figured it out completely as I've only recoloured the seat and the legs (leaving the white frame untouched), but perhaps this is useful anyway. Layers are
- Shadow for seat - Hue+Saturation for the shadow (so that it doesn't kill the colour) - Framework (the white part, including legs, with cutouts for the seat) - Seat I've already retouched the shadow a little (added noise and stuff), so basically all you ned to do in order to give the seat a different color is bucketfill the background layer. |
Bedding Shadow Transparency Template
1 Attachment(s)
I created multiple layers of shadows for maxis bedding with transparency for easy recolouring. I just thought this might help out others so i decided to upload them.  Here are some screenshots >   These are psd files, i'm not sure how they'll run on alternatives like gimp. I based these on Rgiles' bedding template which layers i've merged. All you have to do is insert your own layers of bedding underneath the shadows. In order to cut them into shape just use magic wand selection or rectangular marquee. To edit the shadows just fiddle with the opacity and sharpen them using brightness/contrast tool. If you have any image editing questions feel free to post in the Object Creation & Texturing forum or pm. |
Bedding Shadow Template
I love this template - it makes my bedding so easy to recolor. Thanks again for this great template.
Carol |
Thank you all so much for your great templates
It makes all the difference |
You people were promoted to my gods saviors *0*
Thanks for these. |
cokeandvodka, thank you so much! My beddings looked so unrealistic, but now they look great!
|
Um.. yeah shut up, i know im a noob
So... I designed my whole bed and everything... WHERE DO I SAVE IT TO?????
 BTW I :lovestruc it BTW I :lovestruc it |
| All times are GMT +1. The time now is 5:07 AM. |
Page 1 of 2
|
Powered by: vBulletin Version 3.0.14 · Copyright ©2000 - 2025, Jelsoft Enterprises Ltd.