 Tutorial: Building a Simple Suspension Bridge
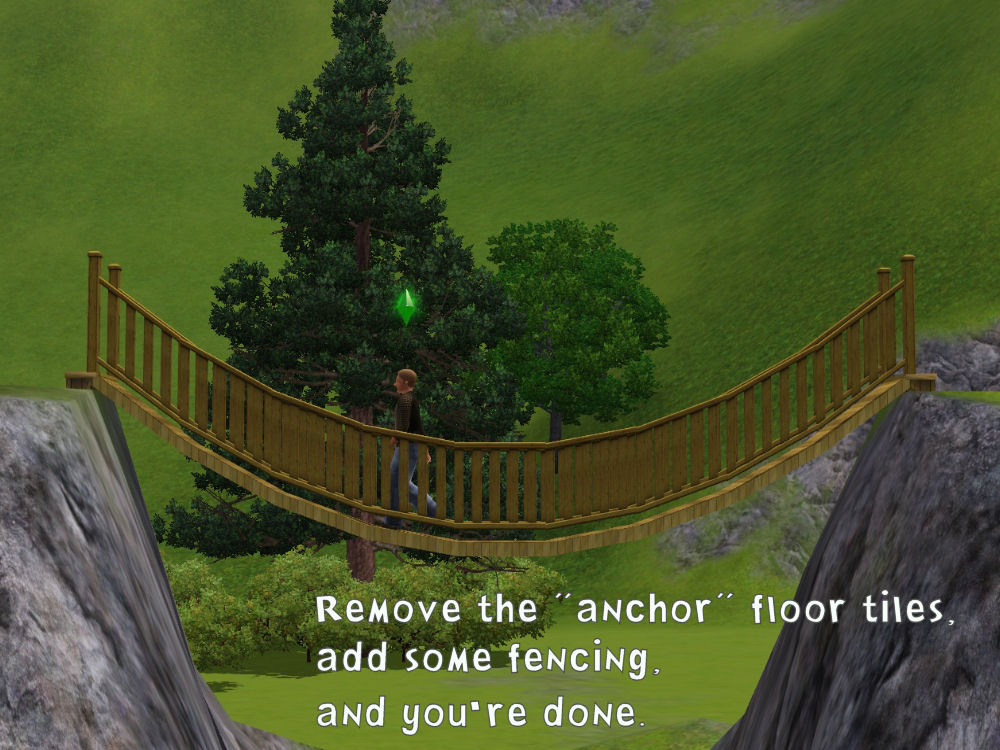
This is a simple suspension bridge, which for our purposes is nothing more than an upside-down arched bridge.
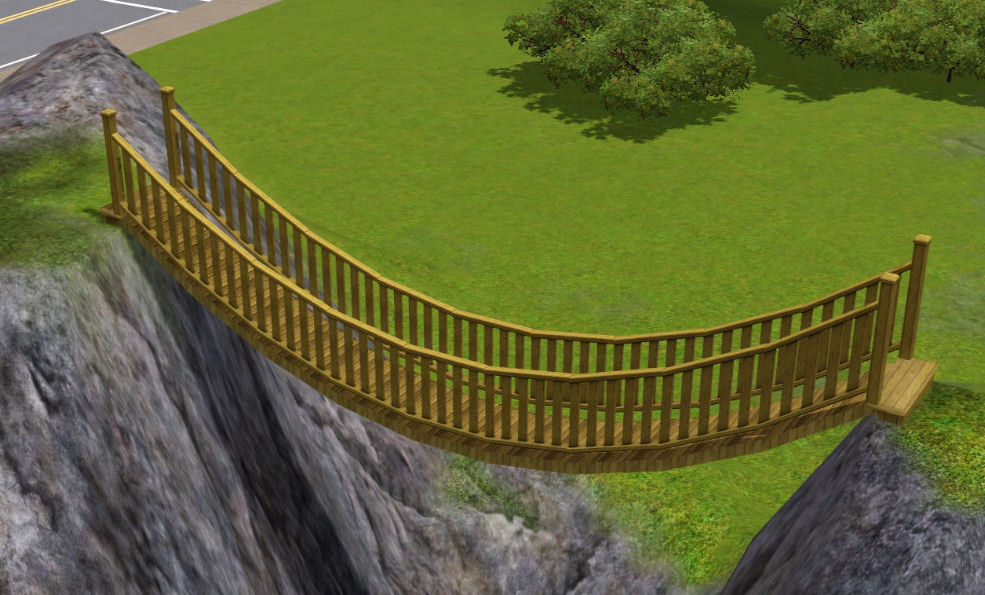 Objective:
 To make a suspension bridge using CFE.
Impulse: @MaddyO84 asked me how to make
this bridge.
Level of Difficulty: Intermediate
I have found a way to make an arched bridge using CFE and stairs. I think it’s the simplest way to make arched bridges (and walls),
because by placing stairs+alt, you can dictate almost
exactly the angle of your slope.
Stuff to consider BEFORE you start your bridge:
1. It’s a good idea to settle the elevation of your terrain before starting the bridge.
Certainly, you will need to settle the elevation of the two tiles where the bridge will begin and end.
2. If you’re making a symmetrical bridge (both ends at equal elevations), it will be more attractive if its length
is equal to an ODD number of tiles (5, 7, 9, etc).
3. Your bridge will look better if it at least 5 tiles long.
4. Remember that you MUST place flooring on the underside of your bridge BEFORE using CFE.
I repeat – the game will NOT let you place flooring or ceiling tiles on un-level tiles.
There are times when my game hasn’t allowed me to place anything on even the
level tiles that have already been CFEd.
But certainly - never, NEVER has it allowed me to place tiles on an
un -level surface that’s been CFEd.
5. While we’re considering floors and ceilings. I will suggest that it’s also safer to CASt those floor/ceiling tiles before CFE.
Theoretically, you can re-CASt a CFEd floor/ceiling, IF it’s touching a level floor of the same texture (in the same room).
Thankfully, this bridge’s center tile
is level. So, using the shift key, you can re-CASt its
top and underside – but I’ve come to not trust the game to let me do what I want.
So be warned – It’s safer to place flooring and to CASt it before you CFE.
Let’s prepare the work area for CFE.
1. Place flooring tiles to mark the two spots where you want your bridge to begin and end.
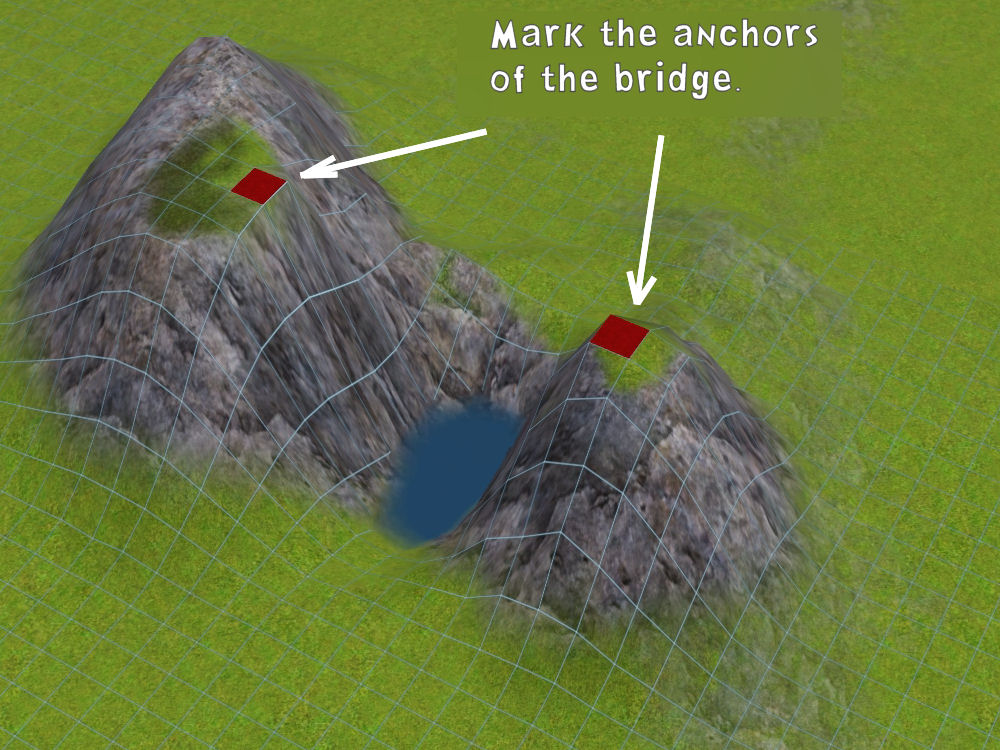
This will anchor the terrain. And it will mark the position of your bridge for you.
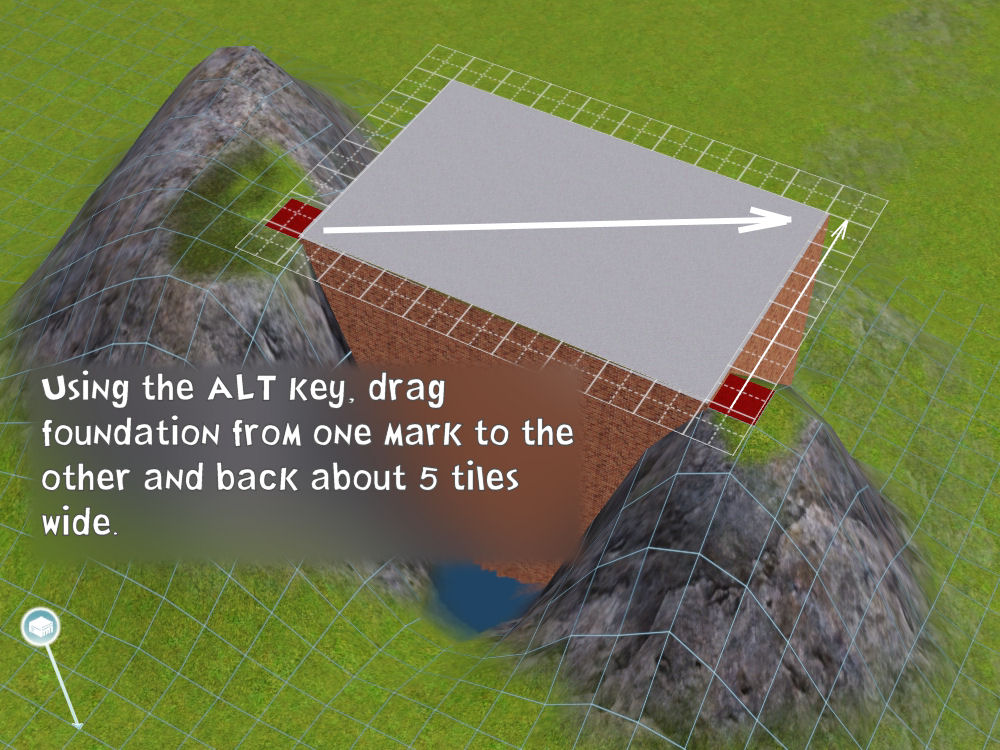
2. Starting at one of the anchor tiles, drag your Foundation Tool + ALT, to the other anchor tile, and backwards a depth of about 5 or 6 tiles.
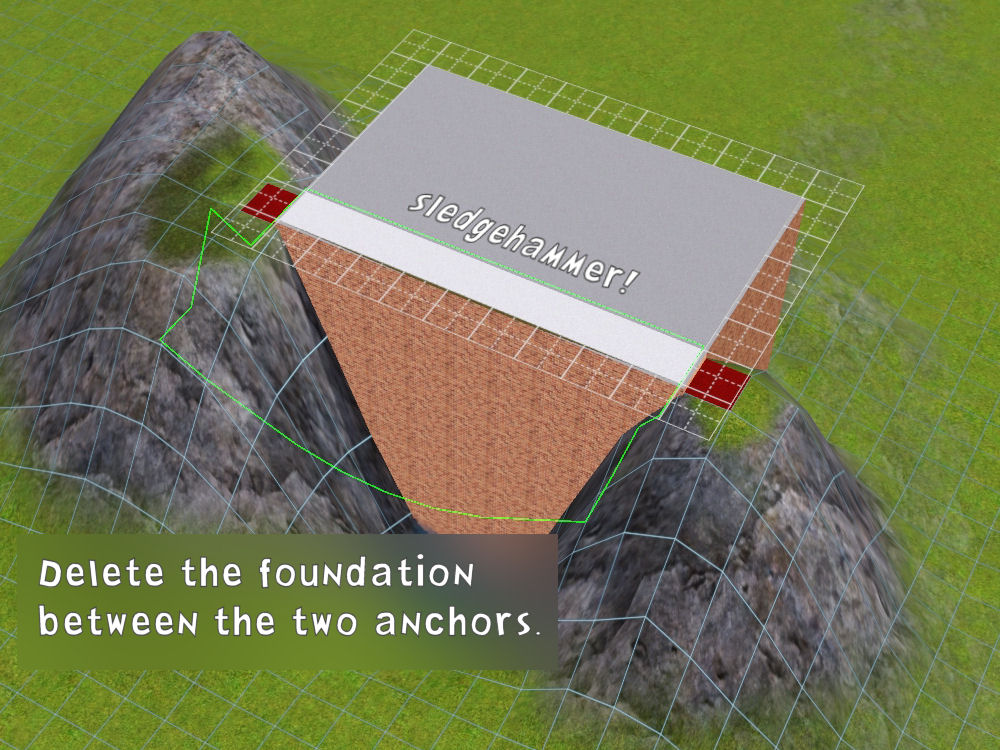
3. Use your Sledgehammer to remove only the length of foundation between the two marked floor tiles.
4a. Place floor tiles the length between the two tiles at each end of your bridge.
(Try to plan ahead so you can use the floor tiling you’ll want for your finished bridge.)
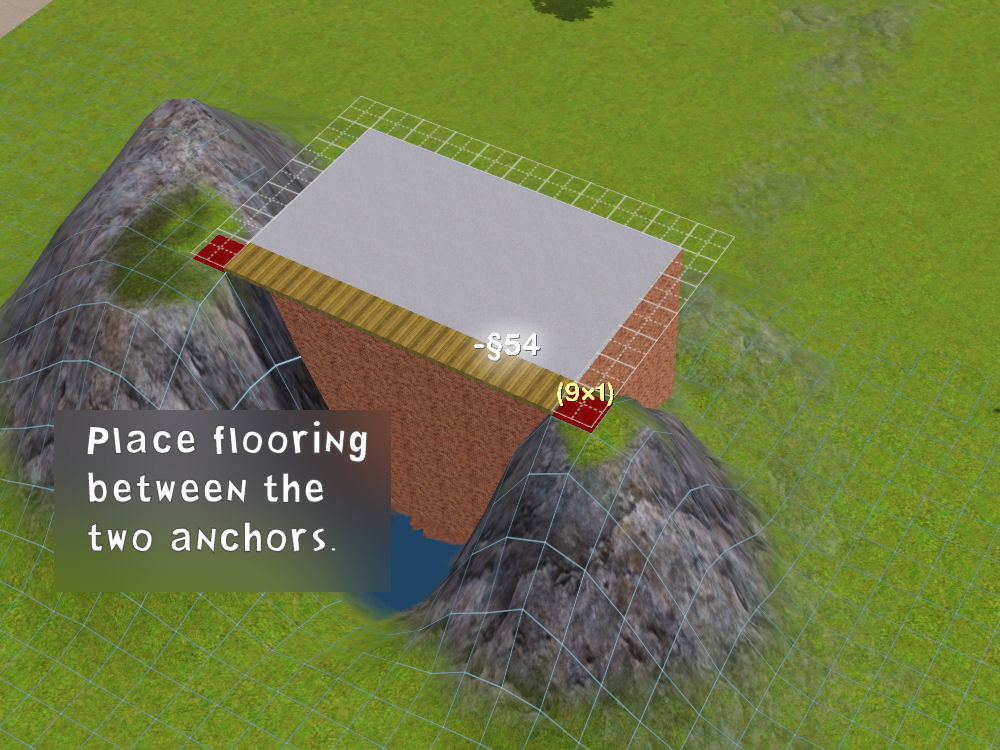
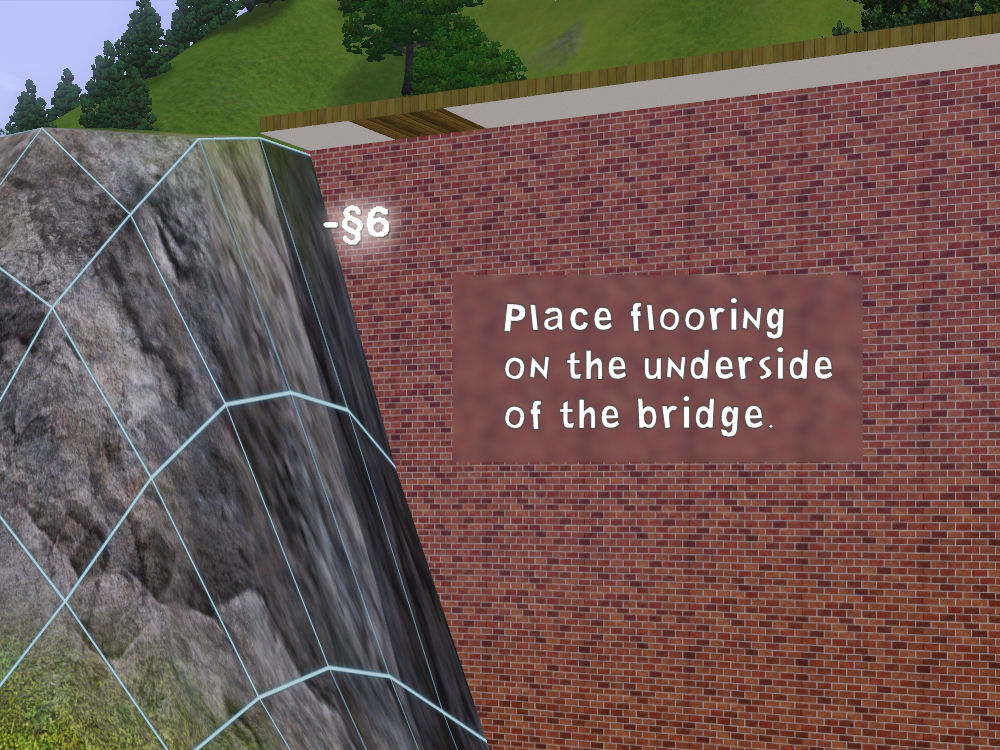
4b. Place floor tiles on the underside of your bridge. If you place one using your shift key, the entire underside will be covered.
This is the time to make changes to your top and underside if you want them. Also, you might as well cast the sides of the bridge floor while you’re at it.
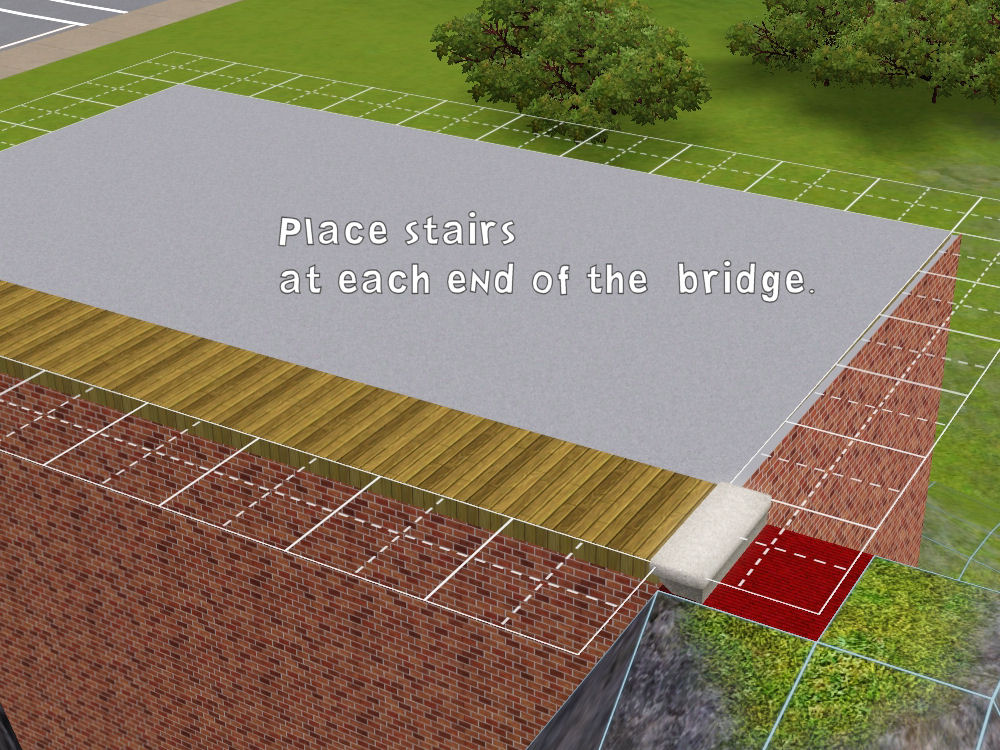
5. Place stairs/steps at each end of the bridge now, before you CFE.
6. Starting back at the one marking/anchor tile, place your Foundation tool on this side of the flooring you just placed,
and drag the Foundation back across to the other side,
taking care to not cover this new floor.
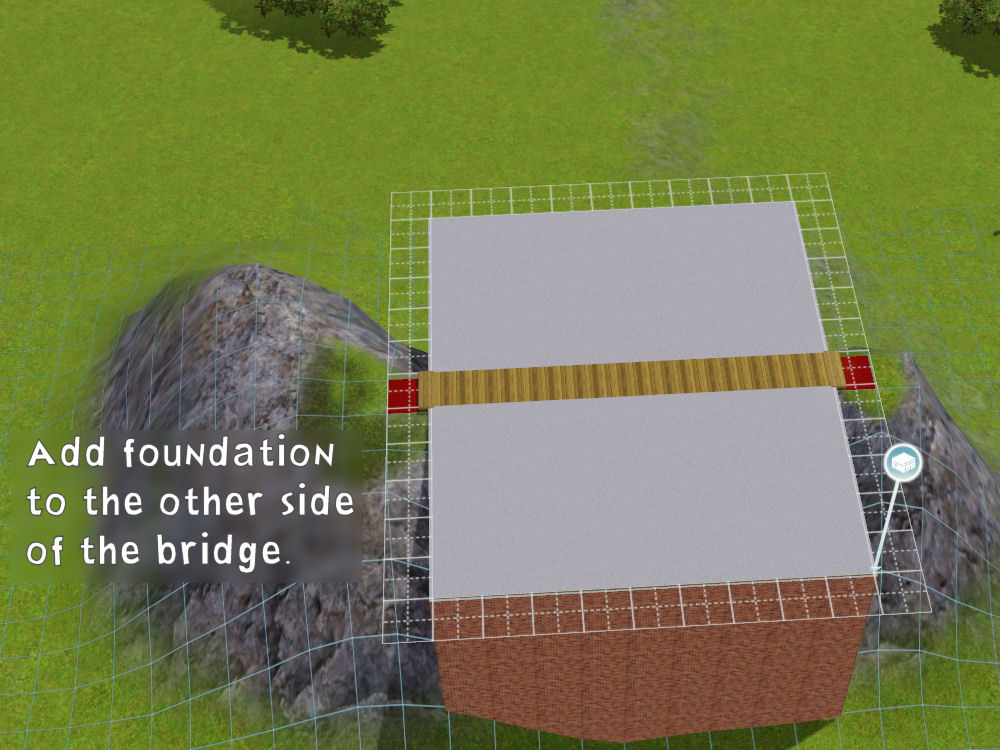
This probably seems like a large surface for such a skinny bridge, but if you’re not used to working with CFE,
this will allow you room to maneuver when placing the steps…especially that last single step,
and that last single level that’s only supposed be one tile wide. So if you’ve never done this before, I encourage you to use this larger work surface.
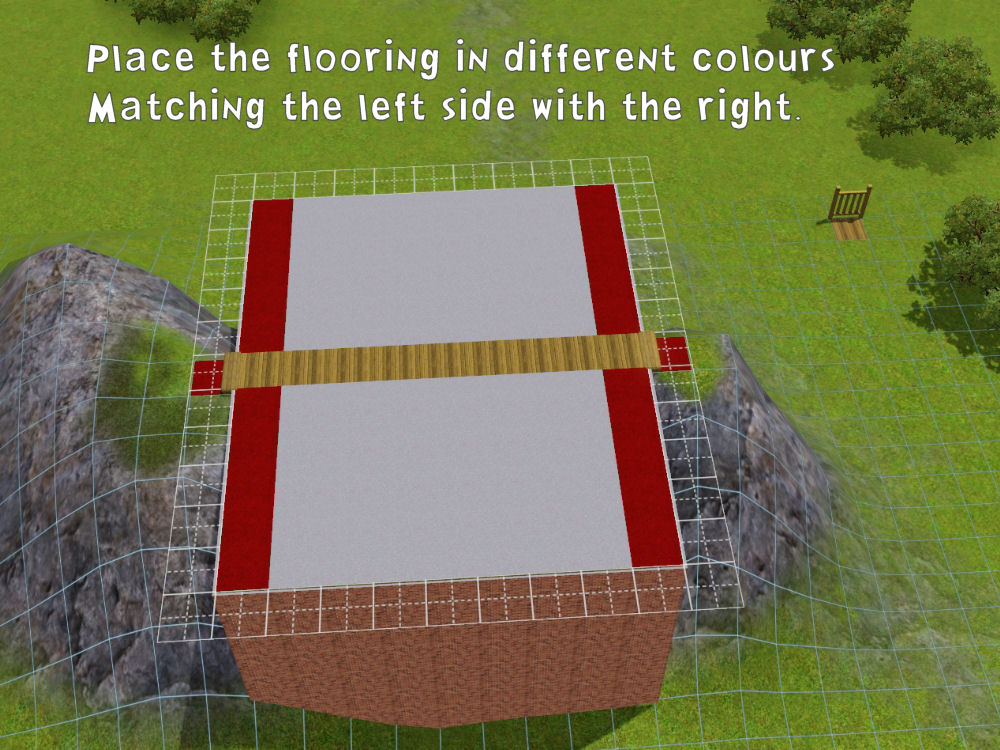
7. Place matching strips of coloured flooring along the two far ends of the foundation (perpendicular to the bridge),
taking care NOT to change the bridge floor itself.
Continue placing strips of coloured flooring across the entire foundation, making sure to match the floor tiles
on each side of the foundation that are the same distance from the center of your bridge.
Yikes. It might be easier to look at the screenshot for this. In fact, it might be easier just to copy the screenshot.

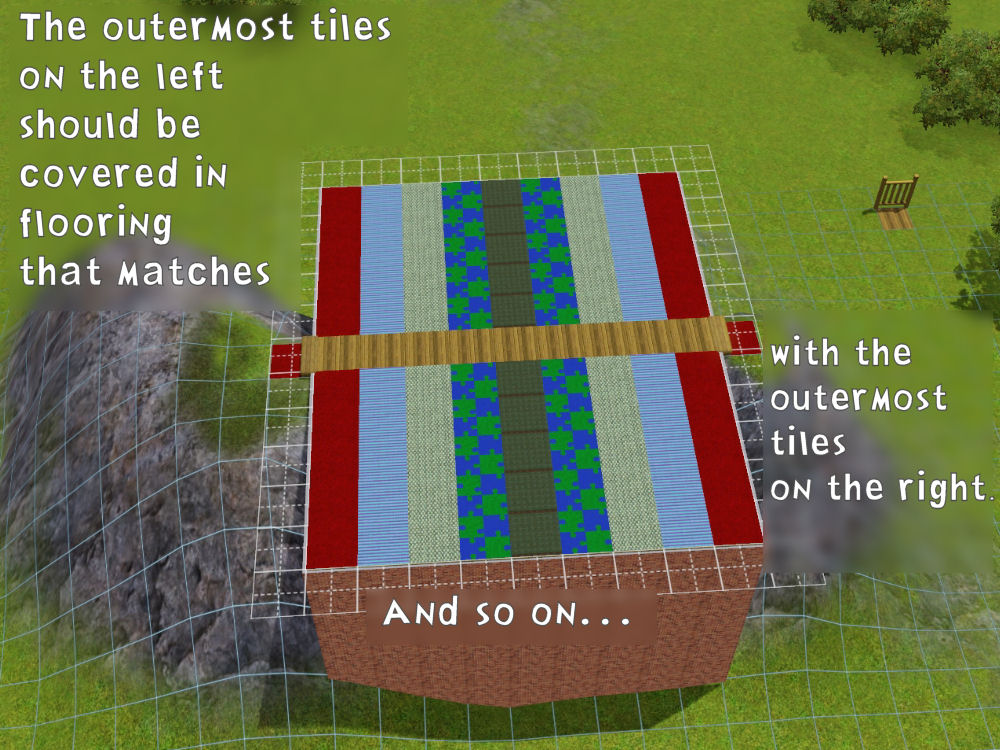
These strips of different-coloured flooring will help you keep track of the different levels when you start using the CFE tool.

ETA: Porkypine has informed me, via PM, that some builders have problems getting the fence on their bridge after CFE. So
I will suggest that you not only place flooring and CASt before CFE, but that you also add fencing!
 Okie Doke. It’s time to start with the CFE
First a refresher in using stairs and CFE:
a. When using CFE, one stair is always equal to 4 steps.
b. 4 stairs is equal to one wall’s height. This means one wall, one story is equal to 16 steps.
c. To get a step, instead of a stair, press the ALT key while placing the stair.
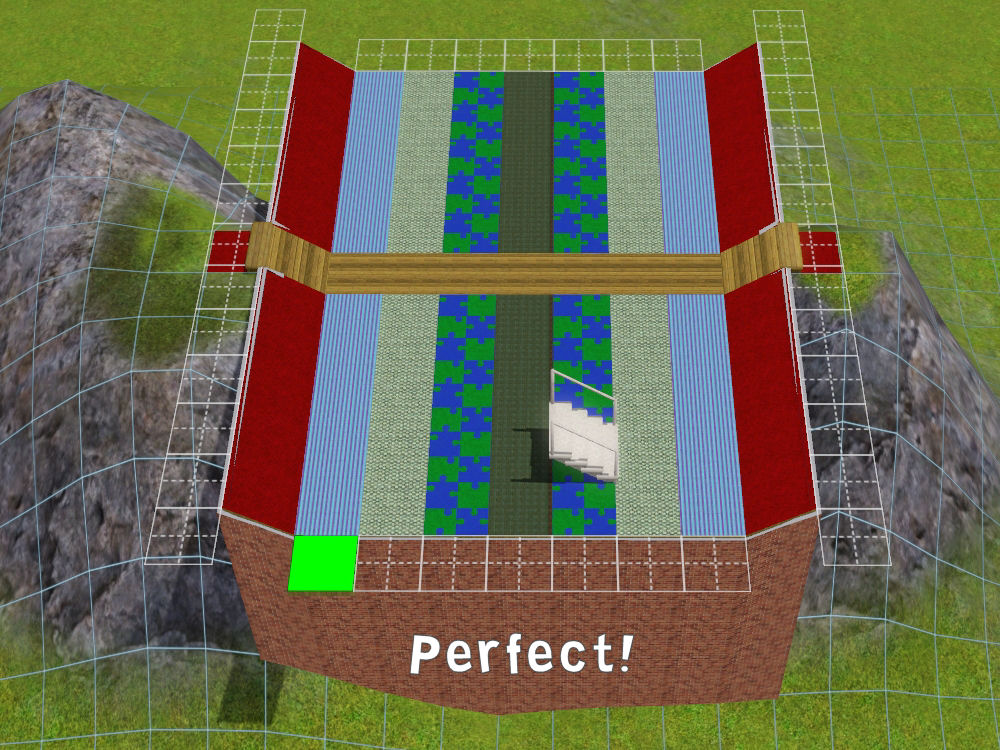
The following instructions are for the bridge in the first picture, which is 9 tiles across. So I’m making the outermost level change equal to 4 steps.
1. Type in
ctrl+shift+C to get that little command window across the top of your monitor.
Then type in
constrainfloorelevation false.
2. This first level change will be equal to 4 steps. Place a stair on the foundation.
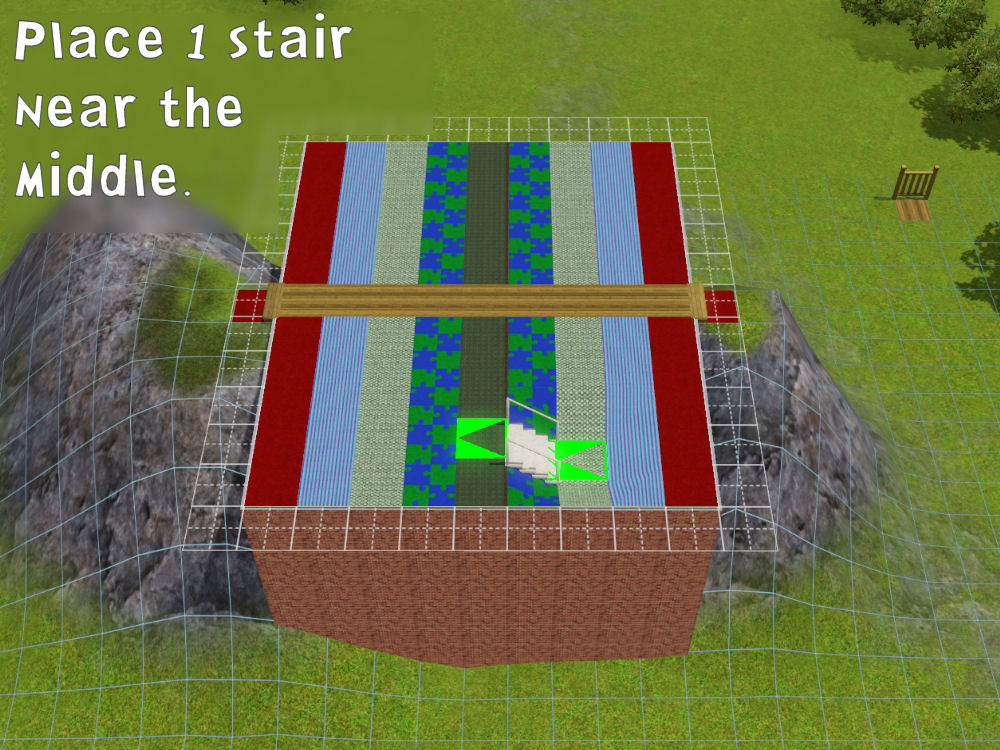
It’s a good idea to do it on the edge closest to you…away from the actual bridge floor.
That way if you can’t get the stairs/steps to go where you want them, they won’t mess up your earlier work.
3. Using your Level Terrain tool, level everything
between those outermost, matching strips (the red strips in my screenshot).
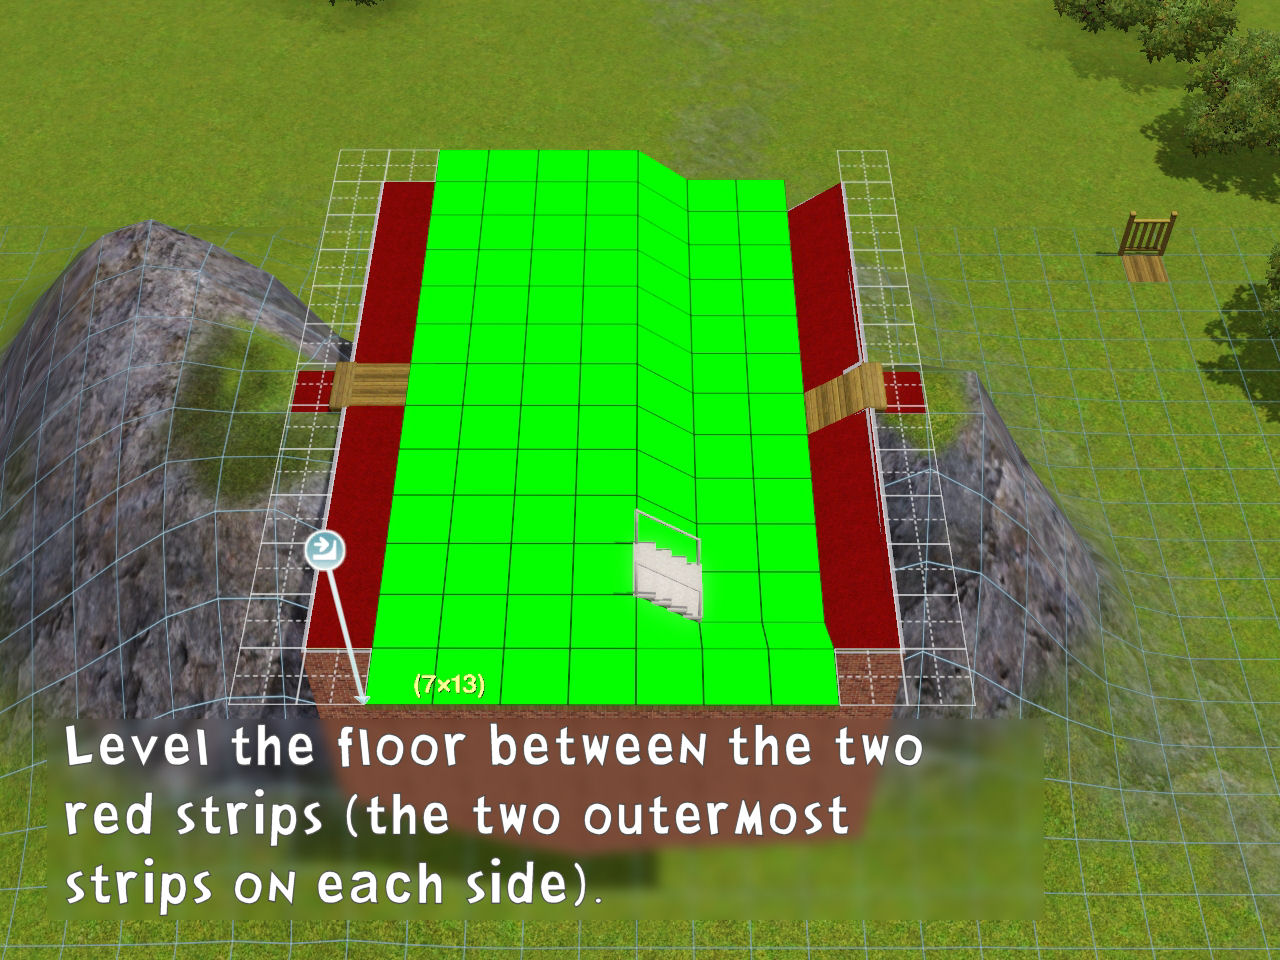
4. Remove the stairs.
5. This second level change will be equal to 3 steps. You’ll need to use the ALT key while you place the stairs, so that you get a step this time.
Depending on your skill, you can probably do all three steps at once. But otherwise, do this one step at a time – three times.
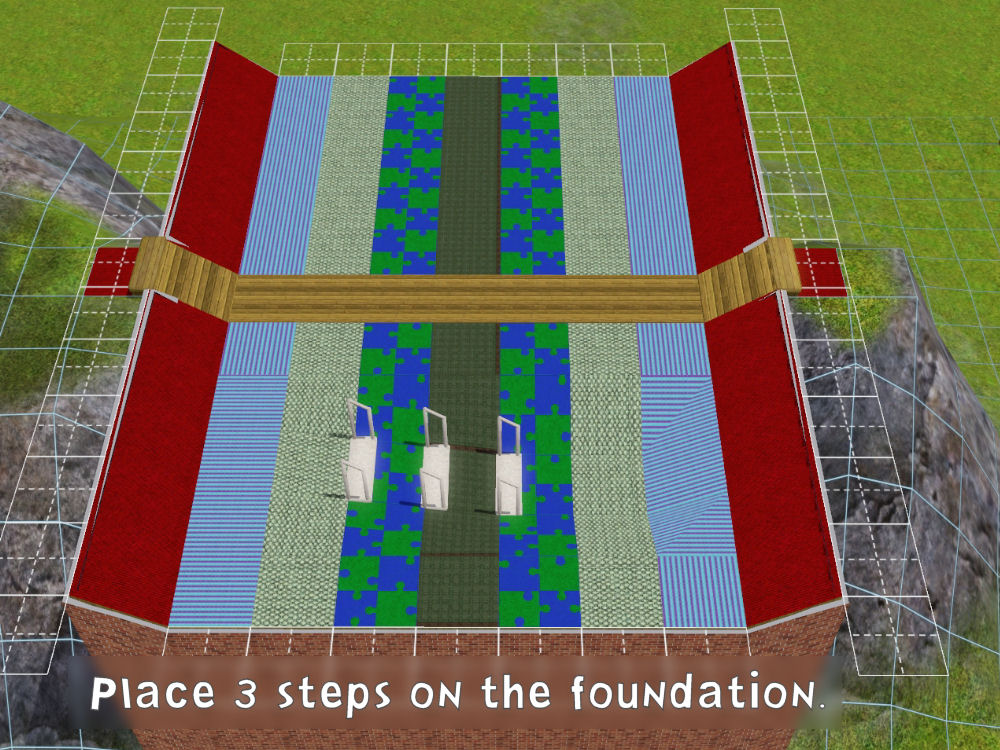
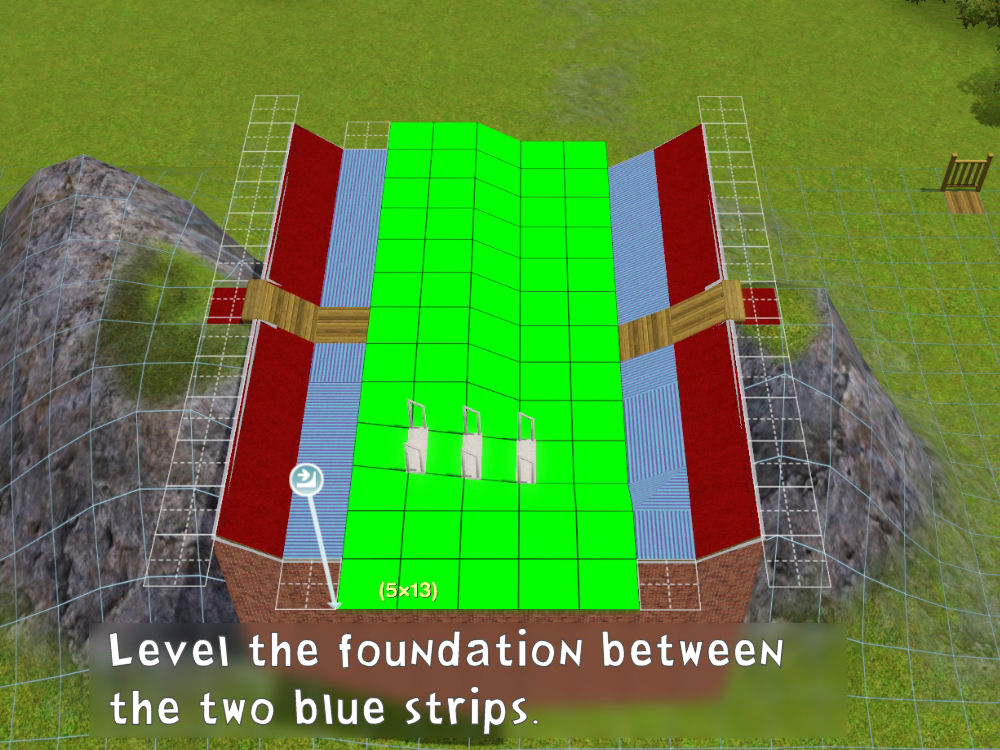
Each time, level the foundation between the second set of coloured strips. (One tile in from the first time. They are blue in the screenshot.)
Take care to level only
between the blue strips.
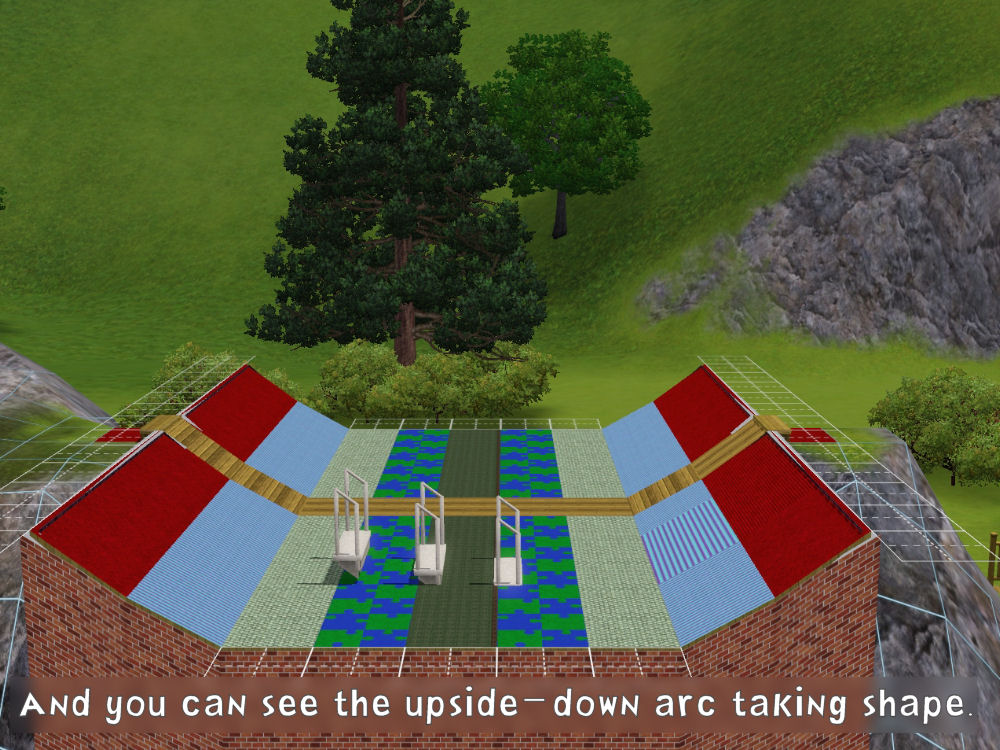
6. This third level will be equal to 2 steps. Do as you did for the last level, except this time only level between the third set of coloured strips.
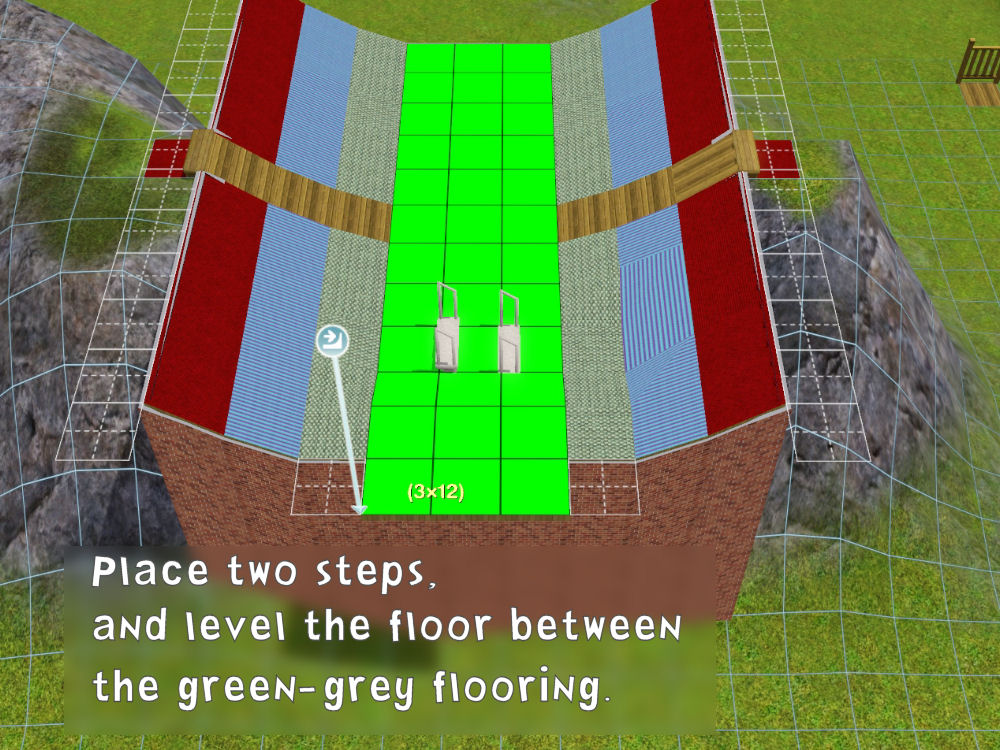
7. This final level will be equal to only one step. Take great care to avoid the other levels when you bring your leveling tool
near the flooring of the actual bridge part.
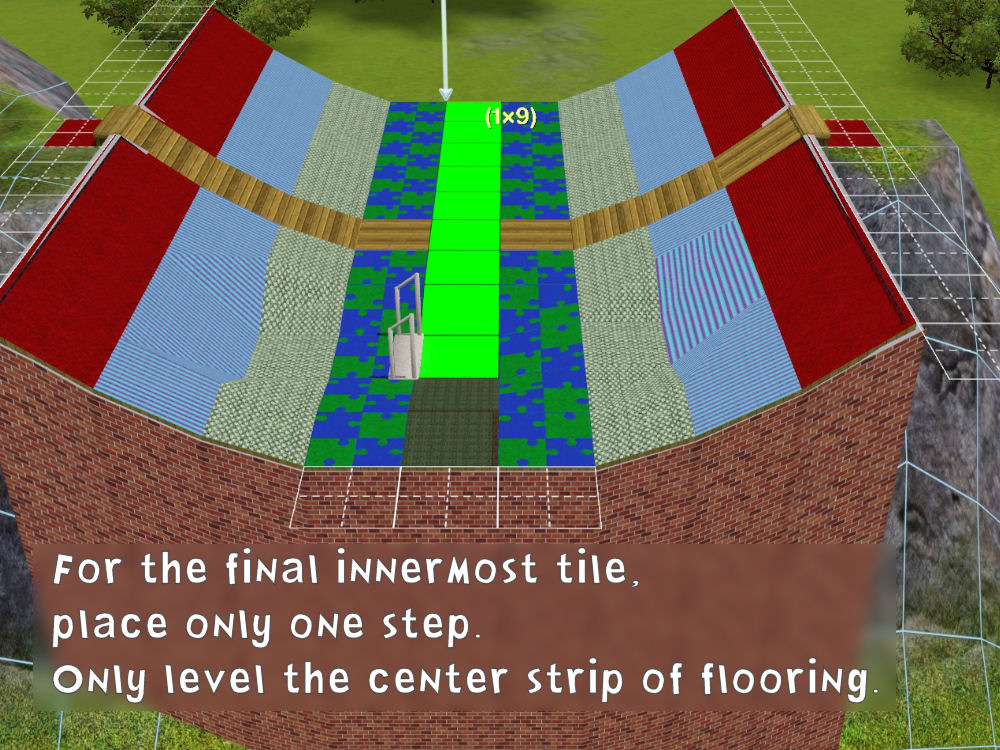
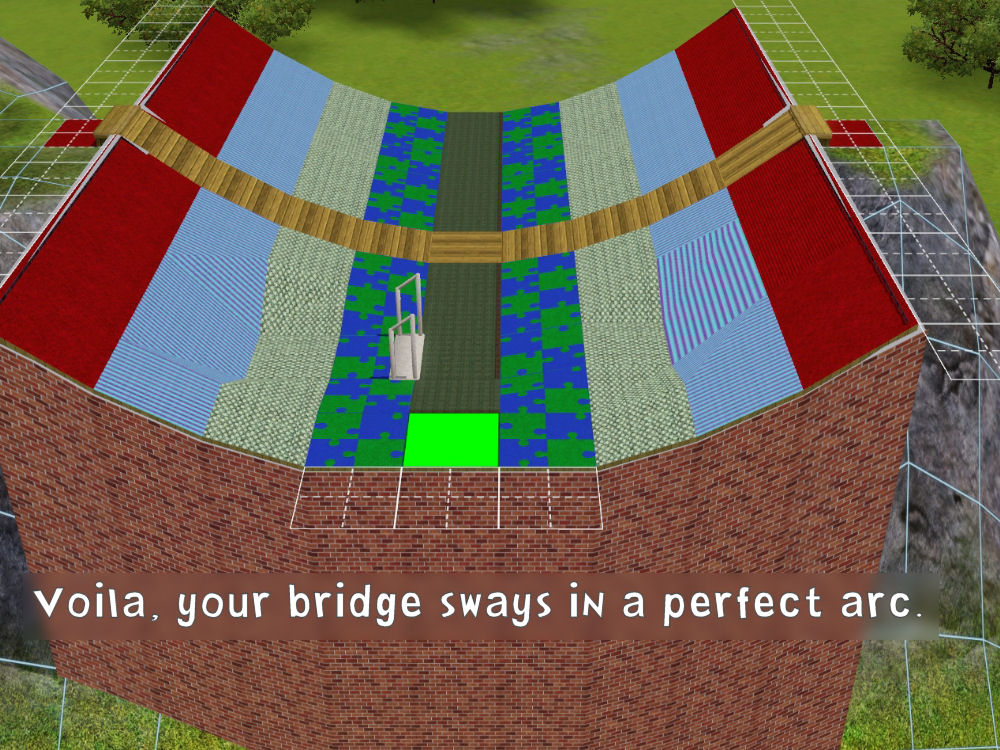
Tip: Because you have this large surface of foundation, you can level out in the area of your step,
without accidently touching the tiles of your bridge floor.
And THEN, you can drag the leveling tool straight down the center of the foundation,
along the single strip of coloured floor tile for this level.
8. Now (before you even think about deleting the foundation), type in
constrainfloorelevation true.
9. Using your sledgehammer, you can wipe out the entire foundation in one fell swoop.
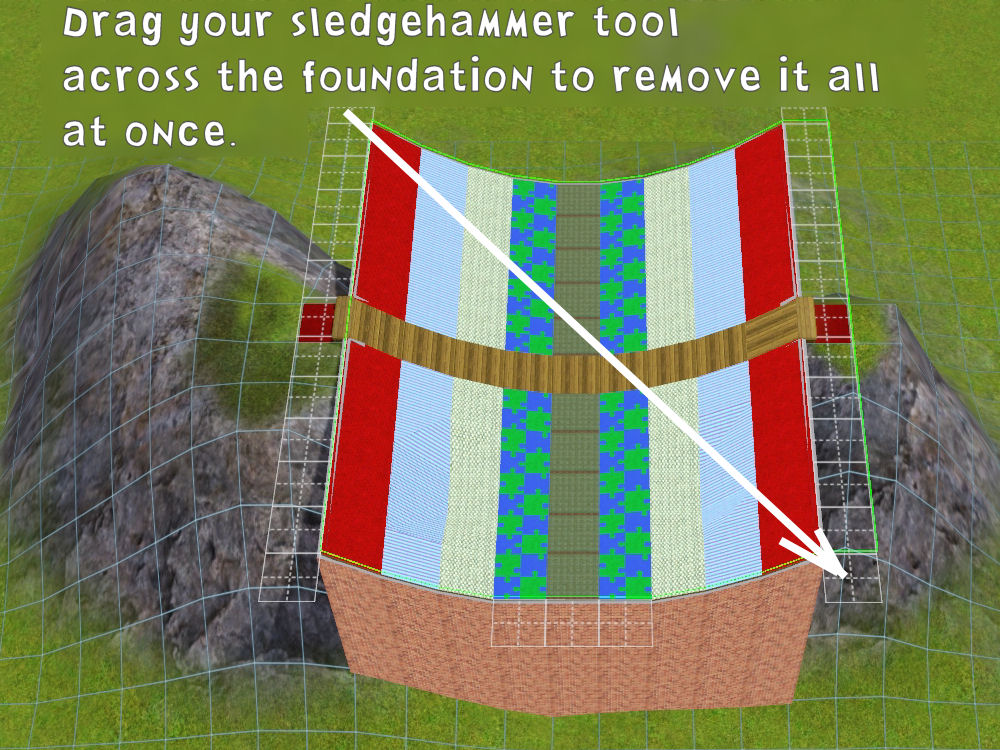

And that’s it. If you haven’t done it already, CASt your steps on each side of the bridge. Delete the anchor tiles.
Add a fence, CASt the
side of the bridge’s flooring, and voila, you’ve got a simple suspension bridge.
Using stairs in CFE works very well for undulating walls and arched bridges, as well.
I prefer dropping steps onto temporary rooms and foundations to using the Raise/Lower Terrain tools. It's less hit & miss.
I believe you get
soooo much more control over your level changes this way!
 More Stuff to Consider When Making an Arc.
To give the appearance of a natural drape or arch, there’s a sort of formula you should keep in mind.
Think of these numbers as the DIFFERENCE in height between two levels.
* You will always want your innermost tile (the center of your bridge) to be 1 step different than the next level,
in other words, one step higher in an arch, or one step lower in a suspension (draping) bridge.
* If your bridge is 5 or 7 tiles long, you will want your outermost tile to be 3 steps different than the next level,
in other words, three steps lower in an arch, or three steps higher in a suspension bridge.
If your bridge is 9 or 11 tiles long, you might want the outermost tile to be 4 steps (one stair) different than the next level.
The 4 steps makes for a graceful arch,
but there will be some slight clipping for your sim at the two ends of the bridge.
With a fence running the edges of the bridge, you’re not likely to see clipping, though.
*-*-*
Here are two examples of suspension bridges. The light, magical one is built by @Crowkeeper, and the dark woodsy one is mine.
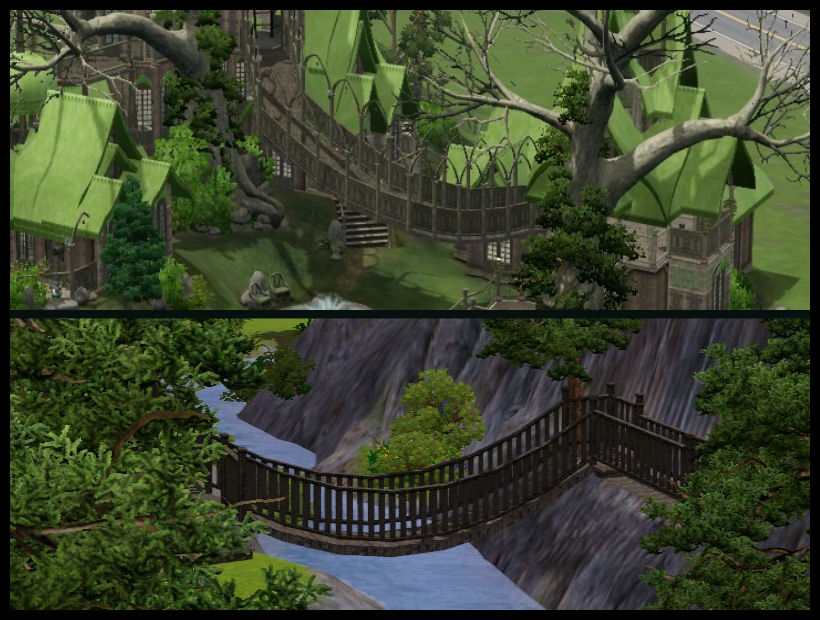
You'll find more images of Crowkeeper's beautiful treehouse
here.
#cfe, #constrainfloorelevation, #arched bridge, #suspension bridge, #tutorial, #tsyokawe
 3rd Apr 2015 at 6:32 PM
Last edited by tsyokawe : 8th Apr 2015 at 1:41 AM.
Reason: Added to Category
 4th Apr 2015 at 12:01 PM
 7th Apr 2015 at 3:49 PM
 8th Apr 2015 at 3:42 AM
 8th Apr 2015 at 8:22 AM
 8th Apr 2015 at 9:11 PM

 Sign in to Mod The Sims


 ETA: Porkypine has informed me, via PM, that some builders have problems getting the fence on their bridge after CFE. So


