Contrary to reports, MTS is NOT compromised, and it IS safe to download from here. For more information, see this thread.
Quick Reply
Search this Thread
Lab Assistant
Original Poster
#1 Old 31st Jul 2008 at 3:41 AM Last edited by Charisa1114 : 26th Oct 2008 at 7:43 PM.
Default Updated Tutorial for making new flooring & walls with SimPE
This tutorial is for anyone wishing to edit a Maxis wall or floor or for anyone who cannot use HomeCrafter. It can also be used as a reference for anyone who wishes to edit bump maps. ***Any floor or wall made this way will not show up in HomeCrafter!!! They will still work in game though. If you wish to make a floor or wall that is HomeCrafter friendly, follow the second part of this tutorial. I recomend using Part 2 of the tutorial if you have Homecrafter available, so that way if someone downloads your floor or wall it will show up in their Homecrafter.***

I have never done a tutorial before, so bare with me. This is a work in progress. If you find anything incorrect, please notify me and I will fix it. For the purposes of this tutorial we will be taking a Maxis carpet and changing the shade. A special thank you to Pixelhate, Inge Jones, and Jasana_BugBreeder for their input!!!

What you will need: SimPE & A texture editing program like Photoshop. If you don't have Photoshop I recommend you try Gimp, it is free. You will also need to make sure you have the NVidia DDS utilities plug in for Sim PE installed. You can start this process by doing the following if you have not already done so: "To set preferences and to download and install NVIDIA DDS Tools open Preferences > System Folders under Extras in the main menu."

Part 1
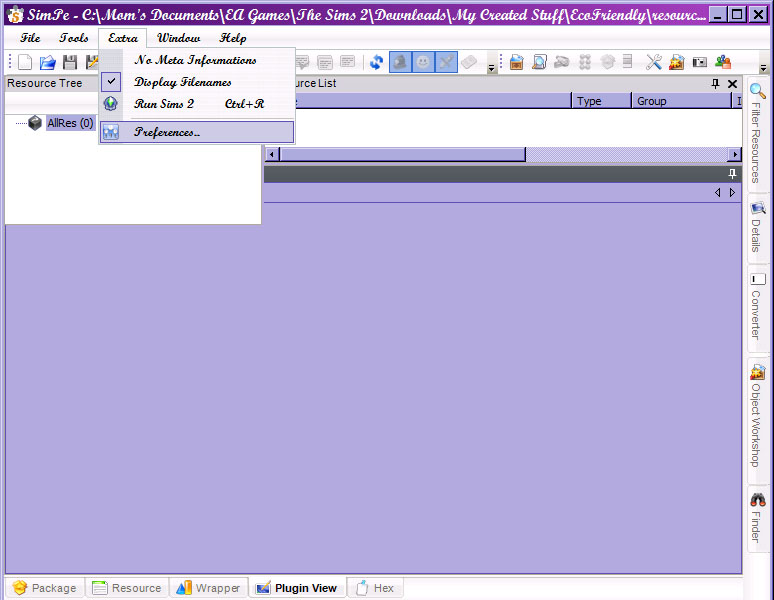
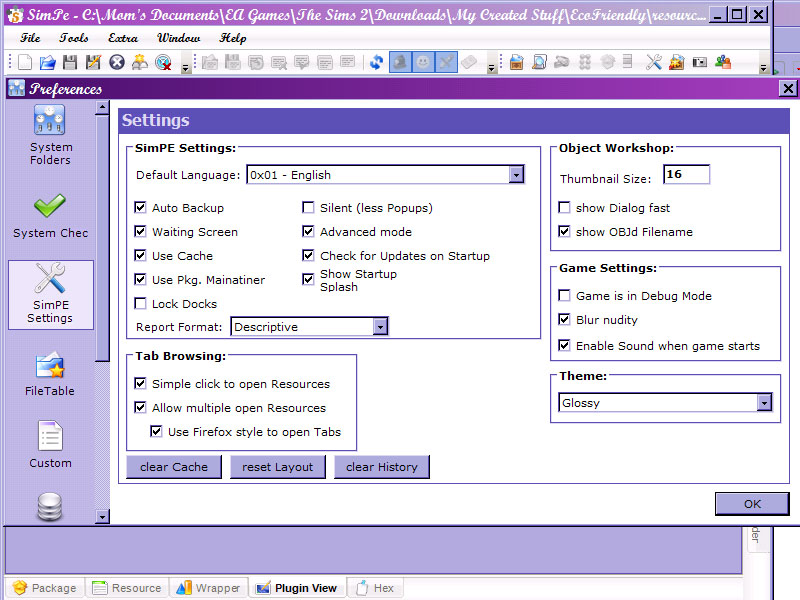
1. First open SimPE. Click on Extra and then Preferences. Click on the SimPE Settings tab on the side. Make sure that advanced mode is checked and click ok. You may need to restart SimPE at this point to insure that the changes take effect if it was not already checked.


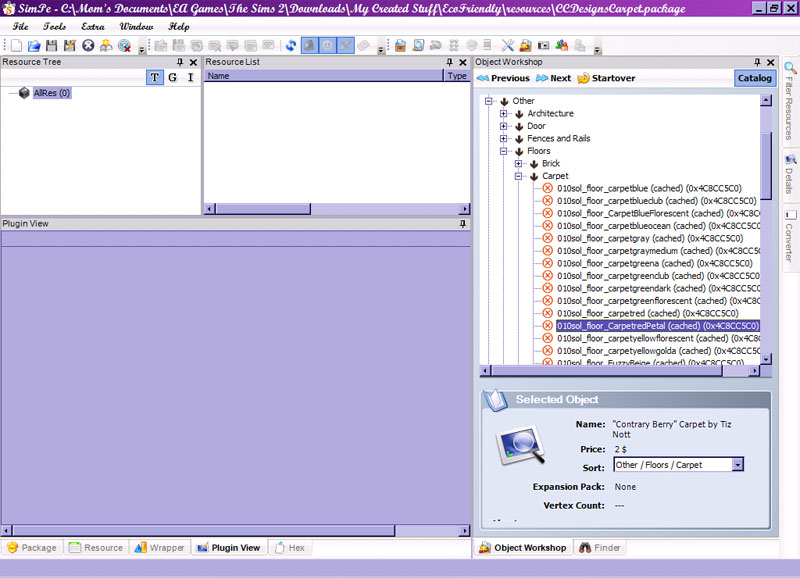
2. Open the object workshop and click start. Depending on the speed of your computer, it may take a while to load. Click on the + beside Other, then Floors, then Carpet. Scroll down until you find the “Contrary Berry” Carpet by Tiz Nott. The file name in the listing will be 010sol_floor_CarpetredPetal. Once highlighted, click Next.


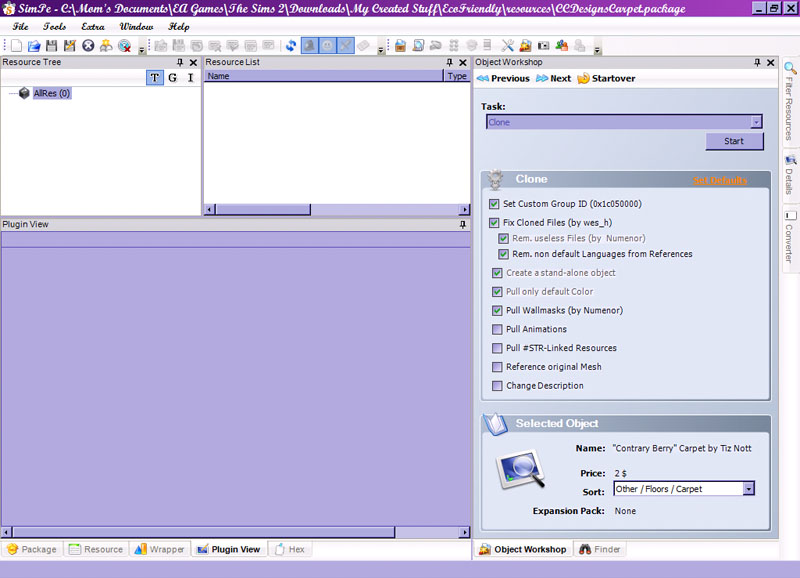
3. There will be no recolor option on the drop down menu, only clone. Make sure the top seven boxes and the last box, Change Description, that you can change are checked and click next. Some of them cannot be changed. If they cannot be changed don't worry about it, your floor will still work.


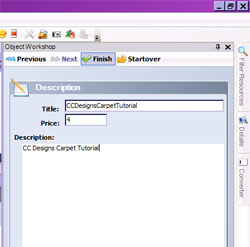
4. In the next screen, change the description, price, and name and the click finish.


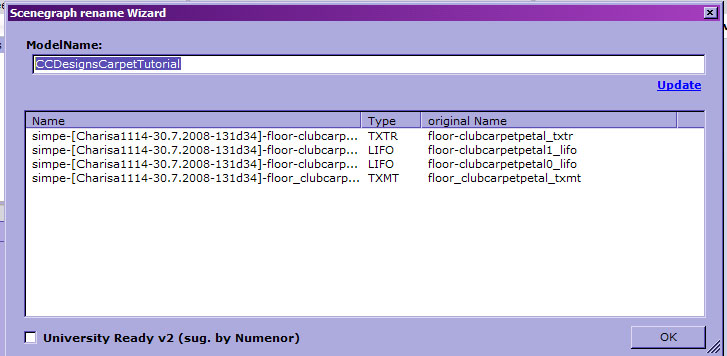
5. When the Scenegraph remane wizard pops up, type in a new Model Name, then click update and then OK.


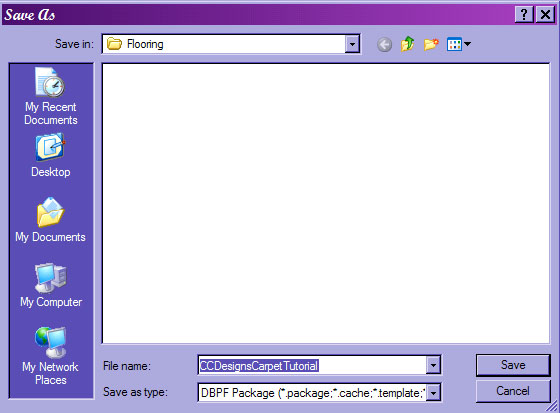
6. Next the save file screen will pop up. Type in a name for your package file and save it to whichever folder you choose. You may want to save it to a temporary folder on your desktop, or you can save it directly to your Sims 2 downloads folder. If you use a temporary desktop folder, remember to move it to your downloads folder once you are finished with the tutorial so it will show up in your game. I personally use C:\user name's documents\EA Games\The Sims 2\Downloads\My Created Stuff\Flooring. Usually you can have as many subfolders under your downloads folder that you want. This helps me to keep my custom content that I create separated from my downloaded stuff. For the purpose of this tutorial I have named my file CCDesignsCarpetTutorial.


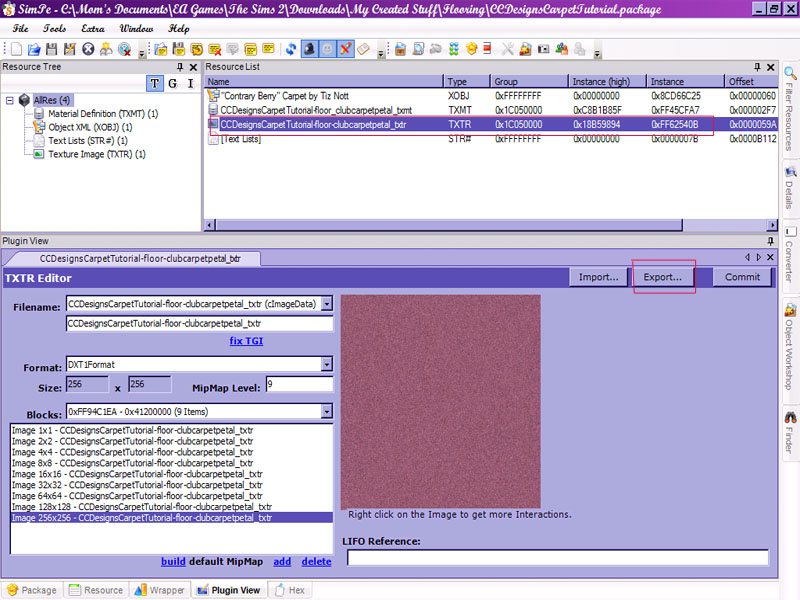
7. In the plugin view select the TXTR file and then click export. This part is just like any other object recolor. When the save as screen pops up, save it to the same directory as your package file.


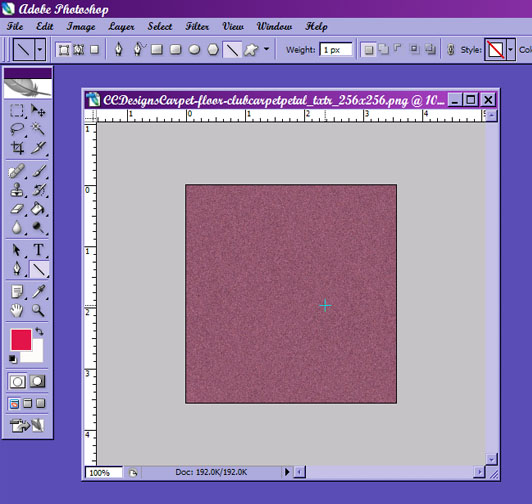
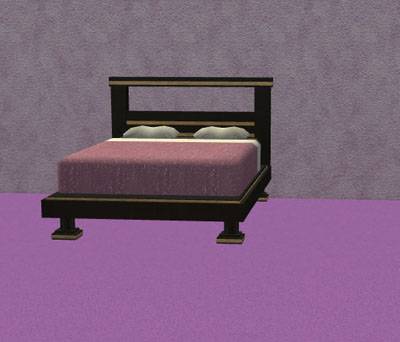
8 .Next, open your texture editing program and edit your file. For this tutorial I will be using Photoshop CS. In Photoshop, open the *.png file that you exported from SimPE. It should look something like this:


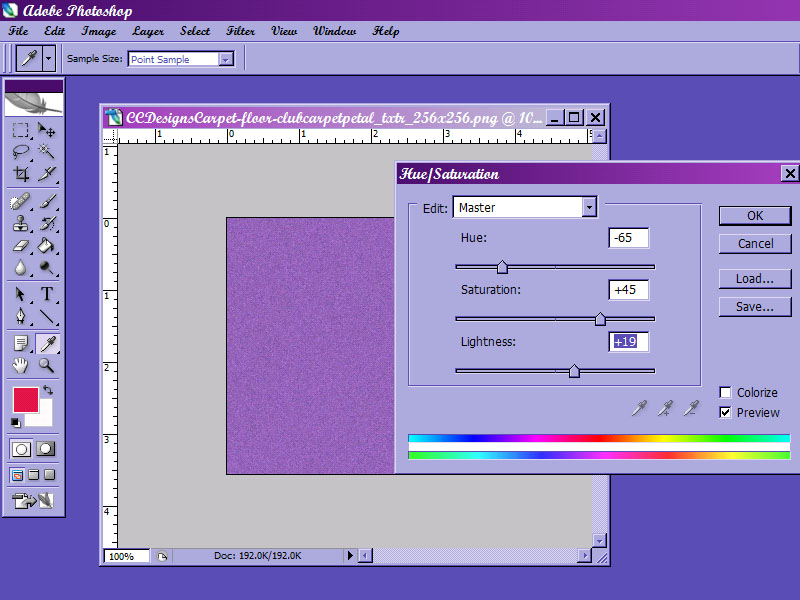
9. We will only be changing the color in this tutorial, so select image, adjustments, hue/saturation. My favorite color is purple, so we will adjust the hue to -65, the saturation to +45, and the lightness to +19. You may play around with it and make it whatever color you choose. Then click OK. Next save your file and go back to SimPE.


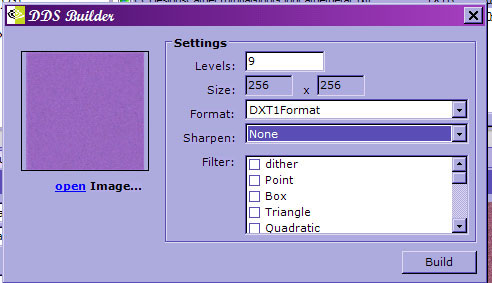
10. Back in SimPE, right click on the image at the bottom of the screen and select build DXT. Click on open, select your *.png file and click Open. Make sure your format is DXT1Format and sharpen is none and click build.


11. Next click commit and OK when the changes were committed screen pops up. Now save your file.

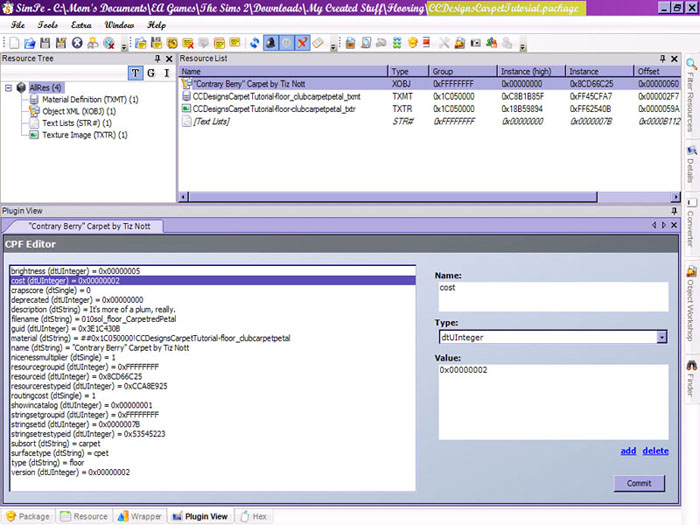
12. You will now have to edit the XOBJ file so that your new floor will not overwrite the existing floor that you cloned. Click on the XOBJ file in the resource list. There is one line in this file that we will change. You should not change the others unless you know what you are doing!!! You do not need to get a custom guid for your new floor or wall unlike any objects that you make. To keep it from overwriting game files all you need to change is line 6 file name. You can either type in the name of the package file here, or enter "aaaaaaaaaaaaaaaaaaaaaaaaa" without the quotation marks. If you forgot what you saved the file as, it can be found at the top of the SimPE screen as seen in the highlighted area of the picture below. Once entered click commit and save your file.


13. It is now ready for the game. Remember to move the file to your downloads folder if you did not save it there to begin with.


In order to do walls, follow the same procedure.

***A special note about bump maps***
Some walls and floors come with a bump map texture file. This will show through your normal texture file. It is useful for creating a textured look or cracks in walls, etc. Bump map's mode in photoshop will be RGB Color, but they are usually a grayscale picture, all back and white. It does not take much darkness in the bump map for it to show through. If your bump map is too dark, your floor/wall will show up as black or dark gray and you will not be able to see your main texture file. My advice is to make it as light as possible, see how it looks and then darken as needed to get the look you want. In the catalog view, all you are going to see in the icon is your main texture file, but your bump map will show through when the wall or floor is placed. When importing your Bump Map file import it using the DXT5Format. Once imported, find the drop down menu off to the left side and change the format to Raw8Bit. Then click commit. Bump maps should be in this format, but unfortunately you can't import them using this option. It must be changed after importing.

***For Terrain paints, follow steps 1-11 above. There is no XOBJ file to edit. Your new file will show up as custom content and should not overwrite any other files.

Part 2:
Creating Homecrafter Friendly Floors and Walls

This part of the tutorial is for people who have Homecrafter, and should be used if at all possible, so the floor or wall you create will be Homecrafter friendly for anyone who downloads it.

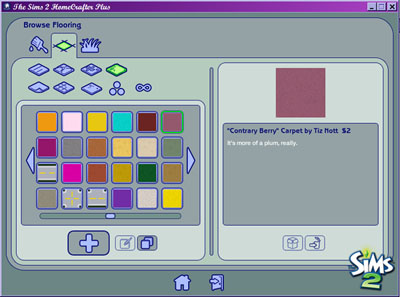
1. First, open Homecrafter and select the wall or floor that you want to clone. For the purposes of this tutorial I am once again using the “Contrary Berry” Carpet by Tiz Nott. Once selected, click the clone selected icon at the bottom of the screen that looks like 2 boxes.


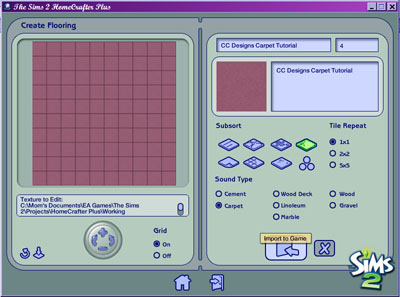
2. Change the name, price, and description. You may also change the subsort, tile repeat, and sound type if you wish, but for this tutorial we will leave them the same.
Open the .bmp file with your texture editor. Under the picture of the wall in Homecrafter there will be a box saying texture to edit. This will give you a location and name of the file.
We will only be changing the color in this tutorial, so select image, adjustments, hue/saturation. My favorite color is purple, so we will adjust the hue to -65, the saturation to +45, and the lightness to +19. You may play around with it and make it whatever color you choose. Then click OK. Next save your file.
Switch back to your Homecrafter screen and click the curved refresh arrow at the bottom so that your new texture shows up.
Once everything is changed, click the Import to Game icon. You will get a few pop up windows. Click the check mark icon on all of them.


If you do not need to add or change a bump map you are done. If you wish to change or edit the bump map you must do so through SimPE. See the special note about bump maps above. Editing a file in SimPE after it was created in Homecrafter will NOT make it so it is not usable in Homecrafter.

I try to take one day at a time, but sometimes several days attack me at once. ~Jennifer Yane
Advertisement
Eminence Grise
#2 Old 31st Jul 2008 at 5:17 AM
This is awesome Charisa It was really needed! I had figured ALMOST all of it out except that my new wall was overwriting the one it was cloned from; I think it was because I had the option boxes checked wrong in the clone dialog.

Is it really necessary to repeat all the string changes you make in the Xobj object? I was able to make a wall that looked like it behaved correctly (had the right name etc) without doing that. But of course I was having that overwrite problem
Scholar
#3 Old 31st Jul 2008 at 11:51 AM Last edited by pixelhate : 31st Jul 2008 at 9:38 PM.
Excellent ! Thank you very much ! *(After some testing/failing)*
Apart from replacing the bump texture, is there another step to make the bumpmapping working ? changing TXMT line or anything ?
When I try to apply your tut for bumpmapped wall, I have black wall with correct thumbnail, correct pricing, unchanged description...
I'm used to commit after each and every change I make
I'm still not making it working after all these years and yet it seems so simple to others. Aaargh !

see http://sumomo.modthesims2.com/showt...953#post1277953
Post#13 and following...

Understand Material definition-TXMT and customize the look of your objects ! This way

"The longer something exists in this world, the more wear and tear it will have."
One horse disagreer of the Apocalypse
#4 Old 31st Jul 2008 at 10:42 PM
Quote:
unchanged description...


Unless you are providing a translation of the new description in every language, you need to click the "Default lang only" button when you are editing a strings file. Otherwise only people in the USA will see your new custom description.

"You can do refraction by raymarching through the depth buffer" (c. Reddeyfish 2017)
Lab Assistant
Original Poster
#5 Old 1st Aug 2008 at 2:31 AM
Thanks Inge! I forgot that step.

I try to take one day at a time, but sometimes several days attack me at once. ~Jennifer Yane
Lab Assistant
Original Poster
#6 Old 1st Aug 2008 at 2:49 AM
Srikandi - As far as I know you have to change both. The one is for the catalog description and the other is for how the game handles the file.

Pixelhate-without seeing the file you are talking about it is hard to tell. I think the bumpmapping is handled through the TXMT file only. There should be 2 different TXTR files and if you change the name of them, you have to make sure that the TXMT is pointing to the correct file. Are you adding a bump map to a wall that did not have one or just changing an existing one? If you post the file in the Creator Feedback Forum I will look at it tomorrow and see if I can help you out.

I try to take one day at a time, but sometimes several days attack me at once. ~Jennifer Yane
Scholar
#7 Old 1st Aug 2008 at 12:20 PM Last edited by pixelhate : 2nd Aug 2008 at 6:17 PM.
Default Wall Bumpmapping Doom
Thank you Charisa for taking some times to help me. But be warned ! I'm a kind of hopeless case when it comes to wall bumpmapping.. I'm trying at least since June 2006 ! Despite the advices from Snowstorm, Inge, Niol, Jasana (whom are not first comers) I failed deplorably. I've tried set by step, I've tried to understand, I've made experiments. In fact it works once "by accident", but I couldn't reproduced it.
This situation is a bit hurtful, but I won't be offended if you try to explain me thing as if I was mentally retarded; in fact I beg you to do so !

The two file attached are made following step by step your tut. The only difference is the Test2 had the last option (in 4th tut pic) "Change description" checked. As a result that I was able to change Name, Description and Price on next step and the changes where already made in Text list and Object XML. I've click commit anyway. And they appear in game.
This could save copy/paste operation and avoid possible mistakes

But my main problem isn't solved. Bumpmap's not showing/working, only black wall. I have my game bump enabled (checked with Bump-map tester).
Wall doesn't appear in Homecrafter.
The main texture is showing in Clean Installer but no shadow or bumpmapping whatsoever. Description and name are ok.

I've cloned the "wall-brickChimneyRedAged_base_txmt.5tm (cached) (0x4C8CC5C0)" on 8th line in bricks, as this one as a bump texture ready.

I've used build Dxt functions to build both textures with the.Png joined. Dxt1 for the main one, Dxt5 for the bump, as proposed by SimPE. Everything looks fine, to me, when package is reopened with SimPE.

Am I cursed or stupid ?
I'm not superstitious, so, the answer is obvious...

A load of delicious Belgian chocolate cookies for you if you/we succeed.

Pix.

( I guess it's all right and in topic to post my files here, but if not, any of the Mods will let me know..)

Understand Material definition-TXMT and customize the look of your objects ! This way

"The longer something exists in this world, the more wear and tear it will have."
Test Subject
#8 Old 1st Aug 2008 at 2:40 PM
Default 7 boxes...
Where you said to tick the first 7 boxes and leave the last 4 unchecked (4th pic) , I did all that but I can't tick the 5th box. The "Create a stand-alone object" one...


How do I change it?
Test Subject
#9 Old 1st Aug 2008 at 4:08 PM
I made my floors and wallpapers without changing it. I just tried it out and it still worked...so do I still need to change it? I don't know what it's supposed to do =/
Lab Assistant
Original Poster
#10 Old 2nd Aug 2008 at 2:12 PM
Quote: Originally posted by sparky
I made my floors and wallpapers without changing it. I just tried it out and it still worked...so do I still need to change it? I don't know what it's supposed to do =/


If it is not already checked and it will not let you check it, then you do not need to. I made this tutorial writing down step by step everything I did that was successful. On mine it was already checked, and I could not uncheck it. You should be fine. That's why I said, "Make sure the top seven boxes that you can change are checked and click next." Some of them cannot be changed when cloning floors and walls.

I try to take one day at a time, but sometimes several days attack me at once. ~Jennifer Yane
Lab Assistant
Original Poster
#11 Old 2nd Aug 2008 at 3:27 PM
Pixelhate - Just wanted to let you know I haven't forgotten about you. I did not have a chance to sit down in front of the computer yesterday. I have narrowed down what is causing the problem, but not why yet.

I am also learning some interesting things along the way. Apparently the change description thing is the way to go. It cuts out a lot of steps, but you still have to go into the XOBJ file and change the filename string, or it will override the existing wall/floor that you cloned. Also for some reason, walls/floors created this way will not show up in Homecrafter. I'm not sure why. There must be something Homecrafter adds to the files that SimPE does not. When I get done working on this, I'm going to rewrite the tutorial to include the change description, and include a tutorial for making them using Homecrafter for people who have it so they are Homecrafter friendly.

I try to take one day at a time, but sometimes several days attack me at once. ~Jennifer Yane
Lab Assistant
Original Poster
#12 Old 2nd Aug 2008 at 3:47 PM
Well I should have waited to post, because it didn't take me long to get it figured out.

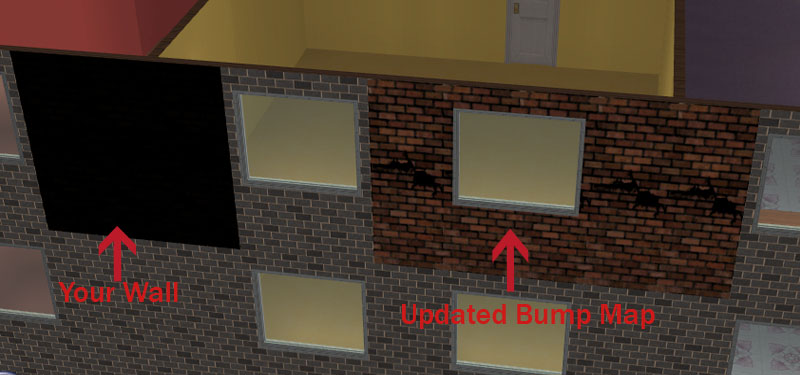
The problem was your bump map image file. I've never played around with them before, but apparently it doesn't take much color for it to show through. Your bump map was just too dark. I played around with the brightness and contrast and came up with this:


Obviously the crack in the wall still needs lightened up some, but that was all that you were doing wrong. I have attached my file, so you can extract the png I made, but all you really need to do is play around with the brightness and contrast to get yours the way you want it.
Screenshots
Attached files:
File Type: rar  CharisaTest.rar (114.6 KB, 23 downloads) - View custom content

I try to take one day at a time, but sometimes several days attack me at once. ~Jennifer Yane
Instructor
#13 Old 2nd Aug 2008 at 4:54 PM
Quote: Originally posted by pixelhate
Dxt5 for the bump
Bump texture must always have Raw8Bit format. SimPE suggests DXT5 because it doesn't have Raw8Bit option - so you should import as DXT5, and then change format to Raw8Bit.
Quote: Originally posted by Charisa1114
Also for some reason, walls/floors created this way will not show up in Homecrafter. I'm not sure why. There must be something Homecrafter adds to the files that SimPE does not.
There's one known change - in XOBJ, 'filename' property is set to row of 'a's (sorry, I'm not on computer with SimPE right now, so can't check it precisely, but it's something like 'aaaaaaaaaaaaaaaaaaaa' - check any Homecrafter-made package to be sure). I'm not certain if it actually affects anything - thought before that it's required for bumpmaps, but figured once that it's not - and my Homecrafter is long dead, so can't check it.
Scholar
#14 Old 2nd Aug 2008 at 6:15 PM Last edited by pixelhate : 2nd Aug 2008 at 6:41 PM.
Charisa, thank you very very much ! This a huge step for me ! I need to check all this to understand, now...
Quote: Originally posted by Charisa1114
I am also learning some interesting things along the way.
It's even better when it's mutualy beneficial.

Quote: Originally posted by Jasana_BugBreeder
you should import as DXT5, and then change format to Raw8Bit.
Is there any special cryptic procedure apart changing format and commit? Any fixTgi or build thingy ?

Understand Material definition-TXMT and customize the look of your objects ! This way

"The longer something exists in this world, the more wear and tear it will have."
Lab Assistant
Original Poster
#15 Old 2nd Aug 2008 at 6:17 PM
Quote: Originally posted by Jasana_BugBreeder
Bump texture must always have Raw8Bit format. SimPE suggests DXT5 because it doesn't have Raw8Bit option - so you should import as DXT5, and then change format to Raw8Bit.
There's one known change - in XOBJ, 'filename' property is set to row of 'a's (sorry, I'm not on computer with SimPE right now, so can't check it precisely, but it's something like 'aaaaaaaaaaaaaaaaaaaa' - check any Homecrafter-made package to be sure). I'm not certain if it actually affects anything - thought before that it's required for bumpmaps, but figured once that it's not - and my Homecrafter is long dead, so can't check it.


I have updated this tutorial. I found out a few interesting things while playing around with pixelhate's files. I tried changing the filename string in the XOBJ file to all a's and it would still not show up in Homecrafter. I am pretty sure all this string does is tell sims what file to use for the wall/floor. If you don't change it, it overwrites the original. If you use all a's it does not overwrite anything or if you change it to the name of your file it does not overwrite anything. I am sure if you had 2 files with the same name and both have the same filename in the string one would overwrite the other. The only way I know to have them show up with Homecrafter is to clone them through Homecrafter first.

I try to take one day at a time, but sometimes several days attack me at once. ~Jennifer Yane
Scholar
#16 Old 2nd Aug 2008 at 6:49 PM
Charisa, that's the problem described in the thread I've linked in post#3

And, yes, I forgot to mention that the original bricks is not appearing in game when the cloned file is in the dwld folder

Understand Material definition-TXMT and customize the look of your objects ! This way

"The longer something exists in this world, the more wear and tear it will have."
Lab Assistant
Original Poster
#17 Old 2nd Aug 2008 at 7:01 PM Last edited by Charisa1114 : 2nd Aug 2008 at 7:38 PM.
Quote: Originally posted by pixelhate
Charisa, that's the problem described in the thread I've linked in post#3

And, yes, I forgot to mention that the original bricks is not appearing in game when the cloned file is in the dwld folder


If you go in and change the XOBJ file that should fix that. As far as changing the bump map TXTR file I don't think you have to fix TGI or build the minimap. I did not know about changing the format to Raw8Bit. I did it by just importing the file as DXT5Format. It looks much better after changing the format.

I try to take one day at a time, but sometimes several days attack me at once. ~Jennifer Yane
Scholar
#18 Old 2nd Aug 2008 at 7:44 PM
Holly Bumper ! A new area is opening for me, at last. It's working ! and seemingly reproducible ! (the raw format was the missing link).
I need to dig a bit, but I'll come with some specific things about wall/floor-(terrain?) bumpmapping-texturing asap.
God I'm great full !

Understand Material definition-TXMT and customize the look of your objects ! This way

"The longer something exists in this world, the more wear and tear it will have."
Test Subject
#19 Old 5th Aug 2008 at 2:54 PM
I have a problem with step 10.. the ''Build DXT'' option is unclickable for me.. i did everything like the tutorial
Scholar
#20 Old 5th Aug 2008 at 3:50 PM
You need the latest NVIDIA dds utilities installed for the build Dxt to work. Make sure the path settings are pointing correctly in SimPE preference.
http://developer.nvidia.com/object/texture_tools.html

Understand Material definition-TXMT and customize the look of your objects ! This way

"The longer something exists in this world, the more wear and tear it will have."
Test Subject
#21 Old 5th Aug 2008 at 8:22 PM
Thank you very much pixelhate
Lab Assistant
#22 Old 6th Aug 2008 at 3:06 AM
Thanks for this Charisa. Major fun. I do still have Homecrafter, but I'm always interested in learning a new way to do things. Also, the whole bump map thing is cool. I haven't found any floors yet though that have a bump map file.

One question? You don't mention editing the text file, but I found when I clicked on it that it still listed the catalog price there as the original, although the xobj file shows its new cost correctly.

“Meddle not in the affairs of the dragon; for you are crunchy and taste good with ketchup.”
-unknown
Test Subject
#23 Old 8th Aug 2008 at 2:10 PM
Quote: Originally posted by Charisa1114
If it is not already checked and it will not let you check it, then you do not need to. I made this tutorial writing down step by step everything I did that was successful. On mine it was already checked, and I could not uncheck it. You should be fine. That's why I said, "Make sure the top seven boxes that you can change are checked and click next." Some of them cannot be changed when cloning floors and walls.


Ok, thanks a lot, Charisa. I just wanted to check incase there was a problem I did not know about. (And thanks for getting back to me so fast )
Lab Assistant
Original Poster
#24 Old 8th Aug 2008 at 9:51 PM
Quote: Originally posted by dragonarts
Thanks for this Charisa. Major fun. I do still have Homecrafter, but I'm always interested in learning a new way to do things. Also, the whole bump map thing is cool. I haven't found any floors yet though that have a bump map file.

One question? You don't mention editing the text file, but I found when I clicked on it that it still listed the catalog price there as the original, although the xobj file shows its new cost correctly.


You are welcome. I'm not sure why your text file wasn't changed. When I do it and check change description in the clone options it changes both files. That is weird. I wonder if anyone else has had it not change both.

I haven't come across a floor with a bump map either, nor have I tried adding one yet. That is something I'm still going to have to play around with.

I try to take one day at a time, but sometimes several days attack me at once. ~Jennifer Yane
Test Subject
#25 Old 8th Aug 2008 at 9:58 PM
Default I'm sucha noob...
Okay, I've followed all directions, and even tried to go back and find the bumpmap file... but my wall doesn't have one! =p I'm still getting a black/purple/pink wall in game... Here is my file... could you help me? ::pleads pitifully::

one other thing, I'm using Paint.net instead of gimp or photoshop. do you know what the rgb equivalent is for that program? (looked for rgb in the tabs and didn't see it ^_^;;

forgive my noobishness m(_ _)m
Attached files:
File Type: rar  Wallpaper over Brick1- torn on seam.rar (55.2 KB, 19 downloads) - View custom content
Page 1 of 2
Back to top