 Tutorial - Converting Skirts For Dudes
So I've gotten I few questions on how I made my skirts for males. Here I will show you the steps I took. I will not be showing you how to use the programs needed, but since you're here you probably know how to already. I will be converting the mini skirt with the belt from base game. I'm still trying to fix and simplify the way I say things so just bear with me. When I make my next conversion I will tweak and polish this up.
Programs Needed
Milkshape - with Wes's tools - Cat's UV data merge tool
CTU Morph Maker
Morph Match Maker
Photoshop - with DDS plugins - Nvidia plugins(only if you want a custom normal)
S3PE Finding the Meshes
Open up
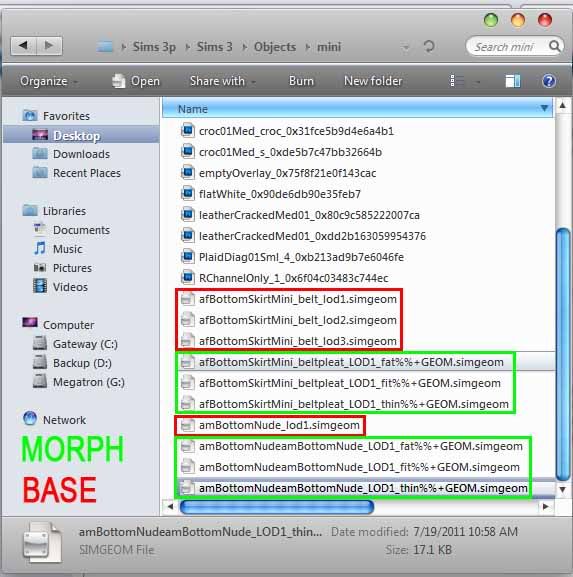
CTU and find the adult male nude bottom, extract meshes, do the same for the nude male top. Find the adult female skirt with belt and extract meshes and textures. Open up the FullBuild0 package in your games directory with S3PE, you may need to run as administrator. Then search and find the morphs for the two meshes you just exported with CTU, you can search for the same name as the base mesh to speed this up. IE: ambottomnude and afbottomskirtmini. You will need the LOD1 fat, fit, and thin for both meshes. So so far you should have these meshes in your work folder. I have deleted the lod2 and 3 for the male nude mesh as we won't be needing these. I've also shortened the name of the meshes to make things simpler, you really don't need all those numbers unless you're making a default replacement, which we're not.
 Meshing
If at any point you miss a vertex or messed up use Ctrl Z, it will be your best friend. But still make sure to pay attention because it only goes back so far.
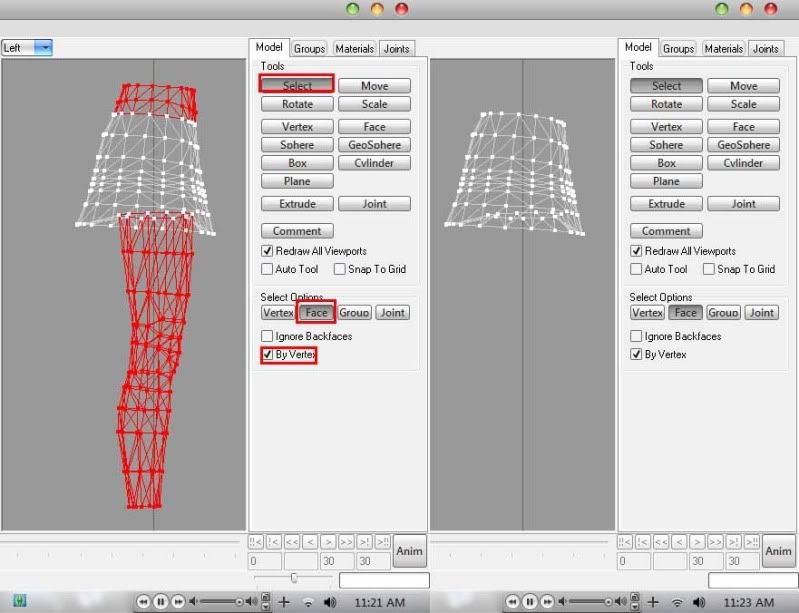
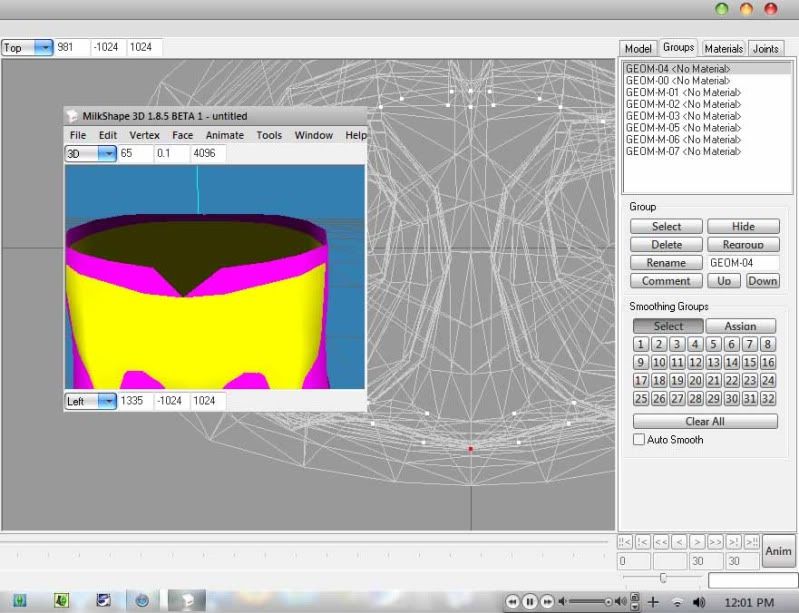
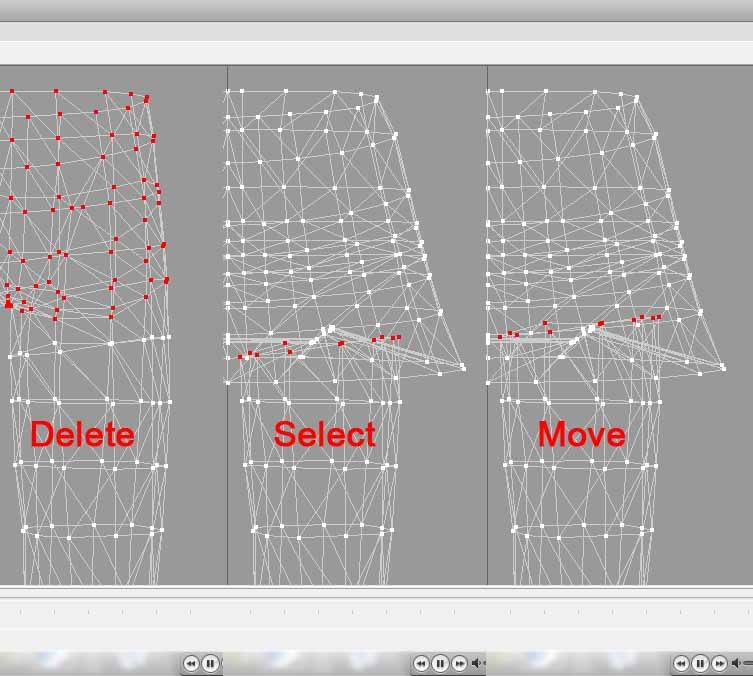
First import all of your meshes into milkshape. You must import the base mesh first, then the morphs. When you get to the second mesh move the base to the top of the group list, otherwise the morphs won't load. When your done importing you can move the second base back down the list with it's morphs. You can rename these if you think you're going to get confused, but as long as you keep them in the same order, base, fat, fit, thin, you should be OK. Now select all and hide all. Unhide Geom00, your skirt mesh. Right off the bat use the select faces by vertex tool and delete those legs and the top two tiers of the waist.
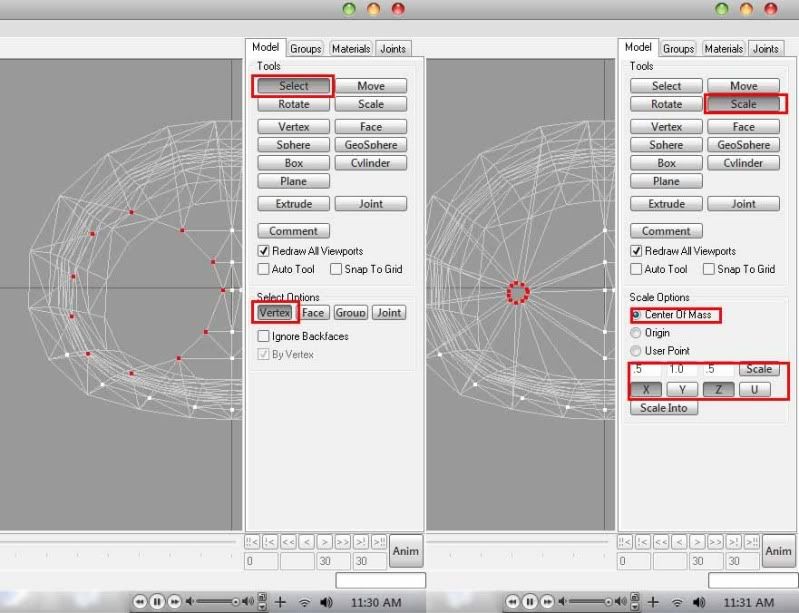
Now in side and front views use select by vertex to hide most of the vertexes so that you can get a good view of the leg openings from the top. Select one side and use the scale option, using Z & X with .5 values, to close this up a bit. Four or five clicks should do the job. Now do the other side.
Using select by vertex, select and hide everything but the top row. Now unhide the male mesh and do the same for this one, then go to top view. Now you may already have the vertex data merge tool set to a short cut, if you don't, save and do so now, saves a bunch of time. Make sure the male mesh is above the skirt mesh on the groups tab, what you want to do here is select a matching vertex from each mesh and merge them. Doing this makes sure the waist matches the male waist. Do this for each vertex, see why the short cut helps here? If you get confused as to which vertexes should be merged take a guess and check the 3D view, you'll know right away if it's the right one or not. If not just Ctrl Z and try again, for the most part they are right next to each other so no guess work is necessary.
You can move the legs back down the list now to where it was. Now hide and unhide the skirt to get all of the vertexes back. Select everything but the top tier using select by vertex. Now go into a side view, and using the move tool set to Z only move the skirt mesh to match the male body better. Don't worry about the butt checks poking out in the 3D view because we're going to delete those later. We want it as close as possible so that your mesh works with the male tops in game, hence no clipping. (Not unlike my skirt, you can tell I've gotten better at this)
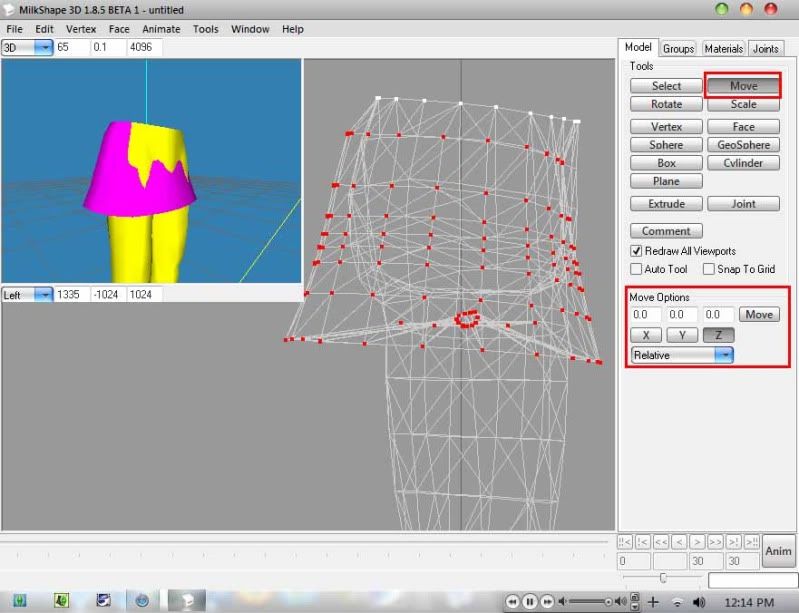
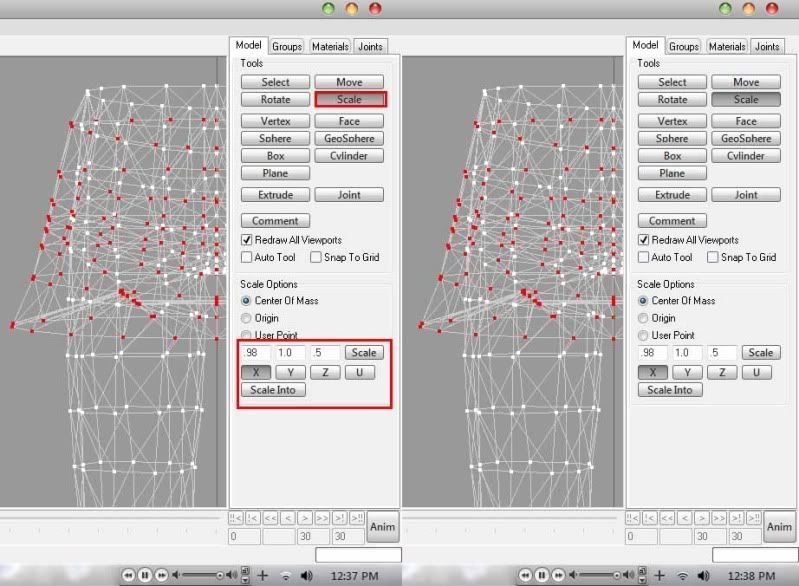
Now if this was a tighter skirt you'd have to scale the bottom few rows a bit to accommodate the larger male leg, just an FYI. Nothing to hard. Hide the legs again, and select everything but the top row, again, unhide the legs and go to front view. Using scale, X only set to .98, scale the skirt to fit the legs, about three clicks should do.
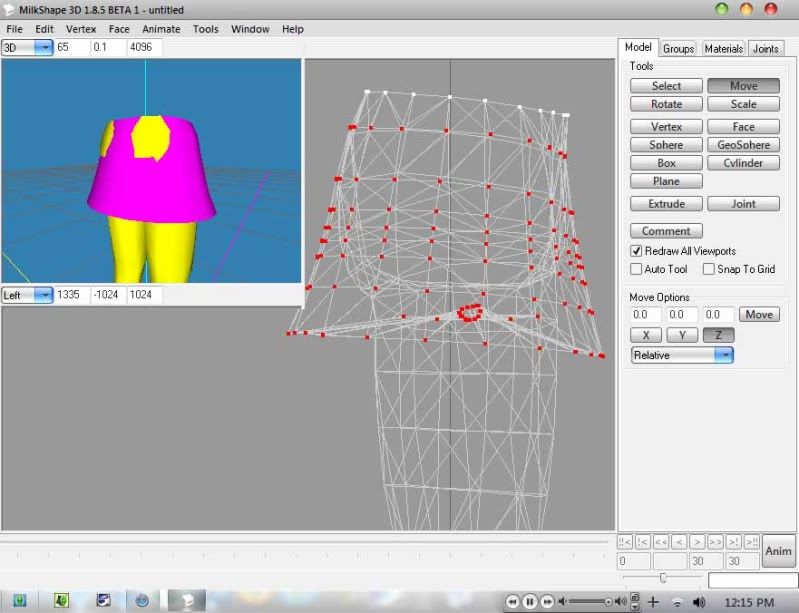
Unhide both meshes, the hide the skirt, now, go to front view and select by vertex the parts of the male waist that the skirt covers up, then delete. Now, select the top row of vertexes on both legs and unhide the skirt. Using the move tool, Y only, move the leg top up to cover at least the top of the leg holes. I'm only showing half the mesh to save room.
Looks like we've got ourselves an awesome looking mesh here. On to...
UV Mapping
We must line up the uv of the waist to the waist of the nude male top. Import the male nude top, select it and the skirt mesh, add a new material to both, use the multiplier of the skirt. Hide everything but the waist line where the two intersect. Go into top view and vertex by vertex use Cat's UV data merge.
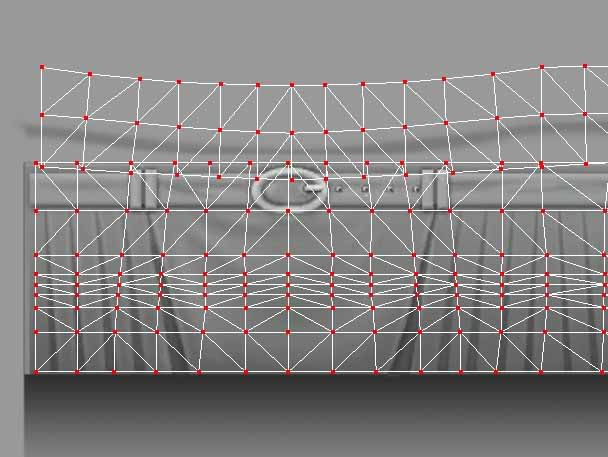
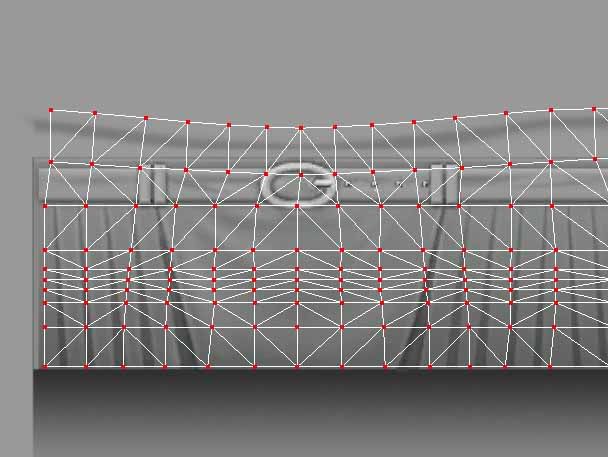
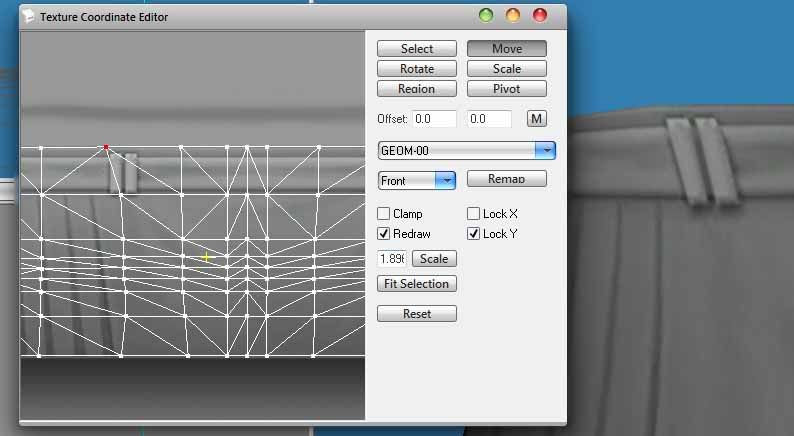
Everything looks good except for the belt straps, we need to fix those. Open up the Texture Coordinator Window and select the skirt mesh. What we want to do here is make sure that every vertical line in the first stripe, the belt, is straight up and down. Starting with the second row, select the entire second vertical row. Make sure you lock the Y position. Now move the entire column to the left until it's straight.

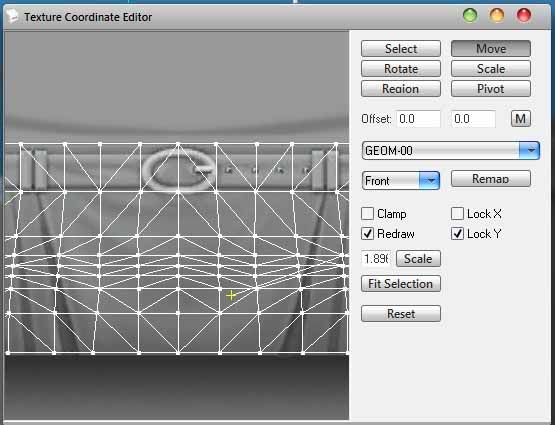
Now, go to the part of the texture with the back belt loops. Select to TOP vertex and move it over, with Y still locked. Now You can't quite get it to be perfectly vertical without some distortion. So just move it over until it's kinda straight without any distortions.
 Morphs
 - Womp Womp
Use Morph Match Maker to make the morphs.
Use the same steps as above to get the morphs as perfect as the base mesh. You WILL NEED to redo the waist line, so just import and use the whole leg meshes as a guide. You will also need to resize the skirt on the morphs, so that you don't get clipping on the male tops. Again use the full leg meshes as a guide.
Now crack open CTU, select the female mini, load the presets, change your gender to male, and change the clothing categories if you want. Over at the mesh tab change the name of the mesh, and load your meshes in the lod1 boxes. For lod2 and 3 I use the female lods. You will most likely never see these, and when you do it'll be zoomed out so far you won't tell the difference. Hit commit and save as. Reload your new package to see the new model take effect.
Once that is done use Morph Maker to make and import the morphs into your package.
Done
Now just pop that bad boy into your mods folder and take it for a spin. I almost never do this right the first time, I usually always get problems with the morphs. Whether it's clipping on a top or the morphs just plain don't work. But don't worry, just go back make your changes and remake the morphs. It's worth the effort.

 Sign in to Mod The Sims
 22nd Jul 2011 at 10:16 PM
Last edited by daluved1 : 25th Jul 2011 at 3:57 AM.
Reason: moved to tutorials
22nd Jul 2011 at 10:16 PM
Last edited by daluved1 : 25th Jul 2011 at 3:57 AM.
Reason: moved to tutorials