Hair: The Basics
Modifying Hair is similar to modifying a body mesh, except that it gets complicated in a couple of different places; here I'm going to give an overview of the differences, and then there are some more in-depth articles by Dr. Pixel and Pinhead that follow.
If you haven't successfully modified a body mesh, the first place to start is with the
Unimesh Body Editing Tutorial.
Now the truth is, that tutorial only scratches the surface of what is needed to do advanced edits - there are TWO MORE tutorials for Unimesh, and I strongly suggest you do them all. That will get you familiar with the tools, although they won't turn you into an expert. You can also read Dr. Pixel's tutorial about adding shoes to a mesh to learn about adding parts.
There is also a
Beginning Hair Mesh Tutorial that will take you step by step through some simple hair edits, again only covering the basics. Some of the articles here give info for more advanced meshing, and is as 'easy' to explain as we've been able to make it.
Now on to the info about how hair meshes are constructed
A hair mesh, just like a body mesh, has the 4 parts -
Geometric Data Container (the good old GDMC that we get the mesh from)
Geometric Node (GMND)
Resource Node (CRES)
Shape (SHPE)
When you build your new mesh file, you gather the 4 parts and fix integrity *once only* and then associate it with a bodyshop recolor.
Maxis named the meshes with their usual naming convention - meshes starting with 'a' are adult, 'c' child... then 'm' or 'f' for male and female. Note that elderly sims use the adult hair, so you will not find any reference to 'e' hair meshes.
You should create, edit and test a mesh for one age first. Once you have done that, you can repeat the process for another age, using the same recolor file, until you have made all the meshes you are going to change.
Hair Mesh Groups
Here's the first thing about hair that is more complex - it tends to be built in several pieces. There's a base 'hair' group, and then there are alpha groups, in pairs, which maxis named with a number - the number corresponds to the transparency code for that layer of hair.
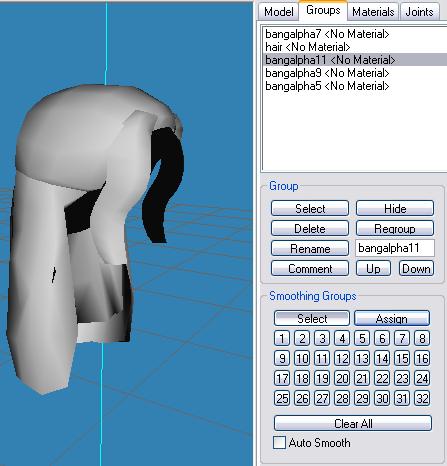
Below is a typical hair mesh inside of Milkshape, using the Unimesh plugin. You can see this hair mesh has 5 parts to it, by looking at the groups tab. Each layer of the hair has an inside and an outside part (the back side of mesh faces do not display in the game). For beginners making changes, the big rule will be to edit those parts so that they stay lined up with each other. Sometimes it's best to hide the other groups and work with one pair at a time.
(Btw, if you want to be able to see how your hair looks with a body or face, you can grab copies of them here:
http://www.modthesims2.com/article.php?t=135300 )

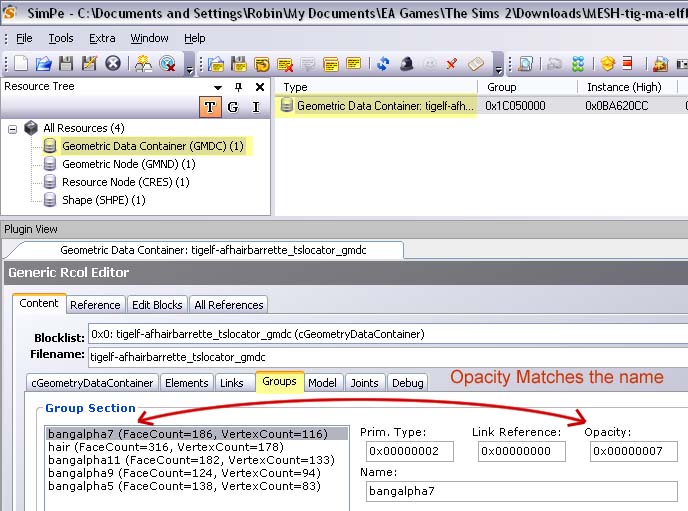
While we're talking about alpha groups/layers, we'll touch on the transparency values. If all you do is slightly modify your mesh, and you use the unimesh plugin, the transparency values should be retained.... and they should match the values that maxis used in each alpha group name. Here's a screenshot of what that part of the mesh looks like in SimPE. You can find more details about how transparency should be assigned in Pinhead's section of this article. The important thing to know as a beginner is that the order and layering matters, and you must be careful if you change it.
 Attaching the Hair to the Recolor File
Once you have gathered your GDMC, GMND, CRES, and SHPE files, and 'fixed integrity', you need to save out your modified CRES and SHPE files, and insert them into your hair recolor file to point to your new mesh.
The hair recolor file in your Saved Sims folder is much more complicated than a recolor file for an outfit - because all the different ages are in that one hair recolor file. First time you look at this file, you might feel overwhelmed, I did. But never fear, there is a method to the madness.
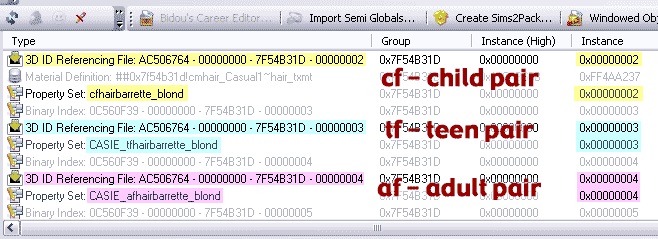
The Property Sets (in the new simpe) show the name of the mesh - pf is a toddler female mesh, cf - child female, tf - teen female, etc.
Each property set has an instance number in the third column of numbers. That instance number is the same for both the property set and the 3DIR that goes with it. The location of the pieces can be scrambled all over the place, in some recolors they will be neatly located, others the order might make no apparent sense. So just look for those instance numbers. See the pic below.

Once you find the 3DIR for that mesh, that is the spot to insert your modified shape and modified cres, so that now it will point to YOUR mesh, instead of the game mesh. You only need to replace the mesh references for the meshes you are changing, and you will use the *same* modified shape and modified cres for both the adult and elderly references.
** remember to delete the modified shape and cres from the main area each time after you have inserted them into their proper spot in the 3DIR... and remember to 'commit' and save!
 Replacing the GDMC with Your New Mesh
Once you are done editing and are ready to put your new mesh/gdmc into your mesh file, there is an extra step not used in body mesh editing.
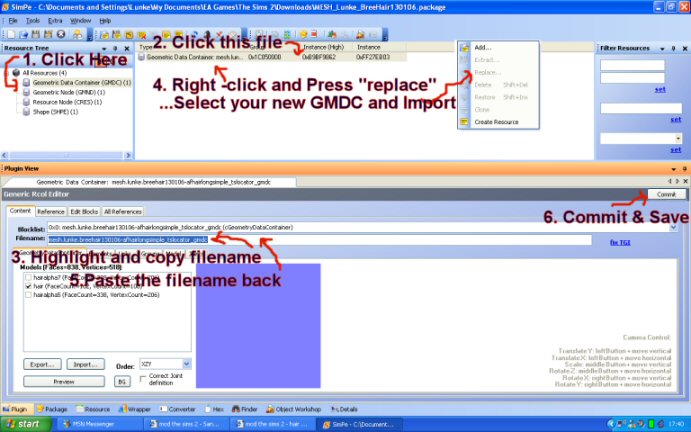
When replacing your gdmc, it's important to retain the name your mesh was assigned during the 'fix integrity' step. This is covered in
Dr Pixel's Hair Tutorial but part if it is written in text. Lunke made this graphic to show exactly where the change needs to be made. Thank you Lunke!
 Other bits of Information
If you are using a recolor file from the other sex and switching it over, you need to change the gender reference in every Property Set and in the Hairtone XML. You will also need to make new meshes for at least the adult and teen styles.
When choosing the hair recolor to attach your hair to, be sure that it has the same amount of parts all named the right way - you'll need one texture and alpha for each layer group your hair has. You can change the name (by changing the comments) of your groups to match the hair recolor if necessary.
Editors:
The Unimesh plugin for Milkshape will get you excellent results, with smooth animations when the sim turns their head, if you assign things well. You can use the SimPE Milkshape export, although that has only one bone assignment per vertex, so is best suited for hair that is not long, because it will not animate smoothly as the sim moves their head. You can also use SimPE's SMD Export - each group has to come out and be saved as a seperate file.
Fix the Eyebrows:
Make sure your eyebrow color matches the hair color in your recolors! Info for how to fix it if it doesn't is
here.