Important accessory info:
Do not use the Harry Potter style (round black frames) glasses as your base accessory. There is something not quite right about them and they do not age up and recolor correctly at times. Use any other pair of glasses!
Accessory Meshing is similar to Body Meshing (which is the simplest) and Hair Meshing. Writing step-by-step tutorials is a huge project, thus here at mts2 we have these detailed tutorials:
Beginner Unimesh Body Meshing Tutorial
Unimesh/Milkshape Tutorial: Level 2, Editing and UV Maps
Unimesh/Milkshape Tutorial: Level 3, Combining Mesh Parts
Hair Meshing with Unimesh
You will also need to learn more about your 3D editor (in this case Milkshape) if you want to build entirely new pieces of a mesh and properly uvmap them. You can learn those skills with ANY Milkshape tutorial that teaches you how to make a new object from scratch, even though it will not be related to making your sims object.
SimPE also supports SMD format, which is another format that has boned data, and there are several programs that can edit SMD format, and there is currently ONE body oriented editing tutorial on the web which uses 3DS Max, for more info, click here.
Now to Dr. Pixel's mini-tutorial:
I don't have time to do a full tutorial, so this is written for someone with experience with body and hair meshing.
It is done much the same as you would do a hair mesh, and I will point out the few differences.
First, you must be editing your meshes in a way that allows adding/removing parts and assigning vertices. In other words, using MilkShape and Wes H's Unimesh Plugins, or else the newer MeshTool and the .smd format if you are editing with XSImodTool, FragMotion, or other 3d Editor that takes .smd files.
Also be aware that SimPE now has a direct export/import of .smd files with some extra features the MeshTool doesn't allow -
In any case, you can't do this if you are using the .obj format.
===================================
So, first you make a BodyShop .package file and export it to the game, just as in the
Clothing Tutorial, but from a pair of glasses rather than a clothing item.
To find the name of the mesh file components, you look at the Mesh Overlay XML files in this .package. Look at the "name (dt string)" line to find it. Make sure you are getting the age and sex you want, this is in the first two letters of the name - for example "af" means Adult Female.
Gather together the 4 mesh parts just as explained in the
Clothing Tutorial, and make up the new Mesh file .package.
-----
To "link" the mesh to the BodyShop .package, this is how to do it for glasses:
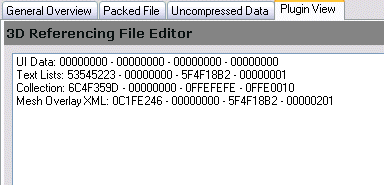
There are really 3 different types of 3DIR files in a glasses BodyShop package.
You will find one of them comes up completely blank if you click on it in SimPE - just ignore that one.
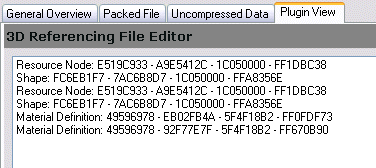
Next, there are several like this pic, they have no Resource Node link, and no Shape link. Also ignore these ones.

The third type is the one you want. You will see that it has not one, but two sets of Resource Node and Shape links in it.

Notice that the original Maxis file will show two different sets of numbers for them...

updated info - thank you Cleoh for solving the distorting mesh problem!
Drag your new Shape and Resource node into the list once, and replace ONLY the TOP set with your new ones. Leave the second set alone.

Note: this linking is the old long way - linking by hand - not using the PSJE tools.
As with any mesh editing project, be sure you delete the added Shape file and Resource Node file from your BodyShop .package after you have completed linking the files - we only want the numbers, the files themselves must NOT stay in this .package.
-----
Here is how to determine which 3DIR file is the right one (or ones) to use depending on what age/sex you want the accessory to go on.
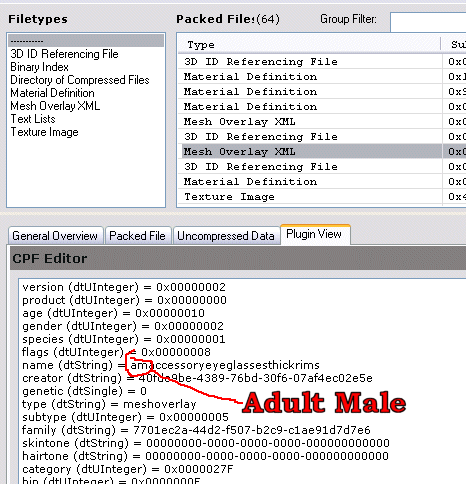
Here I have set SimPE to show the list of all files by clicking "......." on the filetypes list.

I then click on the Mesh Overlay XML to see what age/sex it is for.
The one shown is for the Adult Male.
The 3DIR file directly below this would be the one for the Adult Male.
If you want your accessory to show up for Adult Males, link this next 3DIR to your new mesh.
Repeat this for all age/sex groups that you want.
On the other hand, if you do NOT want the Adult Male to have this accessory, delete this Mesh Overlay XML from your .package file, and also delete the 3DIR file. This will prevent your accessory from showing up as a useless duplicate of the Maxis glasses for Adult Males.
-----
After linking to the BodyShop .package, you go on to the actual editing which I am going to assume you are already familiar with.
In general, it is best to make your accessory from the "frame" part of the glasses, this will make it easier to make re-colors in the future because the "frame" texture is what BodyShop exports for you to edit.
The "lens" group I simply snap all the vertices together, and move them into a place where they will be hidden inside the Sim's head.
The one other thing you might want to do, depending on what your accessory is, would be to change the "category"
By default, glasses are categorized to show on your Sim when they are wearing Everyday, Formal, and WorkOut clothing, and to not show up on the other outfits.
See the next section for how to change when the accessory is worn