Adjusting the UV Map
The UV Map is the guide that controls how the flat texture graphic is wrapped around the 3D mesh. Each vertex of the mesh has a location on the uv map. When we move the vertexes of our mesh, the uvmap remains untouched. So sometimes, depending on the changes, we might need to adjust the uv map.
Sims body meshes start out UV Mapped, so information for objects does not exactly apply here. Usually you will want to preserve the UV mapping – and for some mesh changes you might not change the UV mapping at all. But there are times when you might indeed want to change the uvmapping, and improve the behavior of your mesh. Some instances are when you move the hem of an outfit, or when you drastically change some part of the mesh.
Ideally you will want the uvmap to be distorted/stretched the least bit possible, because that will give people the most flexiblity in what outfits are created. People will be able to put patterned fabrics or trims on your meshes and create things you might have never imagined. You might want to use a test pattern with checks or some other very even pattern to check your uvmap, and I have included a set of two graphics you can use for adjusting your mapping if you wish.
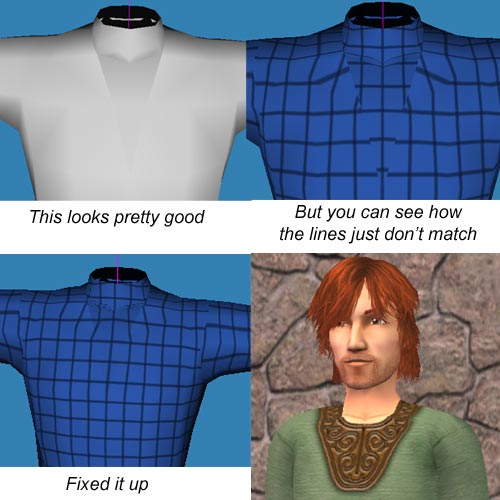
For example, I had modified this V neckline to be almost invisible.... but when I checked how the texture was uv mapped, it was all broken up across the seams, which would have made it almost impossible to texture nicely. Once I fixed the uv map - well you can see the results.

I'll also note here that Maxis uv mapped skirts straight up and down (even if they flare) which does allow for good matching of stripes, plaids, and putting trim across it, so I suggest you leave skirt uv maps 'square' in the up and down direction. But if you moved the hem up or down, it would be good to adjust the vertical spacing so that the design is not stretched oddly in a vertical direction.
I recommend making adjustments to the UV Map using your 3D editor (most likely Milkshape or Modtool).
For information on modifying the uvmap in Milkshape, there are these two tutorials:
Milkshape: Adjusting UV Mapping On Your Modified Body Mesh
Unimesh/Milkshape Tutorial Part 2 (step by step tutorial, *recommended*)
For information on modifying the uvmap in XSI Modtool:
Meshtool/XSI ModTool/SMD Tutorial
If you wish to add entirely new parts you have created to your mesh, the recommended way to do that is to initially create them separately from your body mesh and save them as obj files. You can then uvmap them using any technique or tool you wish, as long as you map them to an unused portion of the texture that will not be used for the body (such as between the legs or below the hands). Then you can import them and add them to your body mesh, and the uvmapping you assigned them will be preserved.
To UV Map a addition to your mesh, like shoes:
http://www.modthesims2.com/showthread.php?t=145153