Contrary to reports, MTS is NOT compromised, and it IS safe to download from here. For more information, see this thread.
Quick Reply
Search this Thread
Ms. Byte (Deceased)
Original Poster
#1 Old 4th Jun 2018 at 7:26 PM Last edited by CmarNYC : 30th Jun 2018 at 12:02 AM.
Default Making a CAS preset with TS4MorphMaker using a BGEO
What this tutorial will do: Show you how to use TS4 MorphMaker and a meshing tool to create a custom face preset using a BGEO morph.

What it will not do: Show you how to use Milkshape 3D, Blender, or another meshing tool. It's assumed you know the basics.

Level: Fairly advanced.

Tools needed:First, some technical background. There are three morphing mechanisms in The Sims 4:

Deformer Map (DMap) - Uses information encoded as a bitmap image to tell the game how to modify vertex position and normals. The UV1 (second uv map) of the mesh is used to get xy coordinates to find the right location in the image. There are two DMaps for every morph: one for shape and one for normals. This method will work on any mesh with a correct UV1, including all lods. Only morph data for the sim's left side (your right side) is used and mirrored for the other side, so you can't make an assymetrical morph. DMaps cannot be used for fingers or tongue because they overlap in the UV1, and should be avoided for eyeballs, teeth, and possibly backs of ankles because they're mapped very close together.

Blend Geometry (BGEO) - Uses vertex ID numbering to find information in a BGEO file which tells the game how to modify vertex position and normals. This method is more precise but requires that the vertices be numbered and that the numbering corresponds exactly to the data in the BGEO. In TS4 only head meshes are numbered, so BGEO morphs are used only for heads/faces. However, all the head meshes in TS4 are constructed and numbered exactly the same way so one BGEO can be used for all ages/genders if it looks good in all of them. Each lod must be meshed separately but all lods are included in one BGEO.

Bone Delta (BOND) - Uses modifications to the location, size, and rotation of bones/joints. The locations of vertices are moved accordingly. This method can be used with all meshes, including all lods, and requires only correct bone assignments. Does not affect normals.

Background on CAS presets:

Presets are the pre-made bodies, faces, and features (eyes, nose, ears, etc.) that appear in CAS. Clicking on one will remove previous modifications for that part and replace them with the ones in the preset. A preset can include any combination of zero, one, or more Sculpts and zero, one, or more modifiers. Sculpts link to morph resource(s) and optionally a texture overlay. The modifiers each link to a Sim Modifier which links to morph resource(s), and have a weight or multiplier defining the level at which the sim modifier is applied.

Differences between sculpts and sim modifiers:
  • Body presets should use only modifiers - sculpts will not be removed when switching to a different preset. This does not appear to be true of face presets.
  • Sculpts in presets are applied 100%, can include a texture overlay, and do not include bone morphs.
  • Sim modifiers in a preset have an associated weight and can be applied at any fraction from 0 to 1, and can include bone morphs.

Typically EA presets include one sculpt and multiple modifiers, but it varies. In this tutorial we will use a sculpt, but the ear morph could also be applied as a modifier.

The structure is:

Preset
-Sculpt
--Any combination of BGEO, DMap, Texture
-Modifier (with weight)
--Sim Modifier
---Any combination of BGEO, DMap, Bone Delta

Lets get started!

For this tutorial I'll use a mermaid ears preset as an example.

1) Open TS4 MorphMaker and go to the Create BGEO tab. In the top section, we'll export one of the game heads as a Milkshape or OBJ mesh. I'm going to use Adult Female. The choice of UV doesn't matter. If you're using Milkshape click the Export MS3D button, if using Blender click the Export OBJ button. Save the mesh. This will be your base. Do not modify or delete it.


2) If using Milkshape, open the .ms3d morph mesh. If using Blender, import the morph OBJ with these options: Split selected: Object checked, Group checked.

You'll notice the mesh looks kind of funky, and this is because all four lod mesh groups are visible. For the rest of the tutorial I'll work with lod0, but for a finished morph you should do all of them except maybe lod3 which is only seen in-game from a distance. In most cases you should hide the mesh groups you're not currently working with, using the Groups tab in Milkshape or the Scene panel in Blender.

3) Shape the ears into the mermail ears shape (or make whatever morphed shape you want). I know, easier said than done. Do NOT rename or change the order of groups. Do NOT add or delete vertices. Do NOT change anything except vertex positions and normals.
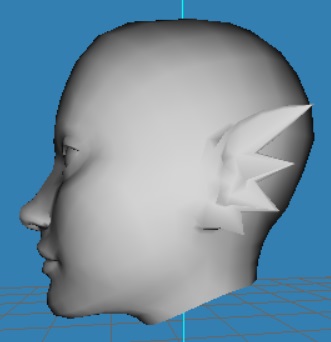


When you're done, save or export the mesh into a new file using a new name that identifies it as your morph. If using Milkshape, save the mesh as a new file. If using Blender, export the OBJ as a new file with these options checked: Write Normals, Include UVs, Objects as OBJ Groups, Keep Vertex Order.

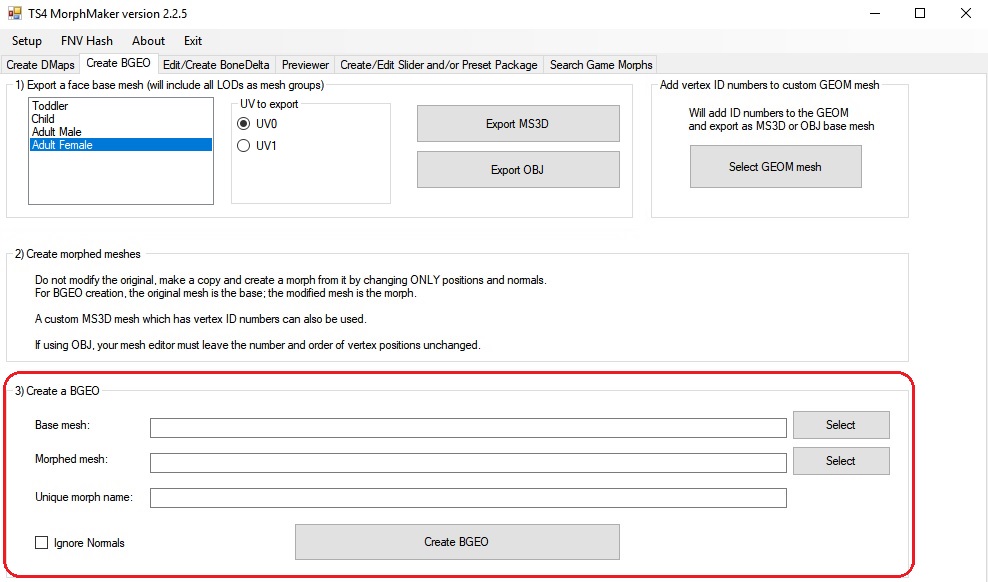
4) Back in MorphMaker's Create BGEO tab, go to the third section. Select your base and morphed meshes in the appropriate spots. Enter a unique name for the morph to make it identifiable. Click the Create BGEO button. Save the BGEO. If you want to preview it, use the Previewer tab.


5) Now go to the Create/Edit Sliders and/or Presets Package tab. Then click the Add/Edit Sculpts tab. Click the Add New Sculpt button and a blank sculpt named 'Custom Sculpt' with a random identifier added will appear. On the right side, fill in the Unique morph name for your preset morph. Next to BGEO: click the Import button and import the BGEO you just made. Check off the ages and gender(s) you want the morph to work for. Select the region - in this case, EARS. Click the Save Sculpt button.


If you want to preview the sculpt, click the Preview button. It will only show LOD0 and only work for BGEOs and DMaps linked to the sim modifier, not bone delta morphs or textures.

Adding Sim Modifiers is exactly the same process except they can include a bone delta instead of a texture overlay. Overlay textures do NOT work with ear presets but I think they work with all the other facial regions. You'll have to experiment.

6) Now go to the Add/Edit CAS Presets tab and click Add New CAS Preset. Again a blank preset will appear in the list with a generic name. Replace it with your unique custom name, and fill in the other information on the right. Most of the settings should be self-explanatory.


  • You can use the Set Preset Thumbnail button to import a custom thumbnail.
  • Is this a Physique Preset: check this if you're making a body preset which uses the fit/fat/thin/bony morphs. You can then fill in the percentage multiplier for each physique morph.
  • Don't forget to enable the preset for one or both frame genders and for Human, Alien, and/or Vampire.
Click the Add Sculpt button. You'll get a popup window asking you to select a sculpt. If you've added and saved your custom sculpt it should appear in the custom list.

If you were to add Modifiers, it's the same process except you have the option of changing the weight (how much of the modifier is applied). You can add EA game modifiers as well; most of them have useful names in the list that appears in the popup for Game Sim Modifier. For example, for mermaid ears you could add the EA modifier that rotates the ears out if you wish.

When you're done, click Save Preset.

7) Click the Save as New Package button on the bottom and save your package. Test in-game.

You'll probably find the morph doesn't look exactly the same in the game as in previews, probably because of the effect of other morphs interacting with it. It may also look slightly different for different ages and genders, and if necessary you can make different presets for different ages/genders/body frames.

Preset sculpts and sim modifiers can use BGEOs (for head/face morphs), DMaps, or BoneDeltas (sim modifiers only) - or a combination. I haven't seen any EA sculpts or sim modifiers combining BGEOs with DMaps however.

The finished mermaid ears are available here: http://www.modthesims.info/download.php?t=612078
Screenshots

Please do not PM me with mod, tutorial, or general modding questions or problems; post them in the thread for the mod or tutorial or post them in the appropriate forum.

Visit my blogs for other Sims content:
Online Sims - general mods for Sims 3
Offline Sims - adult mods for Sims 3 and Sims 4
13 users say thanks for this. (Who?)
Advertisement
Test Subject
#2 Old 19th Jun 2018 at 12:58 AM
I have a question about creating a different sculpt for the whole body ..
could you create a sculpt with more definition and shapes? say if we wanted to do some weird body sizes or increased muscles...
would that interrupt the entire slider or can it be done the same way as the ears?
Ms. Byte (Deceased)
Original Poster
#3 Old 19th Jun 2018 at 3:15 AM
Quote: Originally posted by Yokozii
I have a question about creating a different sculpt for the whole body ..
could you create a sculpt with more definition and shapes? say if we wanted to do some weird body sizes or increased muscles...
would that interrupt the entire slider or can it be done the same way as the ears?


You could do a body preset using a DMap morph for an unusual shape. Depending on how unusual it is it should work with the usual sliders. However, it must be a morph of the standard body meshes - no added or removed polys or anything like that.

Please do not PM me with mod, tutorial, or general modding questions or problems; post them in the thread for the mod or tutorial or post them in the appropriate forum.

Visit my blogs for other Sims content:
Online Sims - general mods for Sims 3
Offline Sims - adult mods for Sims 3 and Sims 4
Test Subject
#4 Old 19th Jun 2018 at 2:11 PM
Quote: Originally posted by CmarNYC
You could do a body preset using a DMap morph for an unusual shape. Depending on how unusual it is it should work with the usual sliders. However, it must be a morph of the standard body meshes - no added or removed polys or anything like that.


ok so how would i make additional shapes to be added on using the BEGO method? i see these ears are shaped differently and they arent morphs ...would the BEGO be a kind of sculpt ? or new mesh attached to the base morph file?
Ms. Byte (Deceased)
Original Poster
#5 Old 19th Jun 2018 at 5:53 PM
Follow the instructions in this tutorial for each preset. You can only use BGEOs for faces. To make a body preset you'd have to follow the tutorial for sliders using a DeformerMap to made the DMap, then follow this tutorial to make presets using those DMaps.

The ears are a morph.

Please do not PM me with mod, tutorial, or general modding questions or problems; post them in the thread for the mod or tutorial or post them in the appropriate forum.

Visit my blogs for other Sims content:
Online Sims - general mods for Sims 3
Offline Sims - adult mods for Sims 3 and Sims 4
Test Subject
#6 Old 19th Jun 2018 at 10:04 PM
That makes so much since now, thank you!
Test Subject
#7 Old 8th Aug 2018 at 5:46 PM
Hello, does not work without updates, (base game)? I followed all the steps and also created an ear modifier. When you open the game, it closes! What can I do to test my new modifier? Should I upgrade my game? Thanks for creating this amazing tool!

AND.GSM.123
Ms. Byte (Deceased)
Original Poster
#8 Old 8th Aug 2018 at 10:49 PM
Quote: Originally posted by Anderson.gsm
Hello, does not work without updates, (base game)? I followed all the steps and also created an ear modifier. When you open the game, it closes! What can I do to test my new modifier? Should I upgrade my game? Thanks for creating this amazing tool!


Some of the resources have gotten new versions since the game came out, so if your game isn't patched to a reasonably recent version the morphs may not work. There's no need to upgrade from base game though.

If you upload your package and the base and morph meshes here I'll take a look in case there's some other problem.

Please do not PM me with mod, tutorial, or general modding questions or problems; post them in the thread for the mod or tutorial or post them in the appropriate forum.

Visit my blogs for other Sims content:
Online Sims - general mods for Sims 3
Offline Sims - adult mods for Sims 3 and Sims 4
Test Subject
#9 Old 9th Aug 2018 at 1:17 AM
I understand, I tested again with a dlc package and it worked. Soon I intend to maybe create a package of morphs, as I did in TS3! I just made a little change, if it was something cool I'd send you. Wait for me to work on it, my friend. Thank you for your help

AND.GSM.123
Test Subject
#10 Old 9th Aug 2018 at 1:18 AM
I understand, I tested again with a dlc package and it worked. Soon I intend to maybe create a package of morphs, as I did in TS3! I just made a little change, if it was something cool I'd send you. Wait for me to work on it, my friend. Thank you for your help :D

AND.GSM.123
Test Subject
#11 Old 9th Aug 2018 at 1:19 AM
Even, I forgot to say, but I'm your fan! You're always doing nice things for us!

AND.GSM.123
Test Subject
#12 Old 20th Nov 2018 at 4:50 PM
Can you use other premade meshes for a preset say a body from another game much like converting meshes?
Ms. Byte (Deceased)
Original Poster
#13 Old 20th Nov 2018 at 5:09 PM
Quote: Originally posted by bmso85
Can you use other premade meshes for a preset say a body from another game much like converting meshes?


Not for a BGEO. Those need specially numbered meshes and only affect the head and face anyway.

For DMaps you can use any pair of obj base and morph meshes as long as the vertices and faces match up. IMO you're better off using the EA body meshes so that the morphs don't come out looking odd on standard Sims, but I guess you could make presets that are made to be used only on custom body meshes.

Please do not PM me with mod, tutorial, or general modding questions or problems; post them in the thread for the mod or tutorial or post them in the appropriate forum.

Visit my blogs for other Sims content:
Online Sims - general mods for Sims 3
Offline Sims - adult mods for Sims 3 and Sims 4
Test Subject
#14 Old 24th Nov 2018 at 10:15 PM
Well, what I'm going for is odd legs pushed a little back from the bottom of the knee and three fingers and two toes rather than the standard five. The only way I've been able to accomplish the toes and fingers is by editing gloves and socks.
Test Subject
#15 Old 3rd Feb 2019 at 7:42 AM
I created the obj files in DAZ Studio and saved them Blender obj files but I don't know how long it's supposed to take for the BGEO file to be created.
Ms. Byte (Deceased)
Original Poster
#16 Old 3rd Feb 2019 at 12:37 PM
Quote: Originally posted by LadyDrakharis
I created the obj files in DAZ Studio and saved them Blender obj files but I don't know how long it's supposed to take for the BGEO file to be created.


BGEOs require specially numbered meshes. You can't use a custom mesh without taking special steps to number it. If BGEO creation isn't working maybe that's why. As I said when you posted in the MorphMaker thread, if you want help you'll have to give more information about what you're trying to do.

Please do not PM me with mod, tutorial, or general modding questions or problems; post them in the thread for the mod or tutorial or post them in the appropriate forum.

Visit my blogs for other Sims content:
Online Sims - general mods for Sims 3
Offline Sims - adult mods for Sims 3 and Sims 4
Test Subject
#17 Old 11th Mar 2019 at 10:37 PM
Default Hello There!
Hi. I am trying to create a nose similar to the Creepypasta character, Laughing Jack, and when I say similar, I mean exactly like his nose... And I'm having issues with it... (Please See The Images Attached To Understand More Than I Can Explain). Anyway... Can you help me? Please? I'm just asking how to get around that error message and make the nose as I wish...
Please... Help me...
Screenshots
Ms. Byte (Deceased)
Original Poster
#18 Old 12th Mar 2019 at 12:20 AM
Quote: Originally posted by Shammrock289
Hi. I am trying to create a nose similar to the Creepypasta character, Laughing Jack, and when I say similar, I mean exactly like his nose... And I'm having issues with it... (Please See The Images Attached To Understand More Than I Can Explain). Anyway... Can you help me? Please? I'm just asking how to get around that error message and make the nose as I wish...
Please... Help me...


Interesting project! How did you form the nose? For morphs you can move vertices and change normals but that's all, so you'd have to reshape the nose without adding or removing any vertices or faces. Looking at that error message, it looks like the nose mesh has a face with way more than the three required sides and with no uvs or normals; if so that must have been added.

If all you did was move vertices, please upload your base head obj mesh and the morphed head obj.

Just IMO, but for this project you might be better off making a head replacement that's used as an accessory and removes the standard head.

Please do not PM me with mod, tutorial, or general modding questions or problems; post them in the thread for the mod or tutorial or post them in the appropriate forum.

Visit my blogs for other Sims content:
Online Sims - general mods for Sims 3
Offline Sims - adult mods for Sims 3 and Sims 4
Field Researcher
#19 Old 12th Mar 2019 at 9:49 PM
I want to take a character's head and the skeleton body from Jungle Adventures and make them a preset, is it possible to do that and if so what are the requirements to achieve this?
Ms. Byte (Deceased)
Original Poster
#20 Old 13th Mar 2019 at 2:05 PM
Quote: Originally posted by ZeldaSpyroJak
I want to take a character's head and the skeleton body from Jungle Adventures and make them a preset, is it possible to do that and if so what are the requirements to achieve this?


It's possible if you can reshape the default sim body into a skeleton without adding or removing any vertices or faces. You would then use it as the morph mesh to make a DMap and make a preset using that.

If you have a skeleton mesh that's not a morph, you're better off making it as clothing.

Please do not PM me with mod, tutorial, or general modding questions or problems; post them in the thread for the mod or tutorial or post them in the appropriate forum.

Visit my blogs for other Sims content:
Online Sims - general mods for Sims 3
Offline Sims - adult mods for Sims 3 and Sims 4
Field Researcher
#21 Old 13th Mar 2019 at 2:57 PM
Quote: Originally posted by CmarNYC
It's possible if you can reshape the default sim body into a skeleton without adding or removing any vertices or faces. You would then use it as the morph mesh to make a DMap and make a preset using that.

If you have a skeleton mesh that's not a morph, you're better off making it as clothing.


Well nuts, I was kind of hoping to make it a preset so I could put clothes on it and make it look like a skeleton when it takes a shower and everything, do you think you can make adding entirely new meshes a feature for MorphMaker in the future if you ever update it or change it?
Ms. Byte (Deceased)
Original Poster
#22 Old 13th Mar 2019 at 8:12 PM
Quote: Originally posted by ZeldaSpyroJak
Well nuts, I was kind of hoping to make it a preset so I could put clothes on it and make it look like a skeleton when it takes a shower and everything, do you think you can make adding entirely new meshes a feature for MorphMaker in the future if you ever update it or change it?


Sorry, but that's not how morphs, including presets, work. By definition a morph is the difference in shape and normals between two meshes. To construct the morph data you need a base mesh and a morph mesh that are identical except for shape and normals - the same lists of vertices and faces. You can already use an entirely new mesh but you still need an original version and a reshaped version of the same mesh.

What you CAN do is classify the skeleton body as an accessory which removes and replaces the sim body, so you can use clothing. (There's a setting for what part types should be removed by a CAS part.) If you make it a tattoo it'll show in the shower too.

Please do not PM me with mod, tutorial, or general modding questions or problems; post them in the thread for the mod or tutorial or post them in the appropriate forum.

Visit my blogs for other Sims content:
Online Sims - general mods for Sims 3
Offline Sims - adult mods for Sims 3 and Sims 4
Field Researcher
#23 Old 14th Mar 2019 at 2:02 AM
How do I use the setting to remove the CAS part?
Ms. Byte (Deceased)
Original Poster
#24 Old 15th Mar 2019 at 12:52 AM
Quote: Originally posted by ZeldaSpyroJak
How do I use the setting to remove the CAS part?


In Sims 4 Studio you have to go into the Warehouse, click on each CASP, and modify the ExcludePartFlags and/or ExcludePartFlags2, and you'd need a list of the values for each part type. I don't see the setting anywhere else.

The easiest way is to use CAS Tools - open the package in the Clone Package Editor tab, and in the General CAS Part Properties tab you'll see a list on the right under 'Exclude Parts'. Just check off the parts you want removed and click the Commit Changes button. It'll be applied to all the swatches.

Please do not PM me with mod, tutorial, or general modding questions or problems; post them in the thread for the mod or tutorial or post them in the appropriate forum.

Visit my blogs for other Sims content:
Online Sims - general mods for Sims 3
Offline Sims - adult mods for Sims 3 and Sims 4
Field Researcher
#25 Old 15th Mar 2019 at 5:55 AM Last edited by ZeldaSpyroJak : 16th Mar 2019 at 1:33 AM.
Quote: Originally posted by CmarNYC
In Sims 4 Studio you have to go into the Warehouse, click on each CASP, and modify the ExcludePartFlags and/or ExcludePartFlags2, and you'd need a list of the values for each part type. I don't see the setting anywhere else.

The easiest way is to use CAS Tools - open the package in the Clone Package Editor tab, and in the General CAS Part Properties tab you'll see a list on the right under 'Exclude Parts'. Just check off the parts you want removed and click the Commit Changes button. It'll be applied to all the swatches.


Thank you, that information was very helpful, I'll go try to do that.
Page 1 of 4
Back to top