Quick Reply
Search this Thread
Test Subject
Original Poster
#1 Old 4th Oct 2006 at 8:23 PM Last edited by Phaenoh : 26th Apr 2009 at 8:19 AM. Reason: fixed image links
Default Default skin replacment tutorial (includes Templates and Pictuers)
After getting a few requests from people wanting me to make more default skins i decided to instead write up a detailed tutorial as well make some Templates to simlify it even further.

I attached the tutorial and template to this post. and the tutorial includes pics to make it easier to make it easier to understand.


Tools needed


1. SimPE (Version used for this tutorial 0.58.2.20950)
http://sims.ambertation.de/

2. Nvidia DDS Tools
http://developer.nvidia.com/object/...ture_tools.html

3. Body Shop (included in Sims 2)


1. Setting up Nvidia DDS Tools in SimPE

Step 1. Open SimPE
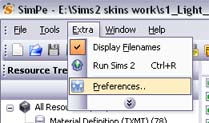
Step 2. In the menu Select Extra->Preferences


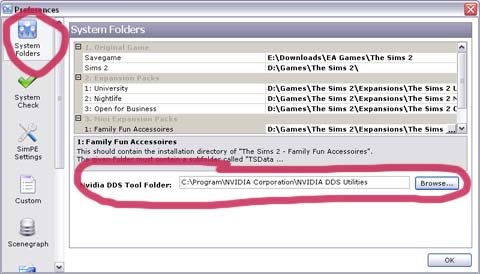
Step 3. Under “Nvidia DDS Tool Folder” select Browse and find the folder where you installed DDS Tools (default folder “C:\Program files\NVIDIA Corporation\NVIDIA DDS Utilities” then click OK.


2. Exporting Textures from a custom skintone

Step 1. Start up Sims 2 Body Shop

Step 2. Select “Create Parts”->”Start New Project”->”Create Genetics”

Step 3.
Now select the Skin Tone you want to make into a default. Then choose “Export selected textures”.

Step 4. Enter the name of the textures your exporting.

Step 5.
It will now export the textures to your ..\My Documents\EA Games\Sims 2\Projects\ folder.

3. Importing textures into Default Replacement Template.


Step 1. Open up the Default Replacemnt Template you want to place your custom textures into.


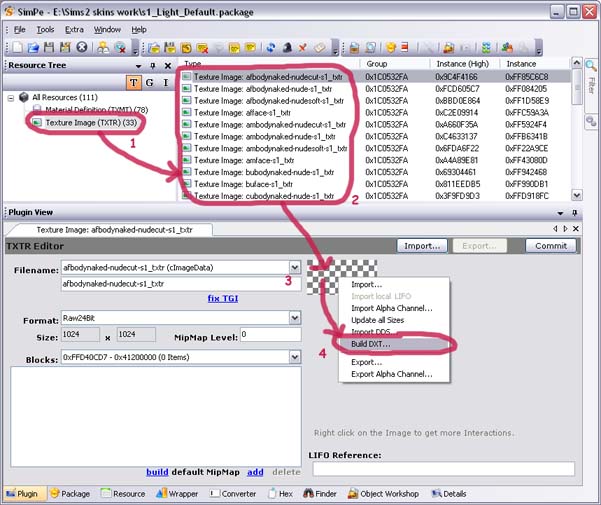
Step 2.
1. Select “Texture Image”
2. Select one of the Texture Image files.
3. Right Click here to bring up menu.
4. Select Build DXT.


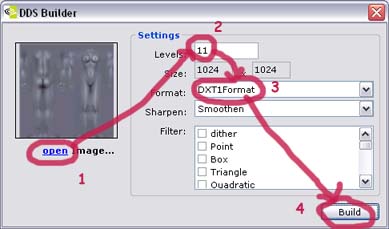
Step 3.
1. Select Open and select the texture file you want to add. The file names a pretty easy to figure out.
Ex. “afbodynaked-nudecut” is the Adult Female well trained body skin. And “buface” is Bady face skin for both genders. The chart below shows what it all means.

A= Adult F=Female
B=Baby M=Male
C=Child U=Unisex (Female and Male)
E=Elder FM=Same as U, Female and Male
T=Teen
P=Toddler
U=All ages


2. If the image is 512x512 (ex Face texture) set this to 10. If its 1024x1024 (ex Body texture) set it to 11.

3. Choose Format. DXT1Format has the highest level of compression and as such it will degrade image quality slightly. DXT3 and DXT5 are bit larger but has better image quality.

4. Lastly select Build.

Step 4. Once DDS Builder has finished building the mipmaps select Commit.’

Step 5. Repeat Steps1 to 4 till all textures have been replaced.

Step 6. Then save and viola you’ve finished your default replacement.


4. Vampire Default Replacment

The vampire skin works a bit differently from normal skintones and is basicly a full body make up that gets placed over your sims default skin.
The Vampire default textures are also transparent so that they mix in with the base skin. It is possible to have the vampire skins non-transparant as well if one does not want it to blend with the base skin.
It is important to set the Format to DXT3 or DXT5 if you are gonna import a transparent texture. (DXT1 does not support transparent textures)
Screenshots
Attached files:
File Type: rar  Default Skin Templates.rar (159.5 KB, 4062 downloads)
File Type: rar  Default Skin Tutorial.rar (131.7 KB, 1982 downloads)
Advertisement
world renowned whogivesafuckologist
retired moderator
#2 Old 4th Oct 2006 at 8:36 PM
Quote:
P=Umm not sure about this one.


P is toddler. >.> <.< Yeah, I dunno what they were thinking with that one.

my simblr (sometimes nsfw)

“Dude, suckin’ at something is the first step to being sorta good at something.”
Panquecas, panquecas e mais panquecas.
Scholar
#3 Old 12th Oct 2006 at 1:42 AM
I PM'd you but also wanted to publicly acknowledge my deep gratitude for all you have done so I can learn how to make my skins default. You went above and beyond all I could have hoped for in being pointed in the right direction to learn how to do what I want to do. Even I can follow this tutorial (I say "even I" because as I told a friend here privately after a health issue I often have difficulty processing and mentally sequencing written instructions.) The visuals help immensely!

I have been busy with family birthdays but hope to get some work time in this week.

What if one little pop could open a world of wonder
So sensory, so satisfying. It's the magic Friskies makes happen every day in so many ways
Friskies, feed the senses. Cat sez eff that, gimme cheezburgers.
Forum Resident
#4 Old 12th Oct 2006 at 2:03 PM Last edited by jmtmom : 12th Oct 2006 at 3:23 PM.
Thank-you so much for providing the templates. I always felt funny using someone else's defaults as a base.

A few quick questions:

I've always understood that you have to convert the BMP images you get from exporting with body shop into PNG images. Is this a required step?

Can the template files be renamed to include the name of the creator or skin you are using?

I've done this several times already (using another tutorial) and never noticed anything about level 10 or 11, how important is that?
Moderator of Camera Models
retired moderator
#5 Old 14th Oct 2006 at 6:27 AM
Fantasitc Guide.

Well done.

I just wanted to add something for folks who only want to change certain default skins (for instance you may only want to change the default skin for an elder female and leave all the other textures the Maxis defaults). It is not required that you create a graphic for every single texture mentioned in the template. Just follow steps 1 - 4 for each texture you want to change. Now all you need to do is select those textures you haven't created graphics for and click shift+del to remove them from the package.

Now your package will only affect those textures you specifically changed. All others will stay the same.

Bit of a time saver if you only want to make changes to a couple of skin textures in the package.

*** Games Journalist with the magazines PC Powerplay and Hyper ***

And guys don't say a game is 'addicting'. That is a horrible massacre of the English language. The word is 'addictive'. Thank you. :)
Lab Assistant
#6 Old 20th Oct 2006 at 6:28 PM
The default skins are not showing up in BodyShop. Is there a separate folder to save these files in order to make them default in BodyShop as well as in the game?

If it weren't for ADD I'd be forgetful, lazy, absentminded, clumsy, always late, disorganized, messy, and annoying.................for no apparant reason.
Lab Assistant
#7 Old 24th Oct 2006 at 11:26 PM
I just downloaded the hack that causes the default (grey) BodyShop skintone to be one of the normal skin colors. This has satisfied me, but I'm pretty sure I was clicking on the plain (default) Maxis icons. Oh, well. Not a problem anymore. Thanks for trying to help! ~Amy~

If it weren't for ADD I'd be forgetful, lazy, absentminded, clumsy, always late, disorganized, messy, and annoying.................for no apparant reason.
Test Subject
#8 Old 3rd Nov 2006 at 6:06 AM
I'm probably just missing something really obvious here, but when I try to right-click the...uh...checkered box for the 'build DXT' option, I get this:


"Then I took Nicky and Alex to the barber, and he gave them Lego haircuts...so I took that blue stuff that the combs were soaking in, and I rubbed it in his eyes. That'll teach him." - From the diary of Uncle Jesse
world renowned whogivesafuckologist
retired moderator
#9 Old 3rd Nov 2006 at 11:58 AM
sunshineandchocolate, you either didn't download or didn't properly set up the nVidia DDS Utilities, linked in the first part of the tutorial. You have to download and install them and then set up SimPE (in its options) to point to where they're installed before you can use that option.

my simblr (sometimes nsfw)

“Dude, suckin’ at something is the first step to being sorta good at something.”
Panquecas, panquecas e mais panquecas.
Test Subject
#10 Old 3rd Nov 2006 at 7:49 PM
You're right - I probably made a stupid error setting up the utilities. I'll have to go back through and make sure I do it right. =D Thanks. It never would have crossed my mind to check and see if I set the utilities up right.

"Then I took Nicky and Alex to the barber, and he gave them Lego haircuts...so I took that blue stuff that the combs were soaking in, and I rubbed it in his eyes. That'll teach him." - From the diary of Uncle Jesse
Lab Assistant
#11 Old 16th Dec 2006 at 6:18 PM Last edited by Thraxwhirl : 19th Dec 2006 at 4:05 PM.
Hold on. What's happened to the easier method for doing this?

Back in April, and again in July, I made some defaults for my game in SimPe, and it was a million times easier than this. I can't remember it precisely, but you just selected "Skin Workshop", and in there it had a "Create Default Skin" feature that did it all for you, and all you had to do was choose the skin file, then select which skintone(1 to 10) it should replace.

There was none of part 3 through 4, selecting every texture file and repeating these steps again and again.

Why has it all been changed in the new SimPE? The older method was far, far simpler.

Edit: Aha! I've found it! Yes, it still exists. I was looking in the wrong place. It's NOT in "Skin Workshop". It's in "Folder Scanner".

Seriously, folks, it's a MUCH easier way to do this, though it does limit you to DTX1(so no transparent skins).

What you do is this:

1) Ensure that the custom skins you intend to use are placed in a folder of their own.

2) Load SimPE, and with "Folder Scanner", scan the relevent folder. A list of skins, with thumbnails, will appear in the big window.

3) Click on the one you want, and then, in the bottom half of the window, select the "Operations" tab.

4) in the smaller window below the Ops tab, scroll down until you come to "Skintone Scanner". Ensure that the correct Default Choice is selected in the "Base Skin" field. This is the skin you wish to REPLACE with the Custom Skin. You have choices of the four standard human ones, plus Alien, Zombie, Mannequin, Mannequin(CAS) and Vampire. Two of the three boxes will already be ticked, I guess. I don't believe you need to tick the third.

5) with your Custom Skin already selected up in the top window, and Base Skin selected in the field, just click "Create default skin Override", and SimPE will do the whole lot for you. No fuss, no DTX issues and no mipmap building.

Easy as pi, and it saves no end of hard work.

Just one thing to note. DON'T use this easier method for creating Mannequin or Mannequin(CAS).

I have found that(on my machine at least) it will swap the heads over between Skintone 2 and Mannequin, so be warned.

Apart from that it seems to work fine.

There WAS once a full tutorial on this method(with pics) written by Morague on Variousimmers, but it's gone now... and that of course is why I couldn't find this feature yesterday. I was looking in the wrong place.

Nevertheless, I've found it again, and I hope it will save many of you a heck of a lot of trouble.
Forum Resident
#12 Old 7th Jan 2007 at 3:09 AM
Thraxwhirl,

A lot of people have had trouble with this method. I used it for a while, but had lots of problems, different colored heads and bodies, other problems. If you only do it once and never change it, it might be OK, but be prepared for problems if you ever decide to change defaults. Also you can't make a shareable default package even if you manage to get it to work right.

I always use this version now.
Test Subject
#13 Old 23rd Jan 2007 at 1:35 AM
the link given doesn't work for me, after searching the site a bit I found http://developer.nvidia.com/object/dds_utilities.html
is this the same thing or ???
Admin of Randomness
retired moderator
#14 Old 23rd Jan 2007 at 5:12 PM
Yes, Kransper, those are the DDS utilities. Guess they moved stuff around on their site.

"Undertake something that is difficult; it will do you good. Unless you try to do something beyond what you have already mastered, you will never grow." - Ronald E. Osborn

Please do NOT PM me with requests, creation questions, or game help questions. Click for help:
Game Help | Create | Content List | Where Can I Find?
Sockpuppet
#15 Old 9th Feb 2007 at 1:05 AM
The first post link is right, just remove the last '/' character.

http://developer.nvidia.com/object/...ture_tools.html
Admin of Randomness
retired moderator
#16 Old 9th Feb 2007 at 5:24 AM
Thank you, I just went and fixed it.

"Undertake something that is difficult; it will do you good. Unless you try to do something beyond what you have already mastered, you will never grow." - Ronald E. Osborn

Please do NOT PM me with requests, creation questions, or game help questions. Click for help:
Game Help | Create | Content List | Where Can I Find?
Test Subject
#17 Old 9th Feb 2007 at 2:54 PM
I want to replace the default skins for vampires, zombies and werewolves with other skins downloaded from here MTS2. Is this possible with this tutorial? Thanks!
Admin of Randomness
retired moderator
#18 Old 9th Feb 2007 at 4:52 PM
Well if you can find a default skin replacement file, then I assume if you change the graphics it should work. Never done it.

"Undertake something that is difficult; it will do you good. Unless you try to do something beyond what you have already mastered, you will never grow." - Ronald E. Osborn

Please do NOT PM me with requests, creation questions, or game help questions. Click for help:
Game Help | Create | Content List | Where Can I Find?
Scholar
#19 Old 6th Mar 2007 at 9:29 AM
so this should also work for the seasons greenman skins?

check out my uploads here updated May 15, 2008
Lab Assistant
#20 Old 6th Mar 2007 at 1:19 PM
Quote: Originally posted by HystericalParoxysm
P is toddler. >.> <.< Yeah, I dunno what they were thinking with that one.


......"Preschooler"? I'm just guessing here.

And it's gone, baby, gone.
Instructor
#21 Old 8th Mar 2007 at 7:26 PM
Thank you for this,and those templates-life saver!
I hope im not hijacking this,but, Ive just finished making HPs newset skintone(pale) as S1,but the package size is 30mb! Is this normal? Or should I just import it as Dxt1?
Thank you

DONT ASK ME FOR A REQUEST ^-^
New Policy,applies to all my meshes ^-^
Im not meshing/Simming now,details in my Policy thing
world renowned whogivesafuckologist
retired moderator
#22 Old 8th Mar 2007 at 7:34 PM
callum91, wait for my tutorial on the better technique than this one. Yes, that is pretty normal for a default replacement pack, especially at DXT3. Default replacements made with my superior method are around 11 mb total for all 4 tones. I'll be putting up a tutorial on it within the next couple days.

my simblr (sometimes nsfw)

“Dude, suckin’ at something is the first step to being sorta good at something.”
Panquecas, panquecas e mais panquecas.
Instructor
#23 Old 8th Mar 2007 at 7:46 PM
HP,Ill wait then THe single Pale Package was 30mb, not for all 4....
I looked at your replacement pack,and it looked pretty darn confusing,haha!
Oh well,Ill follow your guide through,and see how I get on XD

DONT ASK ME FOR A REQUEST ^-^
New Policy,applies to all my meshes ^-^
Im not meshing/Simming now,details in my Policy thing
Test Subject
#24 Old 9th Mar 2007 at 1:44 AM
I followed Thraxwhirl's tut and it worked wonders, it was so easy! The only thing though is that when my Sims get 'fit', they switch back to the Maxis default torso and lower-body textures. But strangely enough it works for the fat mesh :S So as long as I can keep them inbetween 'fat' and 'fit', I should be fine.
world renowned whogivesafuckologist
retired moderator
#25 Old 9th Mar 2007 at 2:04 PM
callum91/anyone else who wants smaller default packages: My tutorial on mixed method skintone defaults is up here... Do let me know if you have any questions. http://www.modthesims2.com/showthread.php?t=222953

my simblr (sometimes nsfw)

“Dude, suckin’ at something is the first step to being sorta good at something.”
Panquecas, panquecas e mais panquecas.
Page 1 of 4
Back to top