 Tutorial: Frankensteined Clothing in Seven (reasonably) Easy Steps
Tools Used
S3OC:
http://www.den.simlogical.com/denfo...4vi0&board=20.0
S3PE:
http://www.den.simlogical.com/denfo...4vi0&board=19.0
Milkshape:
http://chumbalum.swissquake.ch/ (US $35) Plugins for Sims 3:
http://www.modthesims.info/showthread.php?t=357403
--You can use Blender instead:
http://www.blender.org/ (free) Plugins for Sims 3:
http://www.modthesims.info/showthread.php?t=443780
GIMP:
http://www.gimp.org/ (free) Plugins for DDS:
http://code.google.com/p/gimp-dds/ (I recommend using the 32-bit version for both 32- and 64-bit installs - the 64-bit version seems not to do compression correctly.)
--Or Photoshop or any other compatible image editor with DDS capability and alpha channel editing.
Mesh Toolkit:
http://www.modthesims.info/download.php?t=481950
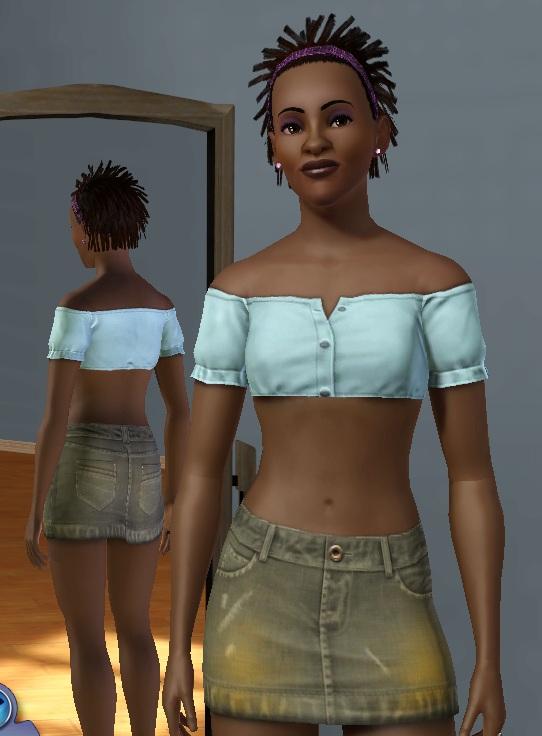
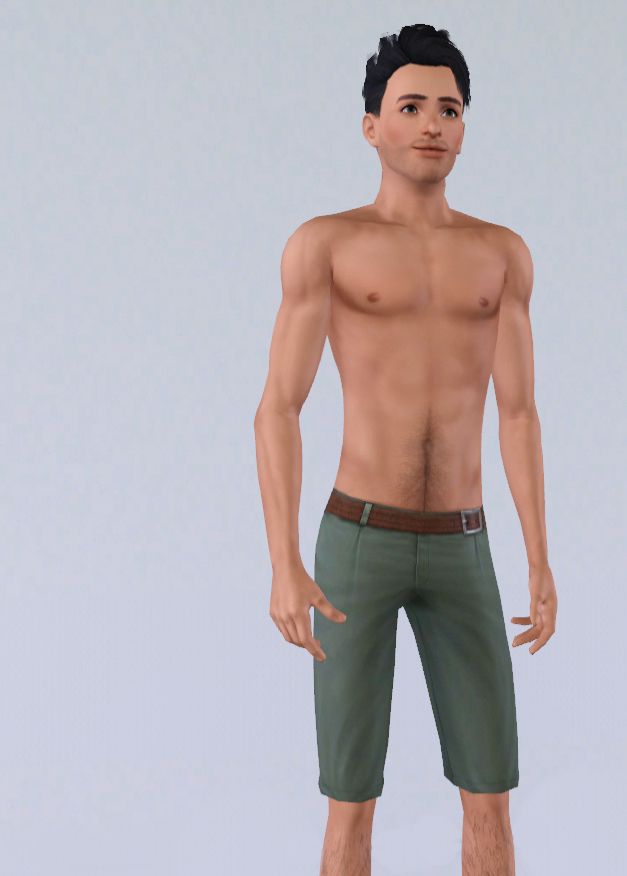
Frankensteining a mesh using s3oc, s3pe, Milkshape (or Blender), GIMP (or any image editor that handles DDS files and alpha layers), and Mesh Toolkit. This project will create a short cropped blouse by using the basegame off-shoulder blouse and replacing the torso with the torso of the nude top.
Audience: This is pretty much a beginner's tutorial, with the exception of clothing texturing which it's assumed you know how to do or will learn elsewhere. You should also have Milkshape or Blender set up and functioning correctly and have the appropriate DDS plugins installed for GIMP, Photoshop, or whatever image editor you use. The examples use Milkshape and GIMP but the steps are the same if using other tools. This is only one of the possible methods for combining pieces of meshes but IMO it's suitable for relative beginners while being flexible enough for some more advanced projects.
This tutorial will NOT teach you how to do texturing or the very, very basics of meshing.
1. Clone the two meshes you're going to combine using s3oc.
Run
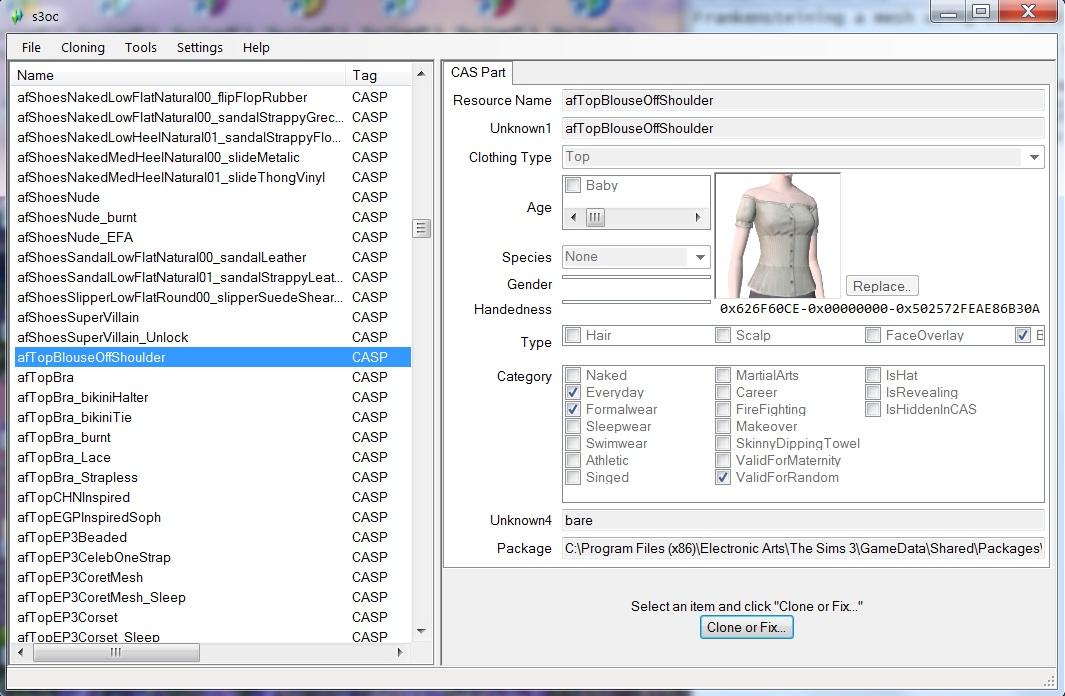
S3OC and click Cloning / (experimental) CAS Part. Wait while
S3OC finds the game CAS items. Then search the list to find the items you want. (Click Name at the top of the name column to sort.) In this case, we're looking for afTopBlouseOffShoulder. When you find it, highlight it and on the right side of the window click the Clone or Fix button.

Change the Unique Name to something descriptive (in this case, I'll change BlouseOffShoulder to CroppedTop) and click the Start button, and choose a work folder to save your cloned package in. The clone may take a minute or so. When the clone is finished, repeat the same steps to clone the afTopNude - for this you don't have to change the Unique Name although you can if you want to. When that's done, you can close s3oc.
2. Extract the files you need to modify.
Use
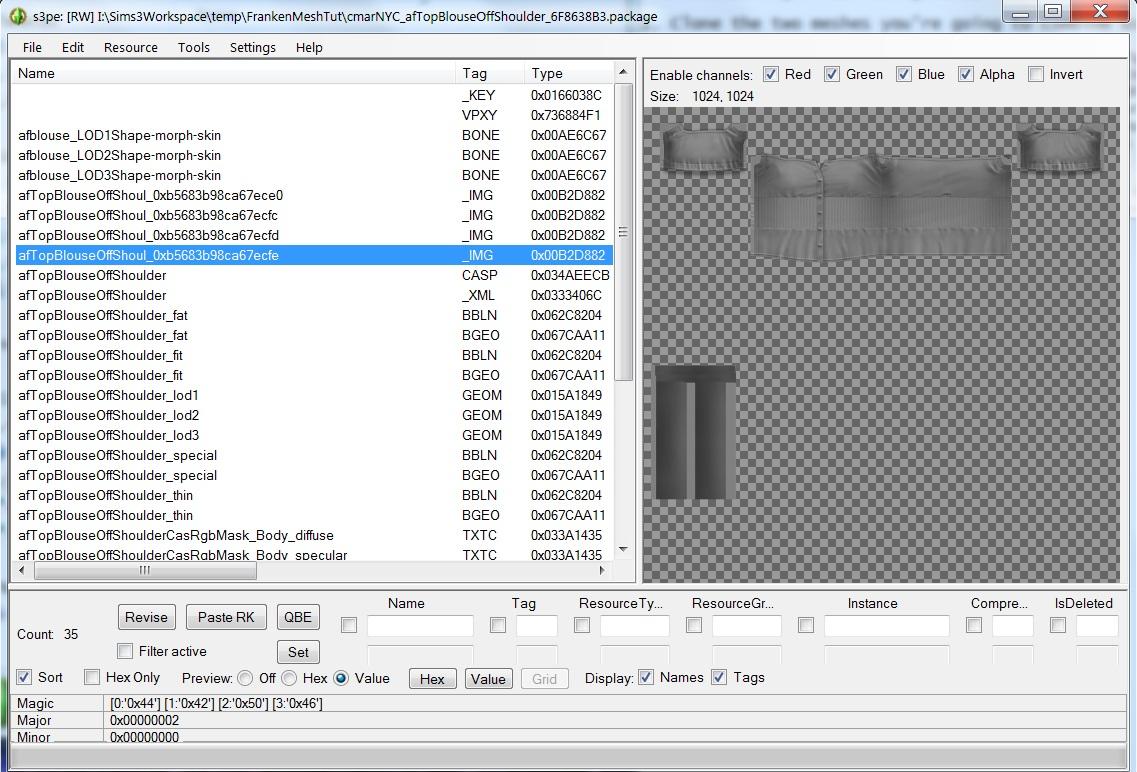
S3PE to open the two packages you created in Step 1 and extract the GEOM meshes and the BGEOs as files. If you're not doing a pregnant morph you don't need the Special BGEOs. In the BlouseOffShoulder package, also extract the _IMG files, which are the clothing textures and bumpmap.

Close s3pe.
3. Remove unneeded parts of each mesh.
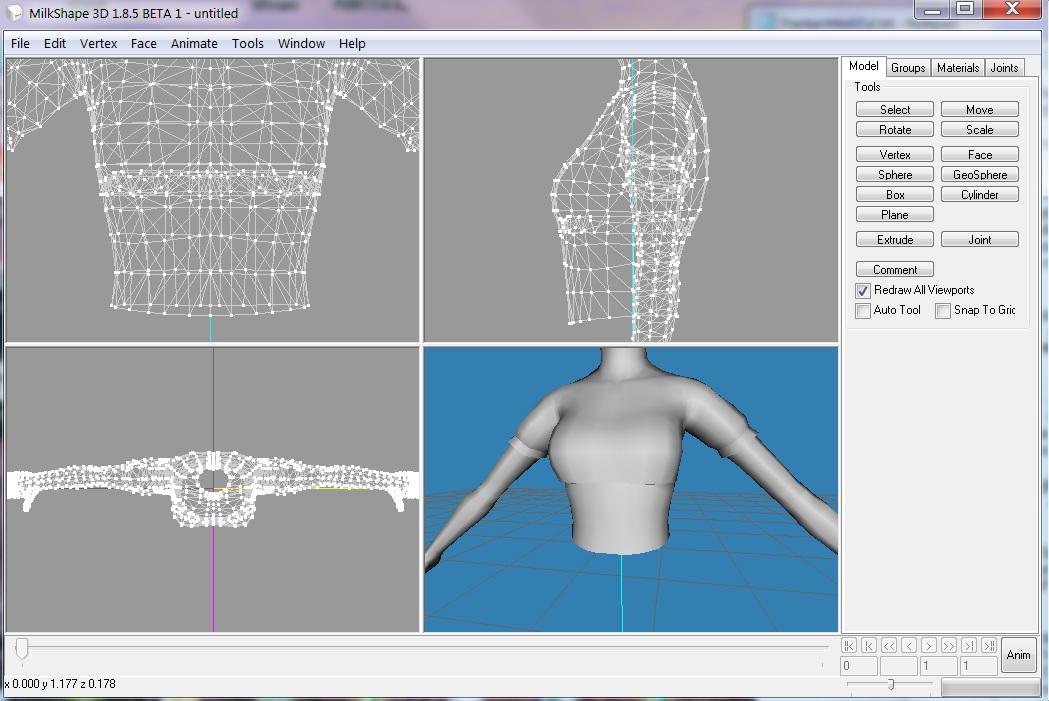
Run Milkshape, click File / Import / Q-mesh Sims 3 GEOM Importer V0.16 - by Wesley Howe, and import the blouse lod1 GEOM. Repeat and import the nude top lod 1 GEOM. In the Groups tab you should see two GEOMs listed. Highlight each one and rename it so you can tell which is which by typing a new name into the space next to the Rename button and then clicking the Rename button.
Hide the Nude mesh by highlighting it and clicking the Hide button in the Groups tab. Now you can work with the blouse mesh without affecting the nude top. What we're going to do is remove the torso part of the blouse mesh.
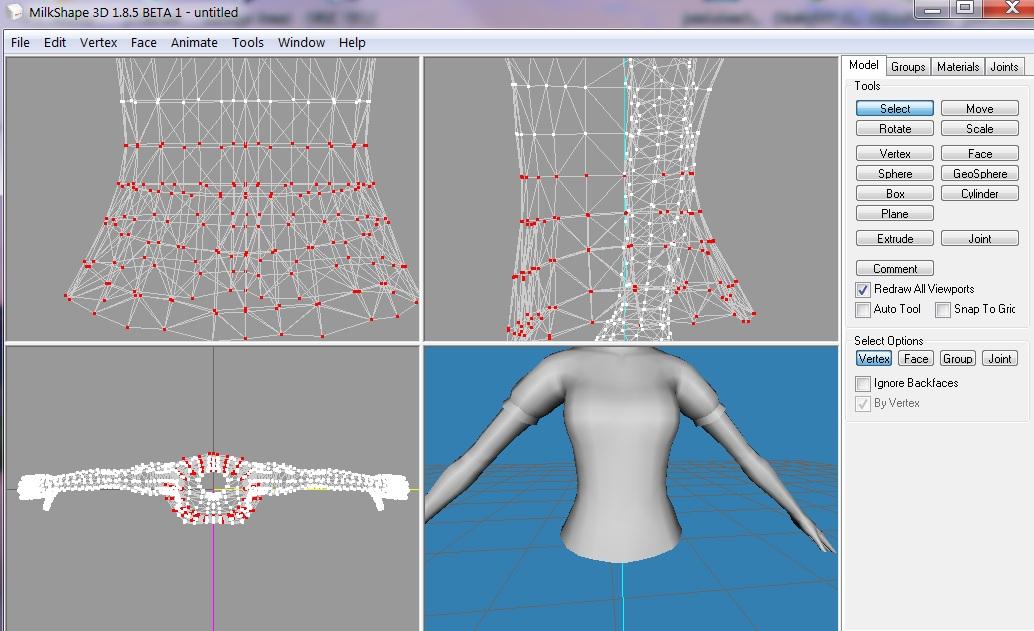
In the Model tab, click the Select button so you're in Select mode. Make sure Select Options are set to Vertex. Drag the cursor to select the blouse from the mid-waistline down, leaving a row of vertices extending below the bottom of the breasts. Click Edit / Delete Selection or press the Delete key to remove those vertices.

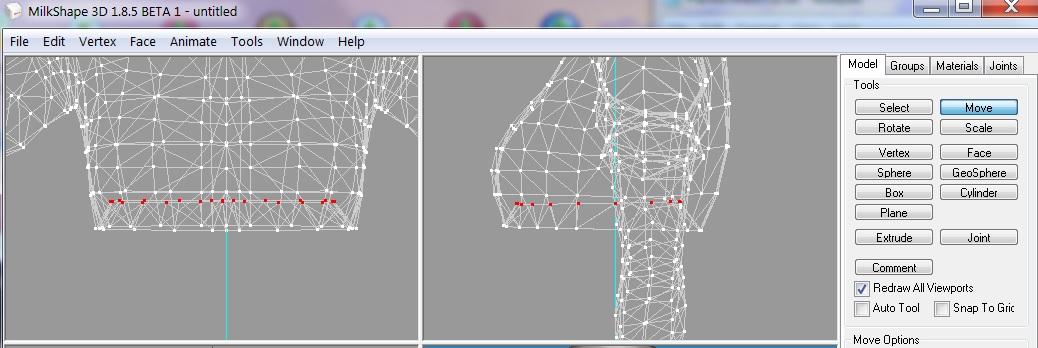
Now select the very bottom row of vertices and click the Scale button. Under Scale Options, fill in .9 for X and for Z. When you click the Scale button next to those numbers, the ring of vertices will shrink in the X (left-right) and Z (front-back) dimensions. Leaving the vertices selected, now click the Move button and drag the ring of vertices up inside the blouse to form a sort of hem.

Go back to the Groups tab, hide the blouse, and unhide the nude top. Back in the Model tab, select and delete vertices until you have only the torso up to just above the bottom of the breasts. Don't forget to delete the arms. The remainder of the nude top mesh should fit under the bottom of the blouse mesh with a small amount of overlap, ideally just to about where the 'hem' row of vertices of the blouse are. You can unhide the blouse to check the fit. You should also scale down and/or move back the vertices at the bottoms of the breasts to be well inside the blouse to avoid them popping outside the blouse mesh in the fat morph and the breast morphs. You can also try scaling up the bottom of the blouse just a little for the same reason.
Note: For a really neat job, you can join up the edges of the two meshes to form a seam. There are some tools in the Vertex menu that are helpful for this: 1) Snap Together with two or more vertices selected will move them to the same position, midway between them. 2) Sims 2 Unimesh Vertex Data Merge, with two vertices in different meshes selected, will move the vertex in the mesh that's lower in the mesh group tab list to the position of the vertex in the mesh group that's higher in the mesh group list. And yes, it works on Sims 3 meshes. 3) Sims 2 Unimesh Normal Data Merge does the same thing with vertex normals instead of position - useful for making a seam appear smooth.
Do NOT use the Weld tools. They make two or more vertices into one vertex, messing up the numbering, combining mesh groups that shouldn't be combined, and often messing up the UV mapping and making the mesh impossible to export.

When you're satisfied that the two meshes look good together, click File / Export / Q-mesh Sims 3 GEOM Exporter V0.16 - by Wesley Howe, and export the two meshes, naming them something easily identifiable. Close Milkshape.
4. Combine the base meshes and update and combine the morphs.
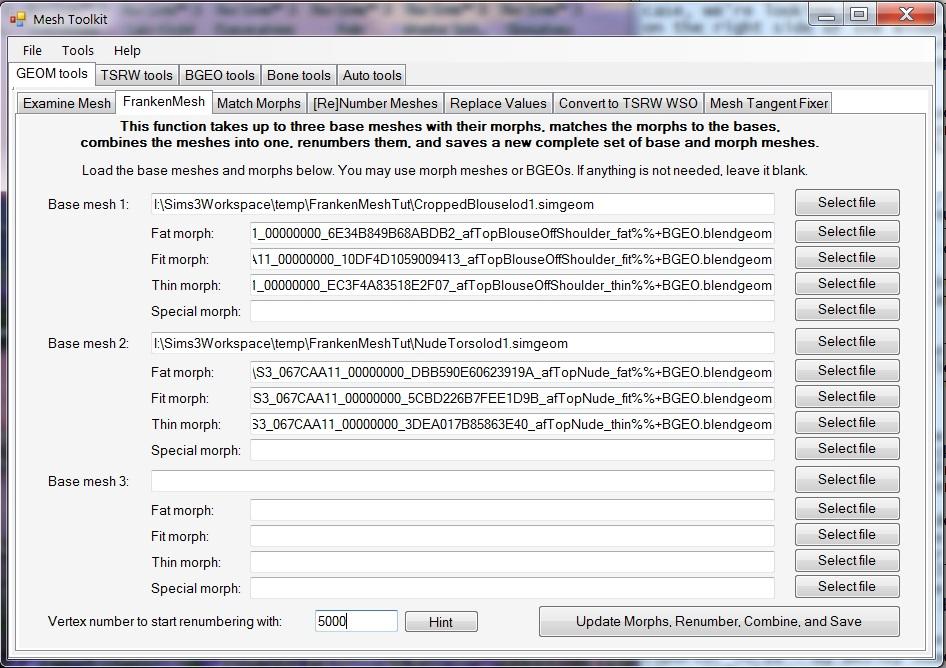
Run Mesh Toolkit. In the GEOM tools tab, go to the FrankenMesh tab. For Base mesh 1, select your modified blouse mesh from the last step. For the Fat, Fit, and Thin morphs, select the BGEO files for the blouse mesh. For Base mesh 2, select the modified nude mesh from the last step, and for its morphs select the BGEOs for the nude mesh. For 'Vertex number to start renumbering with', fill in 5000. (The standard start number for tops.)

When ready, click 'Update Morphs, Renumber, Combine, and Save'. You'll get a popup asking you to select the lod number of the meshes you're working with. Save the resulting combined base and morph meshes with identifiable names including the lod number. Note that the morphs will be saved as meshes.
(You MUST put the blouse mesh as mesh 1 in the FrankenMesh screen. The reason is that the combined mesh will take the settings (shader and most importantly the bump map and other texture links) of the first mesh listed. In the last step you'll be using the cloned blouse package as your final mod, and you need the combined meshes to link to the same textures as the original cloned meshes from that package. Otherwise the combined mesh bumpmap link won't find a bumpmap and you'll get some weird - although oddly attractive - lighting effects.)
(Optional - to check your work, import the combined meshes into Milkshape - base mesh first, then the morphs. The fat morph in particular is likely to give you trouble - you can either go back to your separate modified parts meshes and change them, or modify the Frankensteined fat mesh. If you modify any of the Frankensteined meshes, export them with the changes.)
Repeat steps 3 and 4 for lods 2 and 3. Lod 3 in particular won't have enough vertices to do a neat job, but it won't be seen closely enough in the game for it to matter. Note that in Mesh Toolkit you'll use the same BGEO files for all three lods, and that the program will automatically update your vertex numbering start number for lod 2 and lod 3.
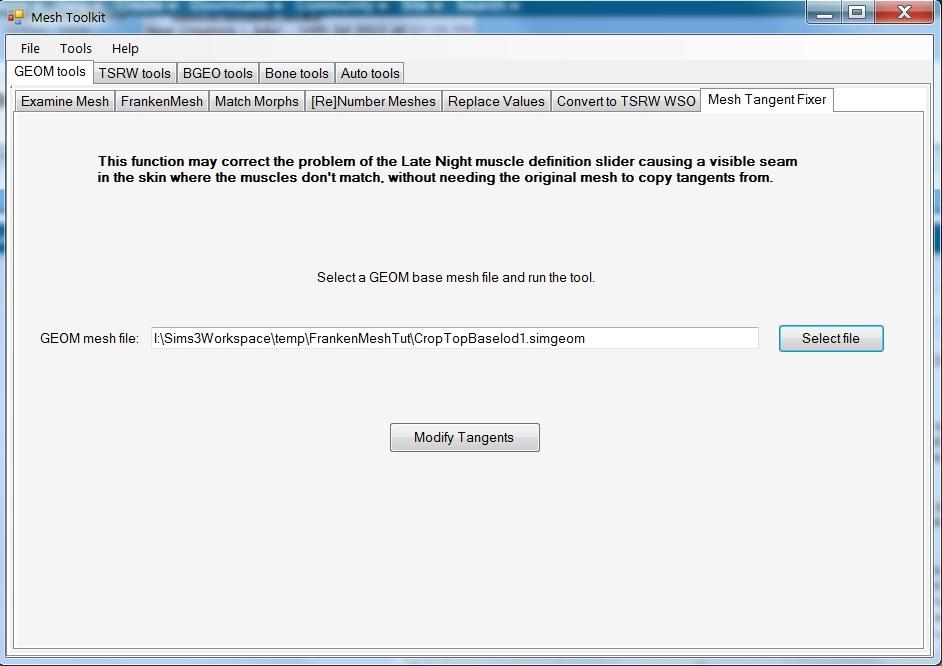
4a. If the clothing you're making shows a fair amount of skin, like this one does, you should recalculate your new base meshes' tangents to make them work correctly with the muscle definition slider. Run Mesh Toolkit and in the GEOM tools tab go to Mesh Tangent Fixer. Select your combined base mesh file, click the Modify Tangents button, and save the fixed mesh. Do this for lods 1 and 2 - lod 3 is optional. Don't forget that if you modify the base meshes in Milkshape later on you should again run them through this tool.

4b. If Mesh Toolkit tells you there are too many bones in your combined mesh, you'll have to make two meshes. See the section at the end on making more than one mesh for a LOD.
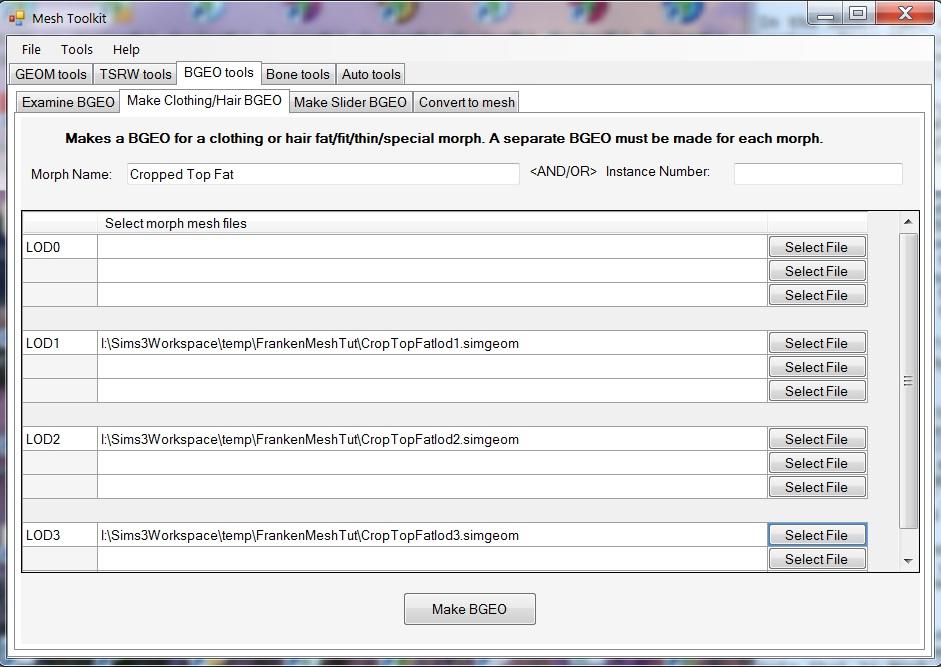
5. Still in Mesh Toolkit, go to the BGEO tools / Make Clothing/Hair BGEO tab. You have to make a new BGEO - Blend GEOmetry, a compressed form of the morph data - for each morph. Give your morph a descriptive name - in this case I'll put 'Cropped Top Fat'. (Using this method, you don't have to worry about a unique name. Using other methods it may be important and in that case you should include your creator name and a more descriptive item name.) Select your Frankensteined fat morph meshes for lod 1, lod 2, and lod 3. (Note that the blank spaces are for multipart meshes - lod1_1, lod1_2, etc. And LOD 0 is for hair - leave it blank.) Click the Make BGEO button and save your BGEO. Repeat for Fit and Thin, changing the morph name each time.

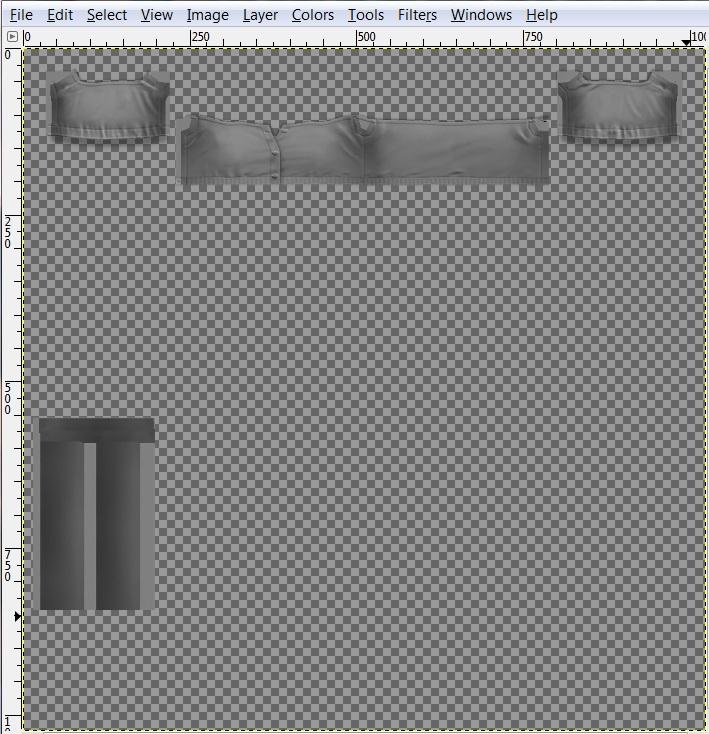
6. Open the clothing texture images you exported way back in Step 2. You can use GIMP, Photoshop, or whatever you're comfortable using as long as it can open and save DDS files and lets you edit the alpha channel. In all of the textures you want to remove the bottom part of the blouse - the part corresponding to the blouse mesh part you removed. I won't go into details since that's a whole other tutorial and this one isn't about texturing.

By the way, I find it's best when editing the bumpmap/mesh normal texture to save with DXT5 compression, or
S3PE and
CTU will pitch a fit with it.
Note that in this case all we have to do with the texture is to erase the lower parts of the blouse, in this case everything from near the top of the band around the midsection on down, so that the skin texture will show though. If Frankensteining other items, you may have to combine two or more clothing textures or make a new texture.
7. Now use
S3PE to open the blouse clone package you created with
S3OC back in Step 1. (You must use the same package.) Highlight the lod1 GEOM, right-click, and click Replace. Select the final combined lod 1 top base mesh from Step 4. Repeat for lod2 and lod3. Find the fat BGEO in the package and replace it with the fat BGEO you made in Step 5. Repeat for the fit and thin BGEOs. Find and replace the blouse texture images. Save and close the package.
And that's it! Install your modifed clone package in your game as usual, and it should show up in CAS as a short top.

To perfect it you can do a few things like setting preset patterns with CAS Texture Unitool (CTU), adding shadowing under the bottom edge in the textures, checking all the morphs and combinations of morphs in CAS, and tweaking the bone assignments under the breasts so the top fits better over the large breast morph, and you might find that the Mesh Toolkit Auto-morph function can make a better fat morph of the combined mesh. In other projects you may include a Special (pregnant) morph which you'd do exactly the same way as the other morphs. But at this point you've got all the basics.
Bonus information on making more than one mesh for a LOD:
If your combined mesh uses more than 60 bones, it will cause distortion in the game. More than 60 bones is most likely to happen in full body meshes, especially for skirts. In this case you've most likely cloned a full body skirt mesh for one of your parts, and it has more than one mesh for LOD 1 and maybe LOD 2 and LOD 3: named lod1 and lod1_1, lod2 and lod2_1, etc. When combining the meshes in step 4, what you need to end up with is two meshes for the same lods that have two meshes in the original clone. The lod1 mesh is usually pretty complete, but Lod1_1 is usually a small piece, maybe just a few fingers, and it's usually best to combine that with the part or parts you're using from other meshes. This will depend on what you're removing from each mesh for your particular project, however, and you may have to experiment. Use the FrankenMesh tool to create each part in order, even if you only have one mesh to load in it, so that the renumbering will be done correctly and your second mesh's numbers will start right after the first mesh's numbers. (Or use the mesh renumber function to renumber the two meshes in order. The important thing is that vertex numbers MUST run continuously without overlap within a lod - overlap is okay between different lods.) Then in step 5 make new BGEOs by loading lod1_1 under lod1 and lod2_1 (if any) under lod2, etc., and in step 7, replace the lod1 and lod1_1 with your two new meshes and again the same for lod 2 if necessary.
I hope this is useful to all you simmer Dr. Frankensteins out there!
 25th Jul 2012 at 4:36 PM
Last edited by CmarNYC : 10th Dec 2013 at 3:21 PM.
 26th Jul 2012 at 11:27 PM
 27th Jul 2012 at 3:10 PM
Last edited by Fawkes : 29th Jul 2012 at 6:16 AM.
Reason: PIC!
 31st Jul 2012 at 11:57 AM
 2nd Aug 2012 at 9:03 PM
 3rd Aug 2012 at 1:41 AM
 6th Aug 2012 at 12:38 AM
 6th Aug 2012 at 1:59 AM
 6th Aug 2012 at 10:48 AM
 6th Aug 2012 at 10:49 AM
 6th Aug 2012 at 5:15 PM
 29th Aug 2012 at 11:25 PM
Last edited by luluke0325 : 1st Sep 2012 at 8:10 PM.
 14th Sep 2012 at 11:02 PM
 24th Sep 2012 at 11:36 PM
 2nd Oct 2012 at 11:06 PM
Last edited by sciguy77 : 2nd Oct 2012 at 11:46 PM.
 3rd Oct 2012 at 2:57 PM
 3rd Oct 2012 at 4:16 PM
 3rd Oct 2012 at 6:40 PM
 5th Oct 2012 at 5:36 AM
Last edited by sciguy77 : 5th Oct 2012 at 6:14 AM.
 5th Oct 2012 at 3:21 PM
 5th Oct 2012 at 4:50 PM
 5th Oct 2012 at 7:47 PM
 5th Oct 2012 at 8:35 PM
 6th Oct 2012 at 5:19 AM
 6th Oct 2012 at 1:28 PM

 Sign in to Mod The Sims