Quick Reply
Search this Thread
Test Subject
Original Poster
#1 Old 5th Jun 2022 at 12:07 AM Last edited by It’s Cassney, simtch : 5th Jun 2022 at 12:52 AM.
Help with invisible mesh
So i was converting a dress from The Sims 4 to The Sims 2, but just as i was going to do one of the last steps i entered body shop and saw the dress mesh was completely invisible, even after i replaced the textures (although i’m not sure if i did that process correctly)… any idea on what i did wrong and how i could fix it? By the way, i think it’s worth mentioning i replaced the textures by replacing the textures that came with the folder that was generated in the Projects folder, so maybe that had something to do with it.
Screenshots
Advertisement
Test Subject
Original Poster
#2 Old 5th Jun 2022 at 12:12 AM
Quote: Originally posted by It’s Cassney, simtch
So i was converting a dress from The Sims 4 to The Sims 2, but just as i was going to do one of the last steps i entered body shop and saw the dress mesh was completely invisible, even after i replaced the textures (although i’m not sure if i did that process correctly)… any idea on what i did wrong and how i could fix it?


If needed, i can link the textures i utilized here.
Mad Poster
#3 Old 5th Jun 2022 at 2:51 AM
Invisible clothes has to do with incorrect linking, usually having to do with the second subset. Most likely something wrong with either the subset names or the PropertySet setup, but could also be missing other resources.

Rented-space has a quick tutorial for how to set up the PropertySet if you're missing a subset: https://rented-space.tumblr.com/pos...groups-in-simpe

With TS2->TS4 outfits you need to make sure the mesh and recolor file has (at least) two subsets, and set those up properly, for the files to work. The main one for skin and the other one for the clothes.

You also need to make sure you're linking up the SavedSims file to the new mesh, and not the file found in the Project folder (both are Package files, but only the SavedSims file will work).

Uploading the mesh and recolor file would help.
Test Subject
Original Poster
#4 Old 5th Jun 2022 at 5:34 PM
Quote: Originally posted by simmer22
Invisible clothes has to do with incorrect linking, usually having to do with the second subset. Most likely something wrong with either the subset names or the PropertySet setup, but could also be missing other resources.

Rented-space has a quick tutorial for how to set up the PropertySet if you're missing a subset: https://rented-space.tumblr.com/pos...groups-in-simpe

With TS2->TS4 outfits you need to make sure the mesh and recolor file has (at least) two subsets, and set those up properly, for the files to work. The main one for skin and the other one for the clothes.

You also need to make sure you're linking up the SavedSims file to the new mesh, and not the file found in the Project folder (both are Package files, but only the SavedSims file will work).

Uploading the mesh and recolor file would help.


Thank you for the help! The issue was that the second subset’s name didn’t match the name of the dress’s group in milkshape, the dress appeared when i changed the name. However i did get another issue with textures after that. I replaced the textures with the Build DXT method, and while the dress looks fine, for some reason the shoes look really weird. How could i fix this?
Screenshots
Mad Poster
#5 Old 5th Jun 2022 at 8:58 PM
Can you upload the mesh and recolor file?

Most likely it has to do with which set of resources the shoes are pulling the texture from. If the legs/shoes are pulled from a TS2 mesh and have UVmapping that doesn't conflict with the rest of the mesh, you can put those on the "body" subset and have the dress as the "body2" (or whatever the second subset is called).

You want anything that draws the skintone (hands/exposed parts of legs/items pulled from EAxis clothes - with some exceptions, etc.), on the base subset, and anything from the TS3 or TS4 mesh, or anything else that is going to conflict with a regular TS2 (naked) body UVmap on the other subset (and if you can't find space for it on either, you might need a 3rd subset, but probably not necessary in your case).
Test Subject
Original Poster
#6 Old 5th Jun 2022 at 9:32 PM
Quote: Originally posted by simmer22
Can you upload the mesh and recolor file?

Most likely it has to do with which set of resources the shoes are pulling the texture from. If the legs/shoes are pulled from a TS2 mesh and have UVmapping that doesn't conflict with the rest of the mesh, you can put those on the "body" subset and have the dress as the "body2" (or whatever the second subset is called).

You want anything that draws the skintone (hands/exposed parts of legs/items pulled from EAxis clothes - with some exceptions, etc.), on the base subset, and anything from the TS3 or TS4 mesh, or anything else that is going to conflict with a regular TS2 (naked) body UVmap on the other subset (and if you can't find space for it on either, you might need a 3rd subset, but probably not necessary in your case).


I can, yes! Included in the .rar file are the GMDC file i used for the dress, the file that i got from the SavedSims folder and the files from the Projects folder (in case you might need it). https://mega.nz/file/u6gTgRBY#YoARi...CQzEk1n7lhV5YRQ
Mad Poster
#7 Old 5th Jun 2022 at 10:35 PM
Looks like a simple mapping issue for the shoes. UVs have a "mapping area" of sorts within a square, and for some items they'll not show up properly if they're not within this area. The shoes have jumped down a full square.

In Milkshape, apply the texture to the legs in the Material tab.
Window --> "Texture Coordinate Editor"
Make sure "Body" is selected in the dropdown list.
Mark the UVs for the legs/shoes (they'll be far down in the map)
Select "move" and do "offset" -1.0 in the right box, click the "M" button. The UVs should jump up to the correct place.
Export the mesh from Milkshape and into SimPE.

(let me know if you need more instructions for the UV window).
Test Subject
Original Poster
#8 Old 6th Jun 2022 at 12:30 AM Last edited by It’s Cassney, simtch : 6th Jun 2022 at 12:42 AM.
Quote: Originally posted by simmer22
Looks like a simple mapping issue for the shoes. UVs have a "mapping area" of sorts within a square, and for some items they'll not show up properly if they're not within this area. The shoes have jumped down a full square.

In Milkshape, apply the texture to the legs in the Material tab.
Window --> "Texture Coordinate Editor"
Make sure "Body" is selected in the dropdown list.
Mark the UVs for the legs/shoes (they'll be far down in the map)
Select "move" and do "offset" -1.0 in the right box, click the "M" button. The UVs should jump up to the correct place.
Export the mesh from Milkshape and into SimPE.

(let me know if you need more instructions for the UV window).


Thank you! That fixed the issue, i finally got the outfit to work. Although i did get another small issue lol. I’m doing two different versions of the dress with two different shoes and while the first one worked just fine, the other one with heels still has an issue with textures. I changed the UV map like you said but the texture’s still a bit wonky
Screenshots
Test Subject
Original Poster
#9 Old 6th Jun 2022 at 12:32 AM
Quote: Originally posted by simmer22
Looks like a simple mapping issue for the shoes. UVs have a "mapping area" of sorts within a square, and for some items they'll not show up properly if they're not within this area. The shoes have jumped down a full square.

In Milkshape, apply the texture to the legs in the Material tab.
Window --> "Texture Coordinate Editor"
Make sure "Body" is selected in the dropdown list.
Mark the UVs for the legs/shoes (they'll be far down in the map)
Select "move" and do "offset" -1.0 in the right box, click the "M" button. The UVs should jump up to the correct place.
Export the mesh from Milkshape and into SimPE.

(let me know if you need more instructions for the UV window).


Oh and btw, here’s the mesh and the recolor file if you need it! https://mega.nz/file/u2YQjArb#oRbni...GFrJaPbsH9I0VEA
Mad Poster
#10 Old 6th Jun 2022 at 2:42 AM
For the one with heels, I'm guessing the textures for the shoes are overlapping with the skin. If the heels were on their own subset in the mesh you took them from, that's usually a clue.

It does look like the heels are mapped in such a way you could combine the shoes with the dress, and leave all the skin parts in its own subset. The trickiest part is to split up the shoes, but other than that it would work fine. Otherwise you might need a third subset for it to work.

One thing though - I noticed on the heel mesh that there are a lot of sharp edges. Do you have the "auto smooth" box ticked under "groups? If you do, untick it. This one causes those sharp edges to appear when you import meshes. You might want to do the heel mesh over (I don't think the other one had sharp edges, so you've got the dress mesh done, you just need to reimport the heels).
Test Subject
Original Poster
#11 Old 6th Jun 2022 at 3:59 AM
Quote: Originally posted by simmer22
For the one with heels, I'm guessing the textures for the shoes are overlapping with the skin. If the heels were on their own subset in the mesh you took them from, that's usually a clue.

It does look like the heels are mapped in such a way you could combine the shoes with the dress, and leave all the skin parts in its own subset. The trickiest part is to split up the shoes, but other than that it would work fine. Otherwise you might need a third subset for it to work.

One thing though - I noticed on the heel mesh that there are a lot of sharp edges. Do you have the "auto smooth" box ticked under "groups? If you do, untick it. This one causes those sharp edges to appear when you import meshes. You might want to do the heel mesh over (I don't think the other one had sharp edges, so you've got the dress mesh done, you just need to reimport the heels).


Got it! luckily i had previously saved a version of the project where i can easily delete the heels and reimport them, so i’ll be trying this later. Little question though, what you mean by saying i could combine the shoes with the dress is i could combine the heels + parts of the legs connected to them with the dress or only the heels and i’d have to separate them from the legs somehow? If it’s the latter, could you tell me how to do it or link me to any tutorial explaining how to?
Mad Poster
#12 Old 6th Jun 2022 at 4:43 AM Last edited by simmer22 : 6th Jun 2022 at 5:03 AM.
The UVmaps for the skin (legs/ankles/feet) and shoes overlap, so those need to be separated anyway. The skin parts need to be on the "body" map, so they draw the skintone properly. The shoes need to either be on their own set of resources, or share resources with the dress. The UVmaps would fit together, so to save on resources you can combine the dress and shoes (but only the shoes, not the skin parts).

The more textures you put into a piece of clothing, the "heavier" it will be to render for the game, so if you can save on resources, it is a good idea to do so.

The easiest way to figure out if an UVmap for a non-skin part will fit with another non-skin part is to combine the textures in a picture editing program. If they don't overlap, it'll usually work fine (and if not, you'll have to extract the UVmaps and see if they overlap anywhere, or check in Milkshape or Blender). If it's for anything that's showing skin, you have to also make sure it doesn't overlap the skin parts that show on the mesh.

---

To separate meshes:
My preferred method is to separate and then duplicate the area I want to edit (in your case shoes/legs), so I have two versions of it. Then I hide everyting except one of them.

Then I decide which of the items I want to be which (one is skin, the other is the shoes).

On the skin item, I start selecting faces (faces selected, with "by vertices" ticked below) I know belong to just the shoe, and when I'm no longer sure, I move them down, then mark the first line of unselected faces, drag this down, and continue until as much as possible has separated from the mesh. In this case there were some extra faces around the foot, these can be selected and removed (if you see you select anything on the foot, just deselect it and continue).

On the shoe item, I select the faces of the skin on the legs, and drag those away/mark/drag away, until they're fully separated from the shoe.

You should be left with the shoes and the legs as separate meshes. These can be combined back into whichever group you want them to be in - make sure you fix comments (those always double up when you combine meshes), and subset names.
Test Subject
Original Poster
#13 Old 6th Jun 2022 at 4:23 PM
Quote: Originally posted by simmer22
The UVmaps for the skin (legs/ankles/feet) and shoes overlap, so those need to be separated anyway. The skin parts need to be on the "body" map, so they draw the skintone properly. The shoes need to either be on their own set of resources, or share resources with the dress. The UVmaps would fit together, so to save on resources you can combine the dress and shoes (but only the shoes, not the skin parts).

The more textures you put into a piece of clothing, the "heavier" it will be to render for the game, so if you can save on resources, it is a good idea to do so.

The easiest way to figure out if an UVmap for a non-skin part will fit with another non-skin part is to combine the textures in a picture editing program. If they don't overlap, it'll usually work fine (and if not, you'll have to extract the UVmaps and see if they overlap anywhere, or check in Milkshape or Blender). If it's for anything that's showing skin, you have to also make sure it doesn't overlap the skin parts that show on the mesh.

---

To separate meshes:
My preferred method is to separate and then duplicate the area I want to edit (in your case shoes/legs), so I have two versions of it. Then I hide everyting except one of them.

Then I decide which of the items I want to be which (one is skin, the other is the shoes).

On the skin item, I start selecting faces (faces selected, with "by vertices" ticked below) I know belong to just the shoe, and when I'm no longer sure, I move them down, then mark the first line of unselected faces, drag this down, and continue until as much as possible has separated from the mesh. In this case there were some extra faces around the foot, these can be selected and removed (if you see you select anything on the foot, just deselect it and continue).

On the shoe item, I select the faces of the skin on the legs, and drag those away/mark/drag away, until they're fully separated from the shoe.

You should be left with the shoes and the legs as separate meshes. These can be combined back into whichever group you want them to be in - make sure you fix comments (those always double up when you combine meshes), and subset names.


Separating the shoes from the legs and combining them with the dress sort of did the trick, the heels look a bit better now but for some reason the dress texture got really borked This is how the UV looks btw, i wonder if maybe it’d look different when in body shop and if i should just check it? Let me know if you need the mesh files again!
Screenshots
Mad Poster
#14 Old 6th Jun 2022 at 5:11 PM Last edited by simmer22 : 6th Jun 2022 at 5:23 PM.
The issue with the mesh most likely comes from the other problem I mentioned - if you've got Autosmooth ticked under the Groups tab, and import a new mesh over that. This causes sharp edges in the newly imported mesh. If you untick Autosmooth, this shouldn't happen. The smoothing issues were there on both versions you sent, on the shoes and skin parts. Usually an issue with Autosmooth (the first part you import in is usually fine, but the following parts usually have the creases).

You either have to redo the mesh (if there's too much damage to fix) by reimporting the dress and shoes (most likely the easiest in your case), or fix it manually by selecting individual parts of the mesh and doing "Vertex--> align normals". However - make sure to not do this on the whole mesh at once, or you'll mess up the smoothing on everything. If you use align normals, be careful around the neck, or you'll end up with a crease, because it needs to have the same normals as the neck on the face mesh.

Are you working in Blender or in Milkshape, or a mix? Blender has some issues with smoothing where there are edge splits, and these don't translate over to Milkshape or to ingame as smooth pieces, while in Milkshape they usually do. If you're working with converting TS4 meshes you'll usually have to fix those edge splits in one way or another, or you get creases.
Test Subject
Original Poster
#15 Old 6th Jun 2022 at 5:44 PM
Quote: Originally posted by simmer22
The issue with the mesh most likely comes from the other problem I mentioned - if you've got Autosmooth ticked under the Groups tab, and import a new mesh over that. This causes sharp edges in the newly imported mesh. If you untick Autosmooth, this shouldn't happen. The smoothing issues were there on both versions you sent, on the shoes and skin parts. Usually an issue with Autosmooth (the first part you import in is usually fine, but the following parts usually have the creases).

You either have to redo the mesh (if there's too much damage to fix) by reimporting the dress and shoes (most likely the easiest in your case), or fix it manually by selecting individual parts of the mesh and doing "Vertex--> align normals". However - make sure to not do this on the whole mesh at once, or you'll mess up the smoothing on everything. If you use align normals, be careful around the neck, or you'll end up with a crease, because it needs to have the same normals as the neck on the face mesh.

Are you working in Blender or in Milkshape, or a mix? Blender has some issues with smoothing where there are edge splits, and these don't translate over to Milkshape or to ingame as smooth pieces, while in Milkshape they usually do. If you're working with converting TS4 meshes you'll usually have to fix those edge splits in one way or another, or you get creases.


I did try redoing the shoes with the Autosmooth box unticked, but i still got the same issue. Then again i didn’t try to redo the dress as i thought it was fine since it worked on the version with the other shoes, so maybe that has something to do with it. Oh, and i couldn’t find the align normals option in Vertex for some reason

Oh, and i’m actually only working with Milkshape
Screenshots
Mad Poster
#16 Old 6th Jun 2022 at 7:50 PM Last edited by simmer22 : 6th Jun 2022 at 8:06 PM.
It needs to be unticked when you import the mesh parts the first time, so if you've already worked on the mesh at some point with autosmooth ticked, then the damage is most likely already done. It is fixable, but expect some trial and failure, especially around the neck area. For areas like the arms, you can reimport them from a new mesh, and they should be fine as long as autosmooth is off.

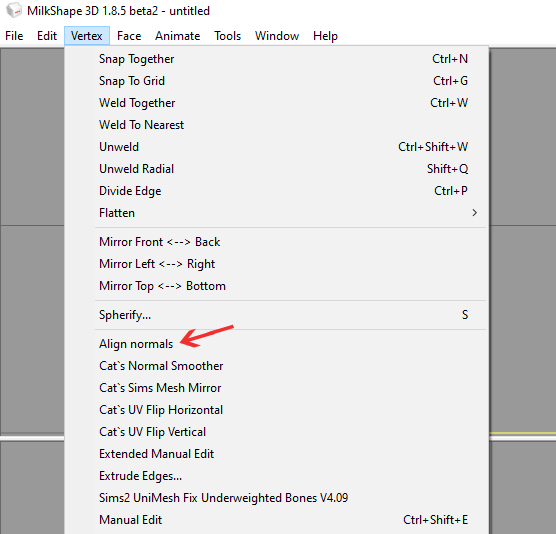
Align Normals should be here:
(The four options below by Cat are Sims-spesific plugins that can be useful for meshing and UVmapping, they're all here in case you're interested).
Test Subject
Original Poster
#17 Old 6th Jun 2022 at 8:06 PM
Quote: Originally posted by simmer22
It needs to be unticked when you import the mesh, so if you've already worked on the mesh at some point with autosmooth ticked, then the issue with the creases can happen.

Align Normals should be here:
(The four options below by Cat are Sims-spesific plugins that can be useful for meshing and UVmapping, they're all here in case you're interested).


Right, i probably must have kept it ticked by mistake while re-doing the shoes at some point. I managed to find the Align Normals option, i just didn’t have the plugin for it installed lol. Now i do have a question, what exactly does align normals do and how should i use it?
Mad Poster
#18 Old 6th Jun 2022 at 8:24 PM
A "normal" is the orientation of a polygon's surface. If they're not aligned, they'll show up like the first two spheres below. When aligned (fully, in this case - didn't have a better example pic, see below) they create a smooth surface. It's part of what creates the illusion of creases and smoothness, especially with lower-poly meshes, to save on polys. Example: https://i.postimg.cc/Z0kSBvxr/sphere-LOW.png

In Milkshape you usually need to be a bit careful with what you select. You don't want to smooth pieces where there are supposed to be creases (like the bottom of the dress, the inside of the sleeves, the bottom of the shoes or heels, and a few other places), but you'll want to make sure the skin parts are smooth and that the dress doesn't have creases where they aren't supposed to be.

I'll usually switch between two methods, depending on what works in which areas. For some areas I'll select only the vertices in the affected areas and then do "align normals". In other areas I'll select faces (with "by vertex" ticked) and see if that works. Sometimes a mix of both.

It can be a good idea to work without textures applied, or switch between "smooth shaded" and "textured" (right-click the 3D view, third and fourth line). Creases show up a whole lot better with "smooth shaded".

For areas like the arms, you can reimport them from a new mesh, and they should be fine as long as autosmooth is off (this is much easier than fixing - if possible, or if easiest, you can do this with the upper body too).
Test Subject
Original Poster
#19 Old 7th Jun 2022 at 6:32 PM
Quote: Originally posted by simmer22
A "normal" is the orientation of a polygon's surface. If they're not aligned, they'll show up like the first two spheres below. When aligned (fully, in this case - didn't have a better example pic, see below) they create a smooth surface. It's part of what creates the illusion of creases and smoothness, especially with lower-poly meshes, to save on polys. Example: https://i.postimg.cc/Z0kSBvxr/sphere-LOW.png

In Milkshape you usually need to be a bit careful with what you select. You don't want to smooth pieces where there are supposed to be creases (like the bottom of the dress, the inside of the sleeves, the bottom of the shoes or heels, and a few other places), but you'll want to make sure the skin parts are smooth and that the dress doesn't have creases where they aren't supposed to be.

I'll usually switch between two methods, depending on what works in which areas. For some areas I'll select only the vertices in the affected areas and then do "align normals". In other areas I'll select faces (with "by vertex" ticked) and see if that works. Sometimes a mix of both.

It can be a good idea to work without textures applied, or switch between "smooth shaded" and "textured" (right-click the 3D view, third and fourth line). Creases show up a whole lot better with "smooth shaded".

For areas like the arms, you can reimport them from a new mesh, and they should be fine as long as autosmooth is off (this is much easier than fixing - if possible, or if easiest, you can do this with the upper body too).


Thank you so sooo much for all the help! I finally managed to fix all issues and finished the dress
Screenshots
Back to top