Quick Reply
Search this Thread
Theorist
Original Poster
#1 Old 11th Jun 2009 at 7:24 AM
Default TUTORIAL: Four-Color Patterns In Paint Shop Pro 9~Graphic Intensive!
Credit where credit is due:
Delphy for his Pattern Packager.
HystericalParoxysm for her tutorial for PhotoShop (without which we wouldn't have figured this out).
Syera (many here know her from BogSims Institute), my graphically artistic daughter, who put her head together with mine until we had this thing working (and has been having a blast making patterns while I created this tutorial).
Janette, my literaturely artistic daughter who did all the proof reading and made sure everything I wrote made sense.

This tutorial was created using Paint Shop Pro 9.

My example is going to show the simplest design I could think of doing. It is merely to show how the process of creating a four-color texture in PSP9 works. I am afraid I don't have time right now to explain how to separate the different pieces of the texture for the different colors so hopefully HystericalPoraxysm's Tutorial can explain that.

I really hope no one minds all the pictures. My mom used to tell me how to do something and then when I had trouble ask, "Do I have to draw you a picture?" Many were the times I wanted to say, "YES! Draw me a picture!" but of course if I had said that I would've been in deep, deep trouble! As such, I've tried to include plenty of pictures for reference.

If you're just getting started there are a few things you'll need.

#1. DDS Support for PhotoShop (yes, it works with PSP but please follow the instructions for installation for PSP9):

Download the plugin from here:
http://developer.nvidia.com/object/...ds_plugins.html

The plugin has a self installer which by default asks where your PhotoShop folder is. Point it to your PSP folder, which typically is at Program File>Jasc Software Inc>Paint Shop Pro 9.

The installer will create a folder within your Paint Shop Pro 9 folder called Plug-ins and install the DDS support files in there. IMPORTANT: You MUST move those files from the newly created folder to the folder named PlugIns within your PSP9 folder. If you don't already have a PlugIns folder in your PSP folder, you can rename the new one. If that folder has the wrong name, PSP can't read the plug-in.

NOTE: If you have PSP running while you install the DDS plugin, just close out of it and restart for it to pick up the DDS plugin.

#2: Delphy's Pattern Packager

IMPORTANT: YOU NEED TO DOWNLOAD .NET FRAMEWORK 3.5 FOR THE PATTERN PACKAGER TO WORK. If you have questions about the pattern packager, please post them in Delphy's Pattern Packager thread, not this one.

Follow the instructions for installing the Pattern Packager; it's easy, just drag and drop the files from the archive into your chosen folder.

------------------------

Keep in mind:

Channels layer in a certain order: Red on the bottom, green next, blue next, and alpha channel on top. If you are creating a design that needs the colors added in a certain order, make sure you are using the correct images for that order.

Okay, time to create your texture!

If you don't already have Paint Shop Pro 9 running, start it.
Next, create a new image, 256x256 pixels.


Once you have your image created, click the Image tab, then look toward the bottom of the list and select Split Channel>Split to RGB.


You now have four images as below:


For this tutorial I next created a new image, again 256x256 pixels.


For simplicity's sake, I divided the image into four equal squares and colored each square uniquely. Each one of these colors is going to be an individually recolorable section of the finished texture.


Next, I take my Magic Wand tool, set the tolerance level to 0 and click to select the upper left-hand square.


Following that, I press Ctrl>C to copy the selection to my clipboard, then paste it into my red channel (the image named Red2 in the screenshot). Once it's pasted into one of the RGB channels, it automatically takes on a gray color.


Then I move it to the upper left-hand corner. This will be one single colorable area.


I repeat the process two more times, working clockwise, selecting one color each time and placing it in its respective corner of the Blue and Green channels. (As I said, this is just a very simple design to show how the process works.)


Now that each of the three RGB channels has their assigned color, it's time to put the original image back together. Select the original image you created, then choose Image>Combine Channel>Comb from RGB...


...which brings up this little screen, so click OK.


A brand new image has been created containing the contents of the RGB channels, in this case Image 3.


Now we're going to create that seemingly elusive Alpha Channel to get a fourth color in this pattern.

First of all, using the Magic Wand tool again, I have selected the very last color in my pattern, the one marked A.


Then, I copy and paste it into Image 3 and move it to where it belongs, which in this case is the only spot left without a color, the bottom right-hand corner. Pasting it onto the image has created a new Raster layer. You need not worry about the layer as it will be gone soon enough. I grab my Magic Wand again and click on this new layer to select it.


Next, go to Selections>Load/Save Selection and choose Save Selection to Alpha Channel.


Then, make sure you still have the alpha selected, and delete that layer. Don't worry, you haven't deleted the Alpha Channel, just the image that marked where that channel belongs.


Save it as a DDS file...


...making sure to use the 8.8.8.8 ARGB 32 setting.


Open the Pattern Packager (if it's the first time you've opened it, make sure to read the licensing agreement and enter your info) and click File>New Pattern. Then click the Browse button and navigate to where you have saved your DDS file and open it. You must enter the Pattern Details, and since this is a four-color pattern, click the circle by the #4. Click on the Palette Boxes below to choose the colors your texture will have by default in the game. Then save it in your Packages folder, or save it somewhere else and move it into your Packages folder. (Remember, if you don't already have the framework for custom content installed, you won't have the proper folder structure for custom content in your Program Files>Electronic Arts>The Sims 3 folder.


So, how does it look in the game?


And with all sections recolored:


And just for grins and giggles, here's a shot of it over the top of a wood wall.


IMPORTANT NOTE:

It is possible with the textures to add several shades of one color to a channel by using varying shades of gray. So far I haven't been able to get this to work on the Alpha Channel color. If you're creating a texture with multiple shades of one color, then it will currently need to be done on the other channels, saving the Alpha Channel for solid coloring.
3 users say thanks for this. (Who?)
Advertisement
Test Subject
#2 Old 11th Jun 2009 at 11:13 AM
Thank you for this tutorial.
I wondered for hours how to create an Alpha Channel.
Than I read your tutorial and now i can have 4 colours in my patterns
Instructor
#3 Old 11th Jun 2009 at 11:39 AM
Wonderful tut Misty, thank you so much.

You can find more of my stuff here: http://www.blackpearlsims.com/downloads.php
Test Subject
#4 Old 11th Jun 2009 at 3:39 PM
I'm realy thankful for this tutorial!
But I still have a problem. How can I split 4-colorued flower pattern? How is it possible to split/select all these overlapping colors?
Test Subject
#5 Old 11th Jun 2009 at 3:46 PM
Thanks bunches for sharing your detailed tutorial ... ... much appreciated.
Lab Assistant
#6 Old 11th Jun 2009 at 3:56 PM
Thankyou so much for sharing this, really apprecaite all the pictures too as am a bit rusty using psp for anything beyond looking at pics lol
Test Subject
#7 Old 11th Jun 2009 at 5:14 PM
Thank you so much for explaining the elusive alpha channel!
Theorist
Original Poster
#8 Old 11th Jun 2009 at 5:58 PM
You're welcome, everyone! I was afraid I'd come here this morning to find a ton of questions because I failed to explain it properly. I'm so happy to find it's being understood!
Quote: Originally posted by missi4
But I still have a problem. How can I split 4-colorued flower pattern? How is it possible to split/select all these overlapping colors?

How familiar are you with using the various tools in PSP? For separating colors you're going to need to either have a good knowledge of or learn how to make selections. If parts of the pattern overlap it could be difficult. HP's Tutorial explains basically how to prepare a pattern. I see many people starting out with relatively simple geometric designs, which I think make excellent starter projects.
Test Subject
#9 Old 11th Jun 2009 at 7:08 PM
Well, my knowledge is not that good...but I really want to try!

Here I have a pattern. Could you explain how I'm able to split it in the RGB channels, please? I don't get it

Theorist
Original Poster
#10 Old 11th Jun 2009 at 8:19 PM
Okay, Missi, I'm still experimenting a lot with this but I'm going to take your image and give you a step-by-step. That's a great image for starting as it will be super easy!

While I'm working on this, why don't you go back and read through the steps one-by-one. The tutorial I posted really doesn't explain how to get your image ready for editing, so much as what to do with it once you have it edited.
Test Subject
#11 Old 11th Jun 2009 at 11:08 PM
Thanks Misty! I'm exciting about reading your step-by-step tutorial soon

The other steps I alredy managed successfully, just worked with 2-channel-pattern. It was easy.
Lab Assistant
#12 Old 12th Jun 2009 at 8:09 AM
I am so very in love with you right now! I looked everywhere for a tutorial like this, thank you so very very much, I had a hard time figuring out how to switch from photoshop to psp -shuffle- LOL! it's so funny my practice is a horde symbol! it looks great on the wall not so much on the bed >.< I must fix it!
Alchemist
#13 Old 12th Jun 2009 at 9:11 AM
Quote: Originally posted by Misty_2004
Okay, Missi, I'm still experimenting a lot with this but I'm going to take your image and give you a step-by-step.


Does everyone get to see the step-by-step?
Lab Assistant
#14 Old 12th Jun 2009 at 9:43 AM
Lol, still trying to get my head around this, but I'll keep at it! Thanks for a great tutorial Misty

I like work, it fascinates me.
I could sit & watch it all day!


Simmodders UK
Lab Assistant
#15 Old 12th Jun 2009 at 12:20 PM
Thank you soo much. I can't wait to be back home and try your tut. I would have started it right now (though I'm supposed to work on much more serious subjects), but alas I have only PSP7 here at work, and the plugin doesn't work with this version. (I've tried).

Thank you again...
Lab Assistant
#16 Old 12th Jun 2009 at 2:05 PM Last edited by ikbod : 12th Jun 2009 at 2:20 PM. Reason: to add sthing
Hiya, have had a go and everything is good (I think) untill I load up the pattern in the pattern packager

When I go to save the file as a dds in psp, I get a msg that says "beacuse of the limitations of the file format no alpha channels will be saved. Do you want to continue"

I click yes

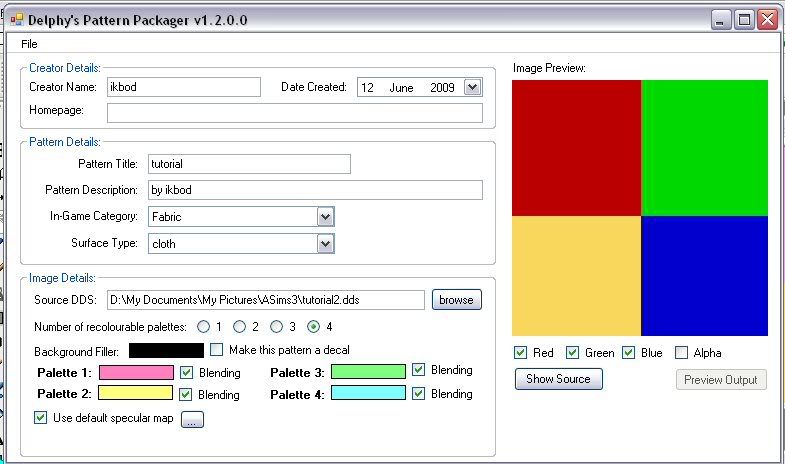
Am able to load the pattern in pattern packager but my pattern doesn't look like yours

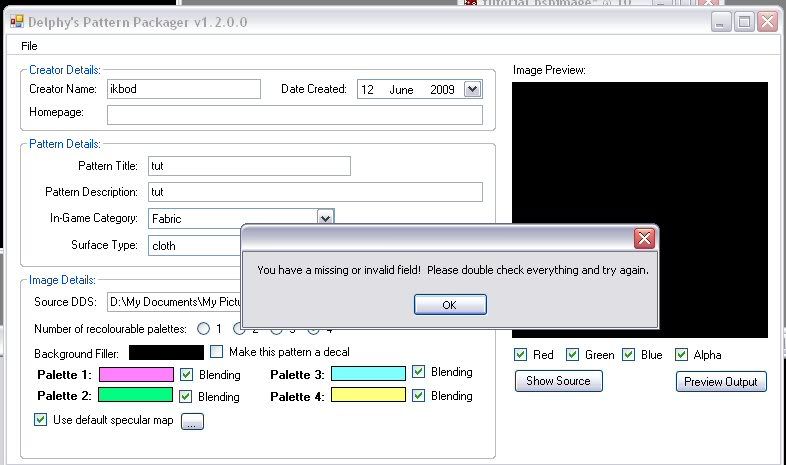
on my first attempt this is what i got - note alpha isn't selected


on my second attempt this is what i got - when i try to save ot pops up to tell me i have a missing or invalid field


Any help with this would be really appreciated, am guessing that I might be able to do a 3 colour pattern ok or maybe should buy psp9, not sure

Many thanks

edit to add i have psp 8
Test Subject
#17 Old 12th Jun 2009 at 2:29 PM
You have to write something in the "Hompage" field.
Lab Assistant
#18 Old 12th Jun 2009 at 2:39 PM Last edited by ikbod : 12th Jun 2009 at 2:42 PM. Reason: i'm a moron
Thanks that made the 3 colour pattern work!
Test Subject
#19 Old 12th Jun 2009 at 7:25 PM
Thank you so much for posting this tutorial. It was most helpful.
Theorist
Original Poster
#20 Old 12th Jun 2009 at 7:40 PM Last edited by Misty_2004 : 12th Jun 2009 at 9:03 PM.
First off, please accept my apologies for disappearing! Yesterday I was going to get that other post made then MTS went down, then a lot of other things happened and I wasn't able to get back to this until just now.

If everything goes according to plan, I'll get Missi's images uploaded. They're very rough, as in I didn't do any real clean-up work, just went through the steps of making her image into a three-color texture.

Ikbod, once I get that finished let's see if we can figure out what's going on with your alpha channel not being saved. First, though, are you using PSP 9 or an earlier version? If you're not around right now that's okay, I can check back.

And to everyone who has posted "thank yous", you're welcome very much!
Lab Assistant
#21 Old 12th Jun 2009 at 7:45 PM
Thankyou so much misty and no worries, real life happens innit! I've got psp 8. If that's the problem i think i could get psp 9 for not too much money
Theorist
Original Poster
#22 Old 12th Jun 2009 at 9:02 PM
Missi picked a great image for a three-color pattern. I wanted to do this as quickly as possible, so the images are a bit messy (for an actual finished pattern, I would definitely make sure to clean up all the dots within the circles before ever starting the copying and pasting process, then do more clean-up as I went along), but this shows how to turn Missi's image into a three-color pattern.

First of all, I open Missi's image and check its size, which is already 256x256. If your image isn't that size when you start or doesn't have a perfectly repeating pattern at this point, I highly recommend fixing it so that it is before you start the seperating process. It's much easier than trying to make things fit once the image is completed. Also, if your image has to be resized after it's completed, you're going to end up with a lot of messy pixels because of the conversion while resizing, making it necessary to do a huge amount of the work you already did all over again.

After I check the size, I create a new 256x256 image.


The next thing I do is seperate the RGB channels from the new image I just created (see first post if you're unsure of the seperation process).


Then I line them all up in order (Red, Green, Blue) because I want to make sure I remember that red goes on the bottom, green in the middle, and blue on top. Then I look at Missi's image and decide how many copies of it I'm going to need to make this texture with the least amount of work possible. Already, I see something that will be much faster than a lot of selecting and copying, so I decide I only need one additional copy and create that (select that image, press Ctrl-C to copy it, then press Ctrl-V to paste it in as a new image).


I'm going to make the white section of the original pattern the background, and I want to include the white dots bordering the circles. Since this is a .jpg image that has some compression, I set my tolerance for selecting to a bit above 30. This will result in selecting nearly 100% of the outlying white area. Then, I select the white area with my Magic Wand (a few artifacts are left unselected so I add those to my selection one at a time), then I turn off Contiguous in my toolbar (up top) and start shift-selecting the white areas in the circles (holding the shift key while selecting adds to my current selection). The reason I deselect Contiguous is to save myself a ton of time while selecting those white dots within the circles. Every time I click on one particular color, every other pixel in the image that is the same color will also be selected.


I then copy and paste the selected white area to the Red channel image.


My next job is to create the channels with the circles so I need to get rid of the blue circles from one of these images and the red dots from the other. Working with one color on a solid white background is going to be easier than trying to select each of the red dots from the first image, so I grab a round paintbrush and start painting over the blue dots with my white paintbrush. (There are several ways to get rid of those blue dots, and some might be a bit faster but this was the fastest method my sleep-deprived brain could think of.) Since the dots aren't exactly round, I end up hitting each one a couple of times with my brush to make them gone and all the while I'm keeping my eye open for artifacts that I can easily cover up with white which will make the later selection process go more quickly.

Once I have the blue dots gone, I use the Magic Wand again and select the white background, then invert my selection. I also Ctrl-Click all the white areas within the red circles so that they are no longer selected. (Shift-Click adds to a selection, Ctrl-Click takes away from a selection).


Now I use Ctrl>C to copy the selection, then choose the Green channel, and press Ctrl-L to paste the portion of the image I just selected into the Green Channel.


Then I go to what is called Image 3 (the copy of Missi's original image) and repeat what I did for the red, this time instead of painting over the blue circles, painting over the red ones. I follow the same steps for selecting, inverting the selection, then copying and pasting this into the Blue Channel.

And here are all three channels with their respective sections of the pattern:


Next, it's just a matter of combining the channel.


And here is the end result of what the new image made by combining the channels looks like:


Then, save it as a DDS file, and import it into Delphy's Pattern Packager.
Theorist
Original Poster
#23 Old 12th Jun 2009 at 9:20 PM Last edited by Misty_2004 : 12th Jun 2009 at 9:40 PM.
Okay, now that I have that done, I'll go back and try to address some individual comments and questions.

@ Coltraz: Indeed!

I ended up skipping straight from PSP7 to PSP9 a couple of years ago, so I don't have any experience with eight. I do, however, have PSP7 installed on another computer so I have my daughter getting the plugin so we can see what happens with it in PSP7.

ETA: I just messed around with it in PSP7, and it is definitely not wanting to save the image with the alpha channel. I can't understand why PSP7 allows the creation of alpha channels if it doesn't allow them to be saved. What anyone using previous versions might want to do is see if per chance there is a plugin out there for earlier versions that will allow it, buy a later version of PSP if one can be found for a good price, try GIMP or stick with three-color patterns. I wish I had a better solution.
Test Subject
#24 Old 12th Jun 2009 at 11:25 PM
Quote: Originally posted by Misty_2004
It is possible with the textures to add several shades of one color to a channel by using varying shades of gray. So far I haven't been able to get this to work on the Alpha Channel color. If you're creating a texture with multiple shades of one color, then it will currently need to be done on the other channels, saving the Alpha Channel for solid coloring.


Have you tried creating a mask from the fourth colour and saving the mask to the alpha channel rather than creating the alpha channel from a selection. I wanted to try it myself but I have PSP8 and am having the same problem as Ikbod saving an images with an alpha channel.
Theorist
Original Poster
#25 Old 13th Jun 2009 at 1:08 AM Last edited by Misty_2004 : 13th Jun 2009 at 4:03 AM.
Feefa, right now I'm working on a four-color pattern to get ready to do that. And ironically enough, just as I was typing this my daughter came in and said, "Hey! I think you can fix that by saving it as a mask instead of a selection!"

So, as soon as we get this part worked out I'll post back with the results.

ETA: I don't think she was trying to accomplish the same thing with the mask as was my objective. Now I have to find out what it was she was talking about with the mask.

It's all good, though. I actually made my very first good four-color pattern.
Page 1 of 3
Back to top