 Tutorial for Creating Walls
This tutorial will show you how to make new walls in the sims 3. You can also make floors using this method, but new floors in The Sims 3 are rather pointless, as you can just make a new pattern that will give you the same effect.
A few things you will need:
S3OC:
http://www.modthesims.info/showthread.php?t=362413
S3PE:
http://www.modthesims.info/showthread.php?t=362412
Gimp:
http://gimp-win.sourceforge.net/stable.html
DDS Plugins for Gimp:
http://nifelheim.dyndns.org/~cocidius/dds/
The Sims 2 Homecrafter Plus (Optional, only used for TS2 conversions):
To download Homecrafter Plus, click
here.
Or
here for the Chinese, Japanese, Korean, Taiwanese and Thai version.
Open
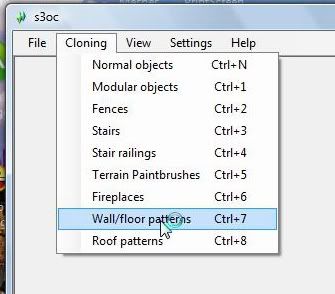
S3OC and at the top click wall/floor patterns

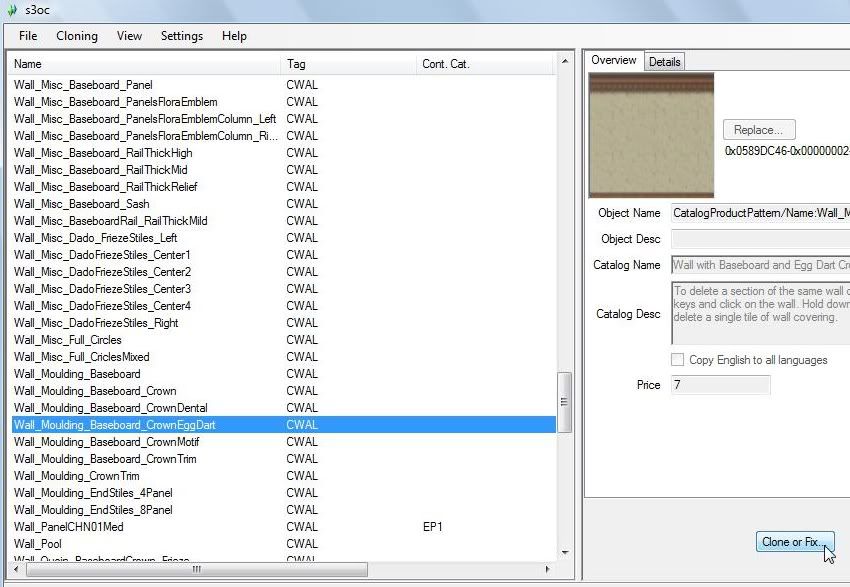
Select a wall you wish to clone from. You should select a wall that has the same amount of recolorable channels you want your wall to have, and that is located in the same area of the wall catalog you want your wall to have. It's best if the wall you select has the default patterns you wish to use in your new wall. After you have selected an appropiate wall, then click Clone or Fix.

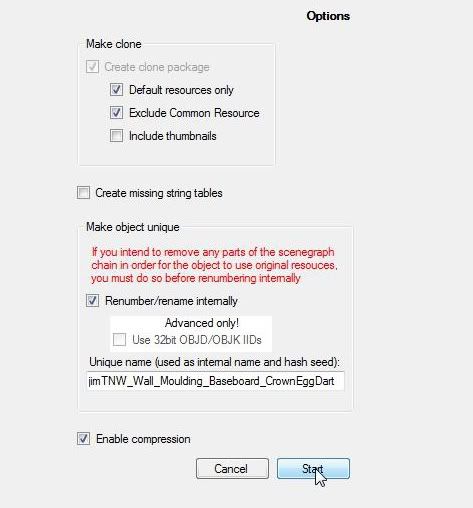
In the next screen you will see the cloning options area. If you want your wall to be a new wall, then leave checked Renumber/rename internally. If you want your wall to be a default replacement then uncheck that box. Click start. Wait for it to clone your wall completely, then when the pop up says ok, click it and close out s3oc.

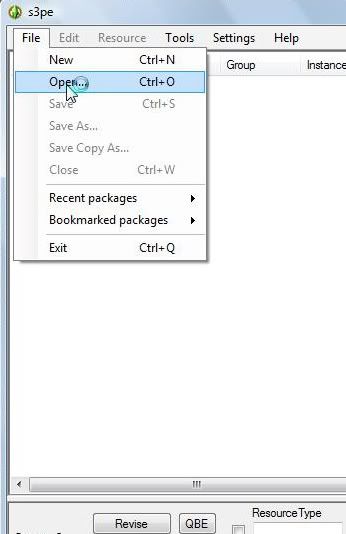
Open s3pe, and click file/open at the top, and browse to your cloned wall from s3oc.

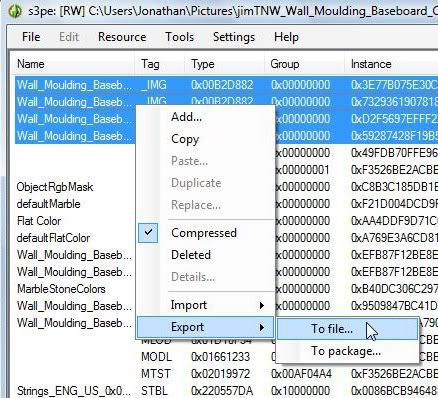
Select all the IMG with wall in the filename by holding down ctrl while clicking on them, right click, then select export to file. Leave
S3PE open.

Now you will need to find a good texture for your wall. If you are doing a sims 2 conversion you can follow these steps, if not, you can omit this part.
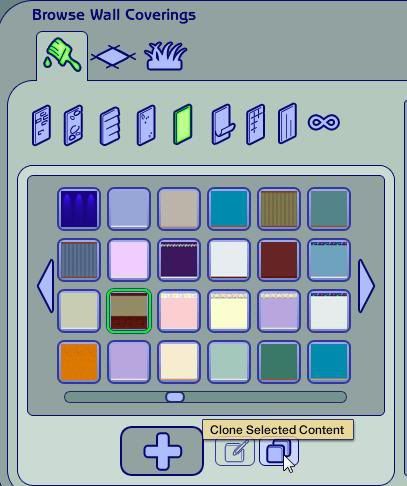
Open The Sims 2 Homecrater Plus. When it finishes loading, click create wall. Find a suitable wall you wish to create from the areas shown. Then you can click on the area that says clone selected content. It looks like 2 rounded squares.

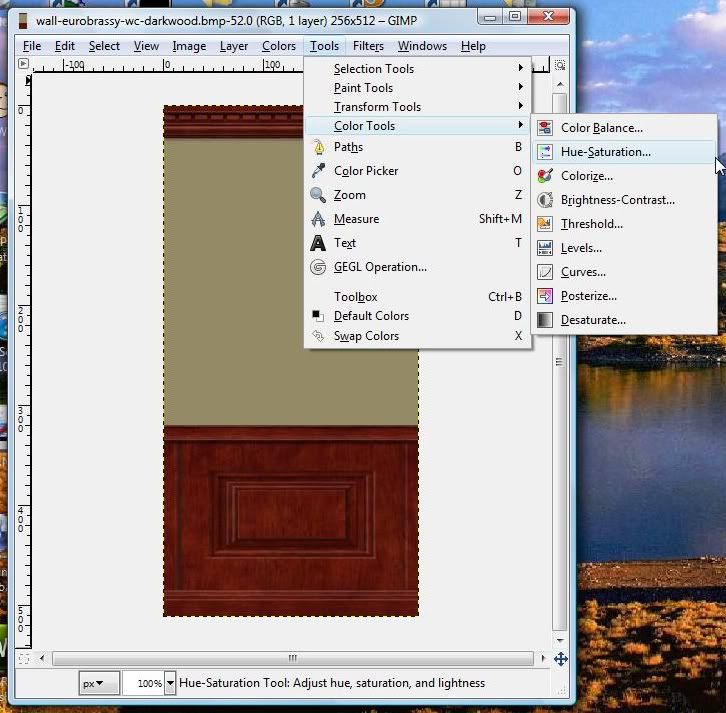
To find your texture browse to User/Documents/EA Games/The Sims 2/Projects/Homecrafter Plus/Working Directory. Open the file there in gimp. Once you have it open go to tool/color tools/hue and saturation at the top of the image window in gimp.

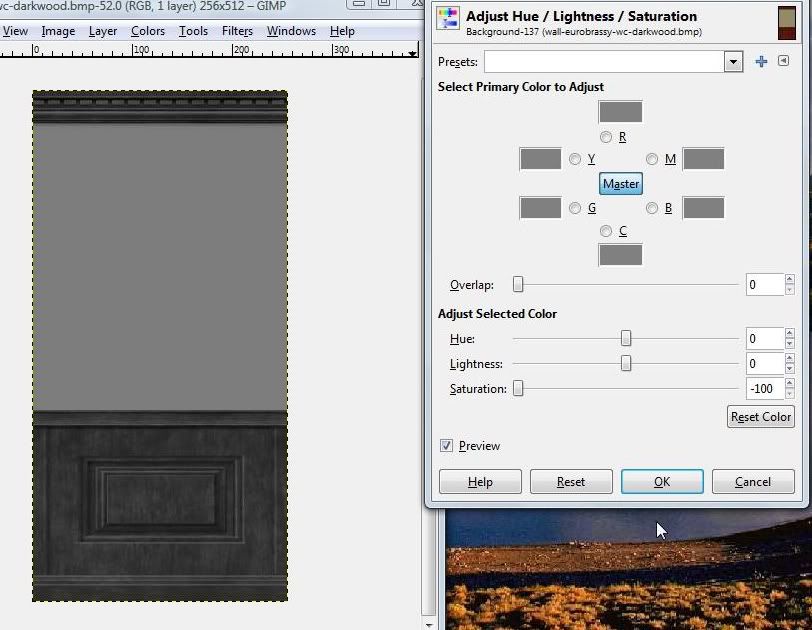
Bring the saturation down to -100 (negative 100)

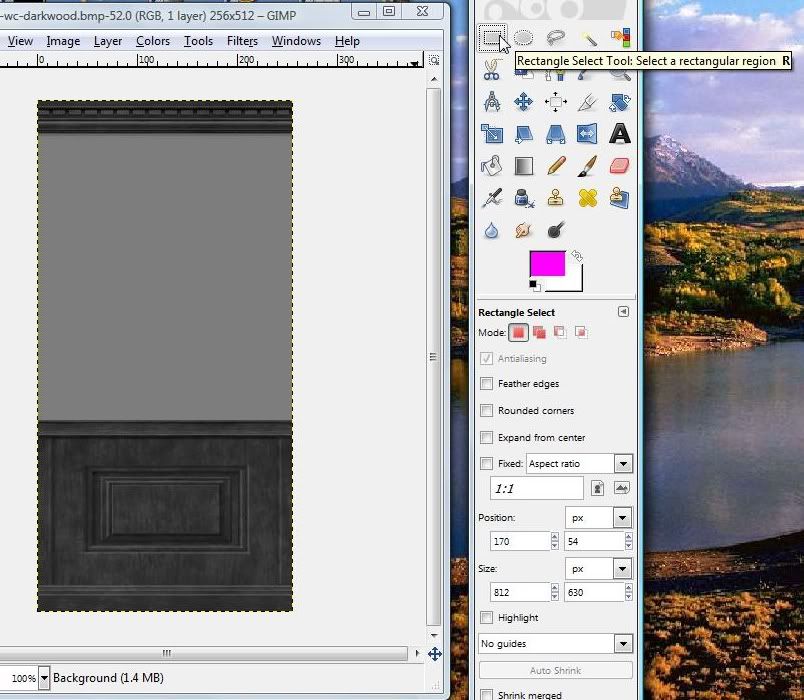
Currently the trim of the image is too dark to be used as a sims 3 texture. You will need to lighten it some. It should look a tone of medium grey. Go to rectangle select in your gimp toolbox.

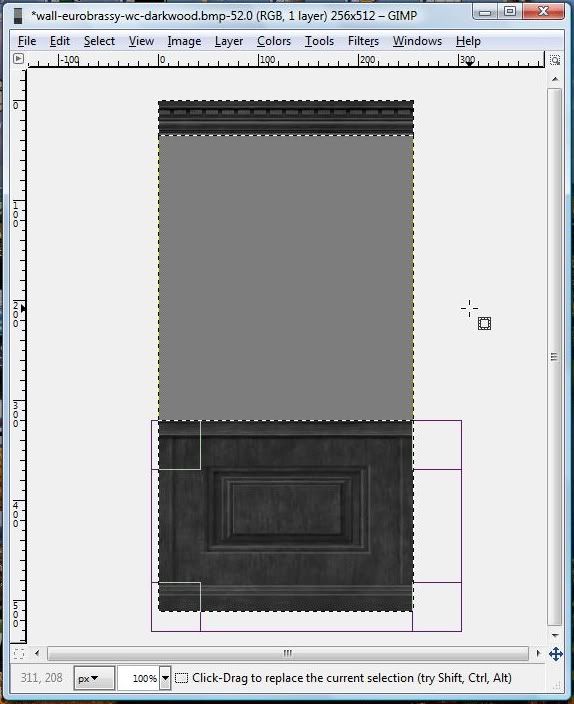
You will need to select just the trim. To do this, hold down shift while clicking and dragging over the top area of the trim. With shift still held down click and drag the bottom area of the trim. Now you have only the trim selected.

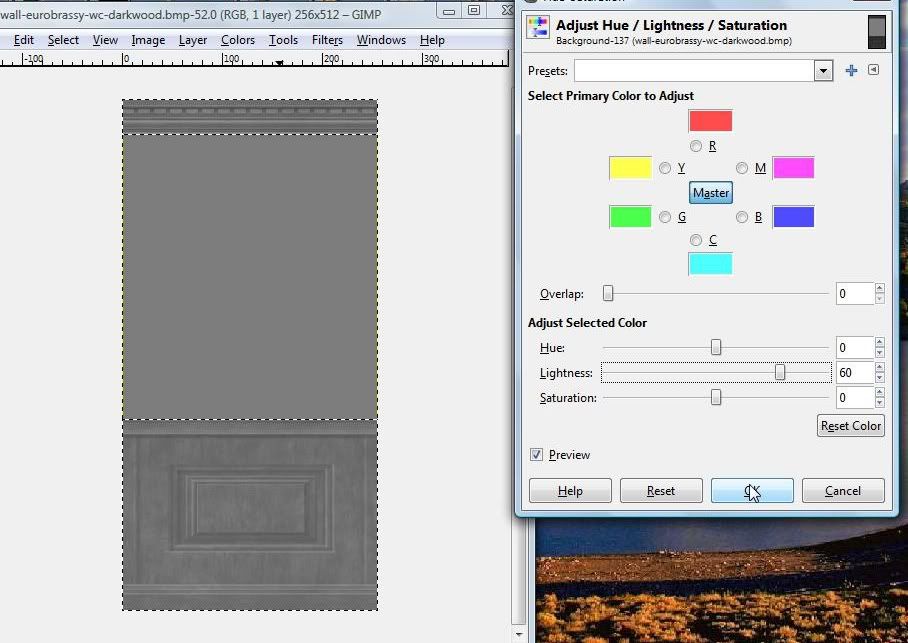
Now go to tools/color tools/hue and saturation again at the top of your image screen in gimp. This time you will need to bring the lightness up some for this particular wall 60 as a lightness looks good. Some walls will be lighter, and you will need to bring the lightness down. Basically, you need to have just a plain medium grey as your texture for the sims 3. Nothing too white or black or too dark or light grey.

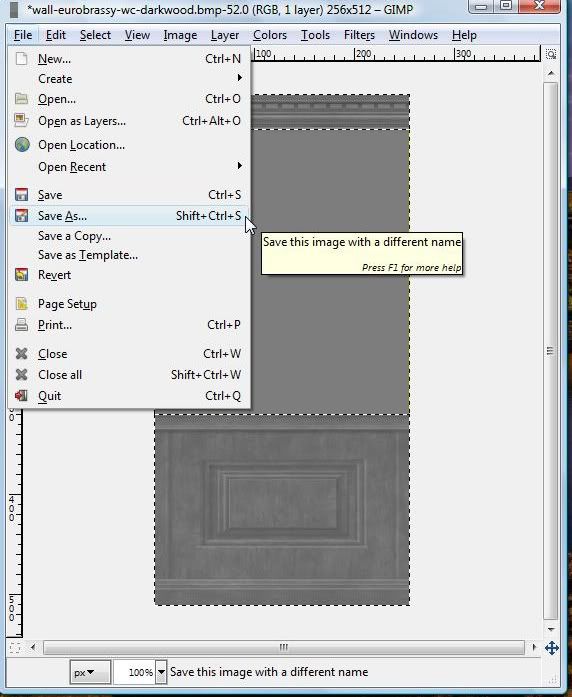
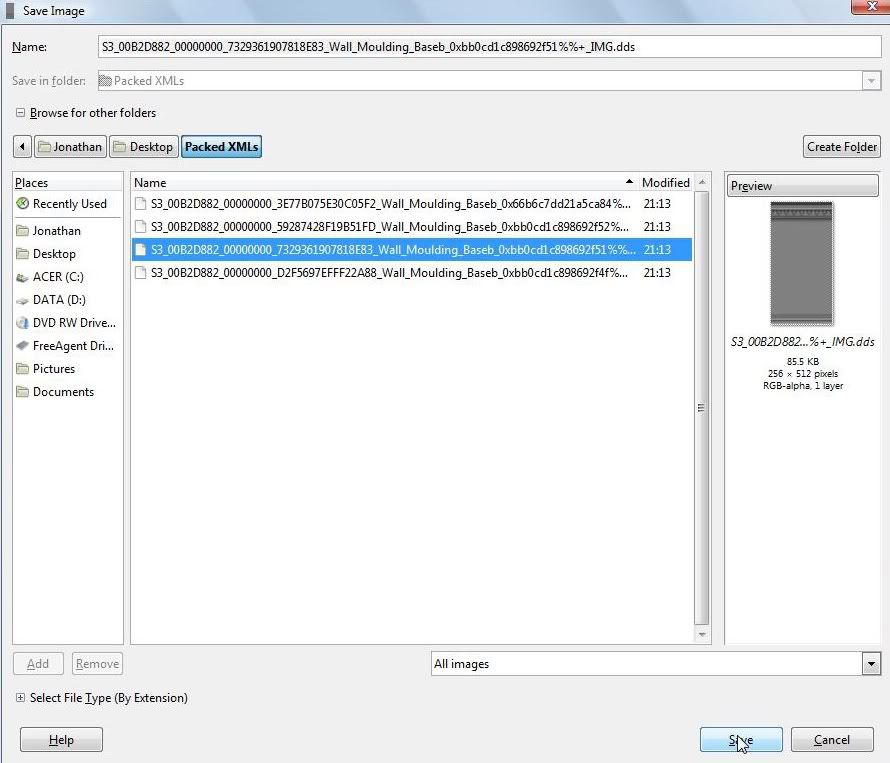
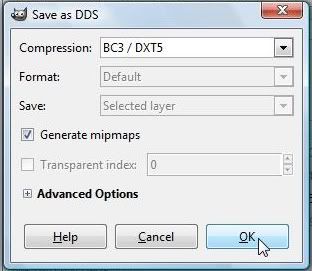
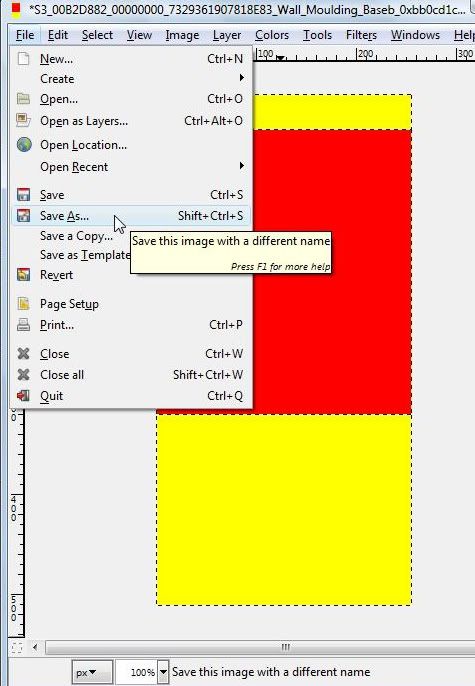
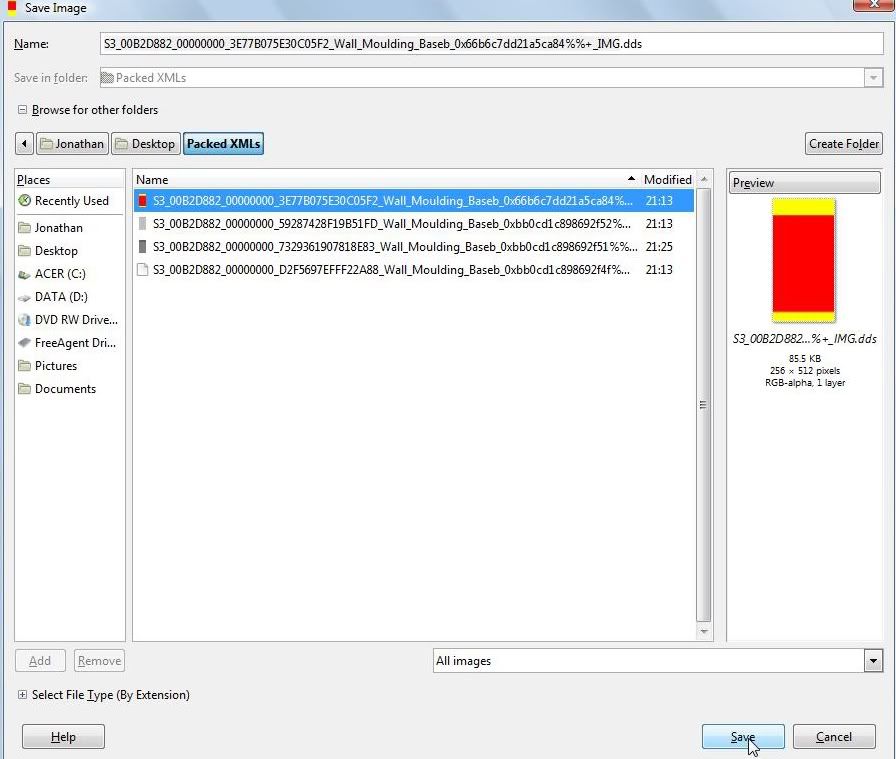
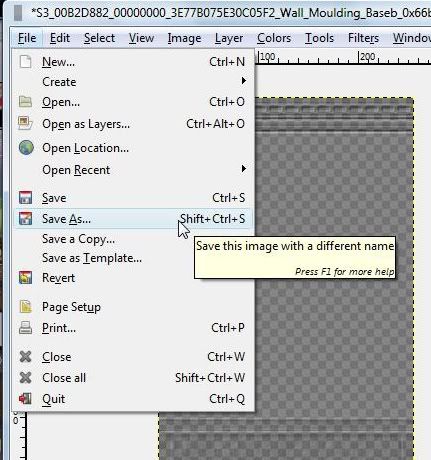
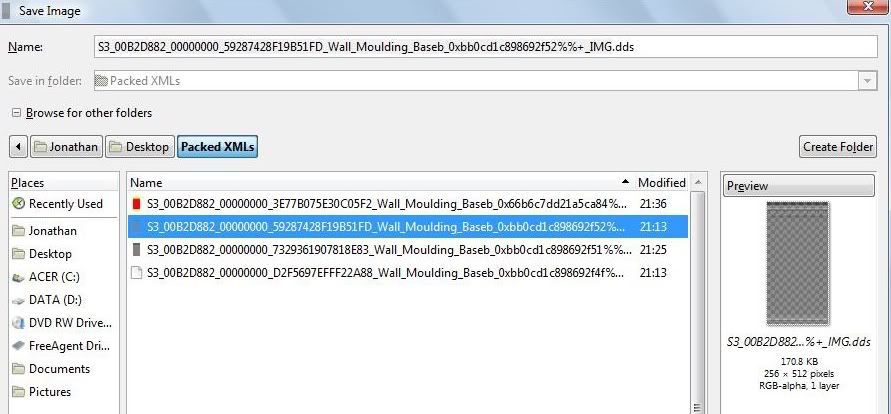
Now you need to save this. Go to file/save as at the top of your image screen and save it over your texture (multiplier) exported from s3pe. In the dds save screen make sure Compression is set to BC3/DXT5 and generate mip maps is slected and press ok.


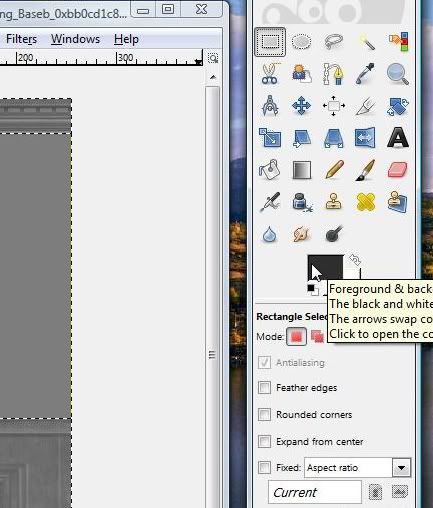
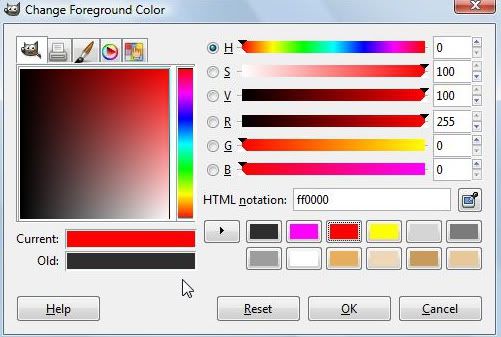
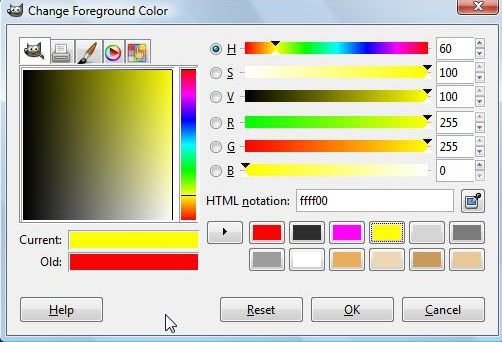
Now you will need to make your RGB Mask for your wall. To do this, you will need to change the foreground color double click on the current foreground color in your toolbox. The first channel is always bright red. So to achieve the exact tone of bright red needed, input ff0000 into the html notation and click okay. The html notation for the second channel (bright yellow) is ffff00. The html notation for the third channel (bright fuschia) is ff00ff. For now, we only need to make the first channel so just input ff0000.


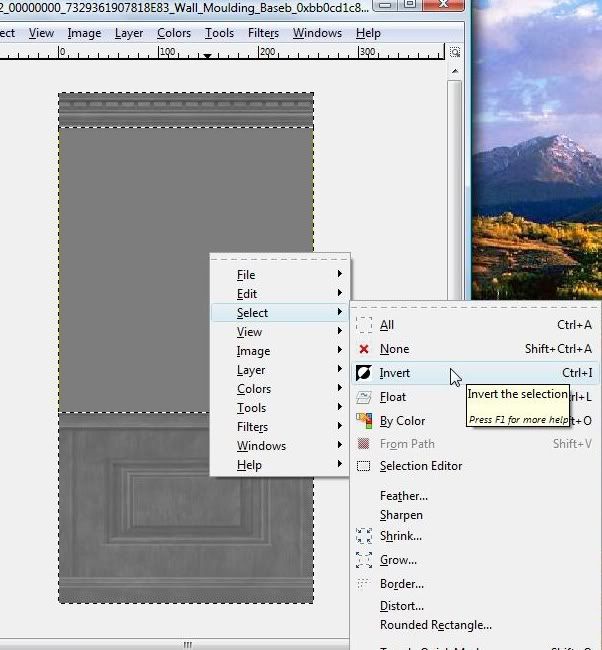
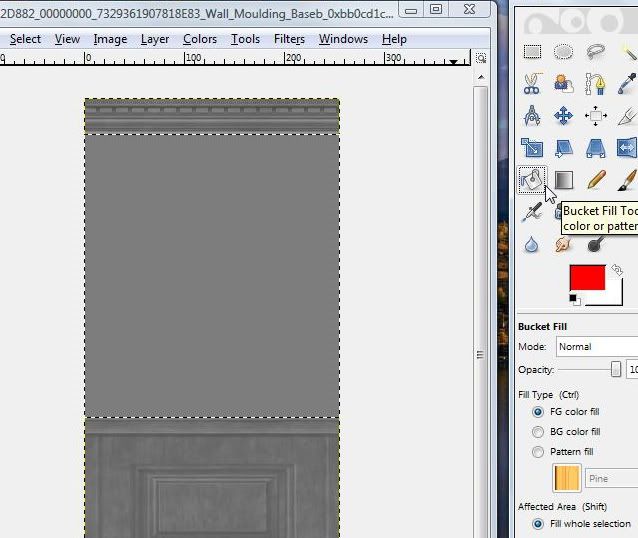
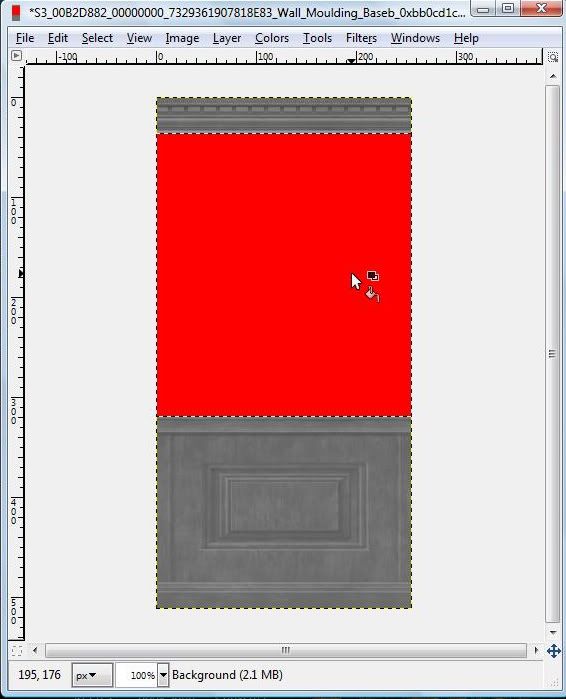
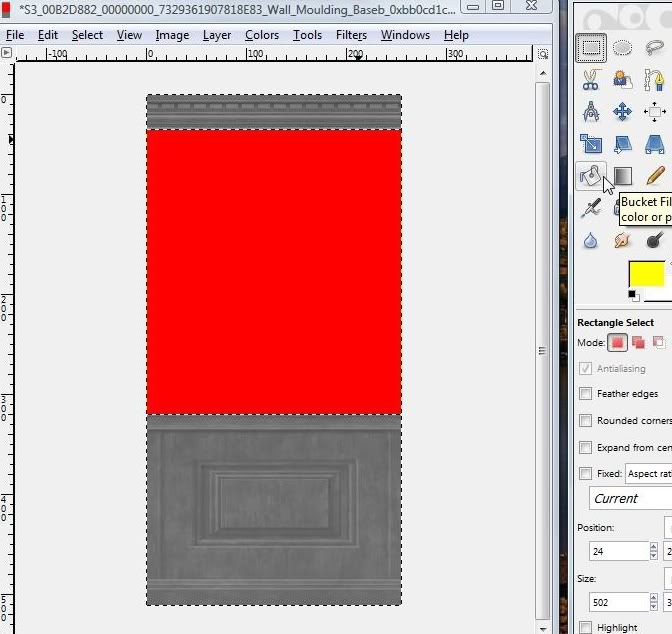
Now you need to select the area that will be our first channel. in the middle of your image right click and do select/invert. Now you can bucket fill with the red you selected as your foreground. Find the bucket fill tool in your gimp toolbox, and bucket fill the middle part of the wall with red.


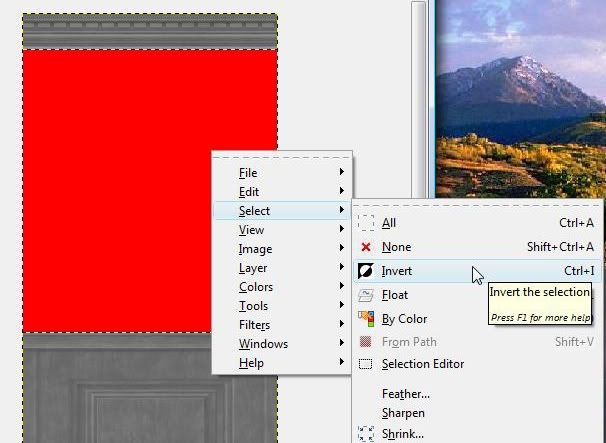
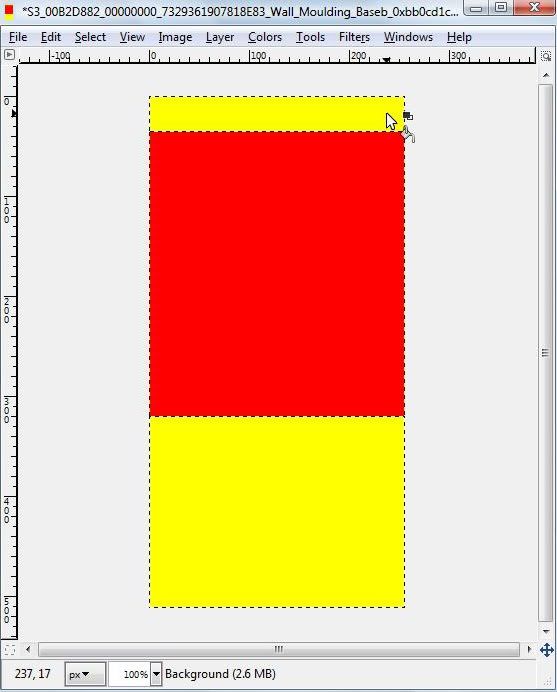
Now you can right click and do select/invert again, change the foreground color to yellow using the input number for the html notation for yellow and bucket fill the trim with yellow.


Now you will need to save this over your RGB channel exported from s3pe. When you get to the dds save as screen as always make sure compression is set to BC3/DXT5 and generate mip maps is selected.


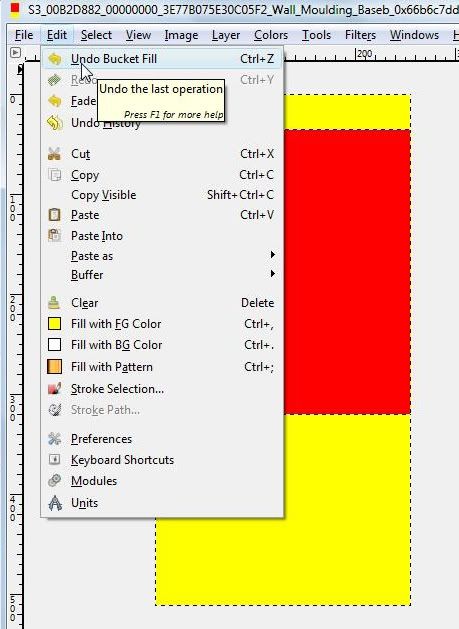
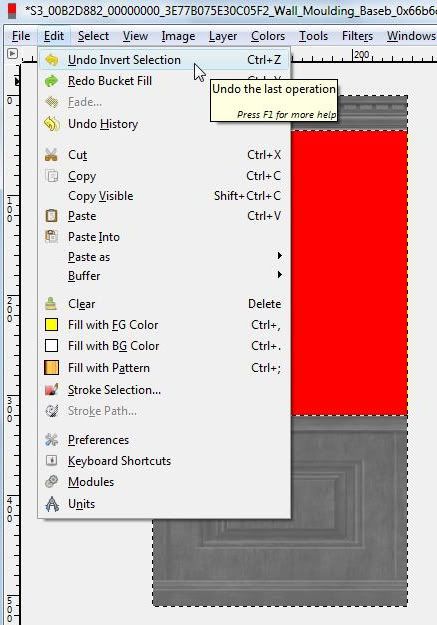
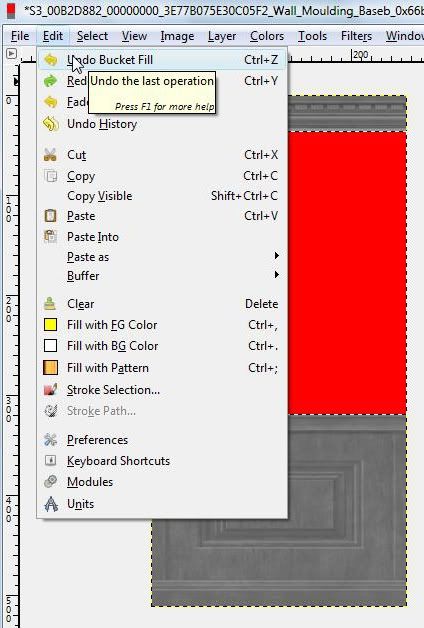
Now you must make your bump map for the wall. Since you already have the RGB channel and the texture saved, you can undo all the changes you just made by clicking edit/undo. If you want to go quicker, you can just press ctrl + z and it will undo it faster.


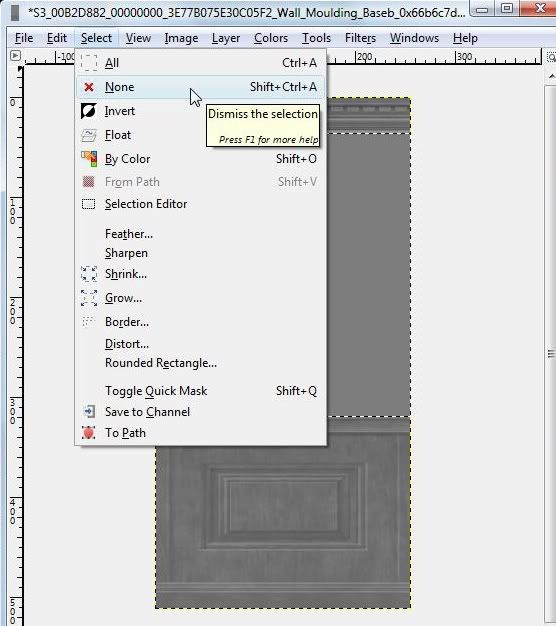
Now you can go to select/select none

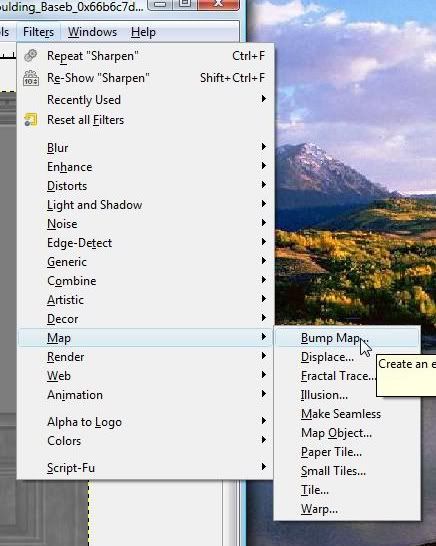
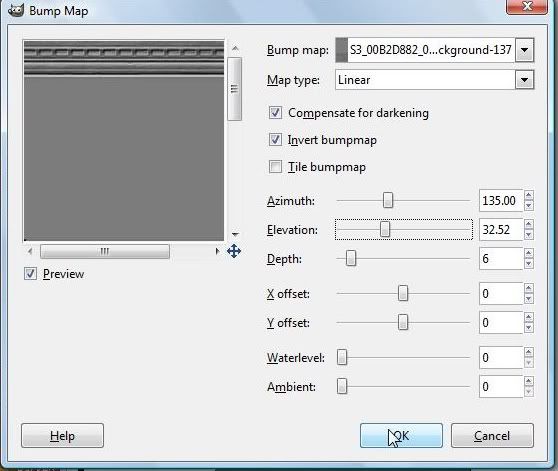
Go to filters/map/bump map. In the pop up screen, click invert bump map. you can move the sliders to get a nice subtle bump map you would like.


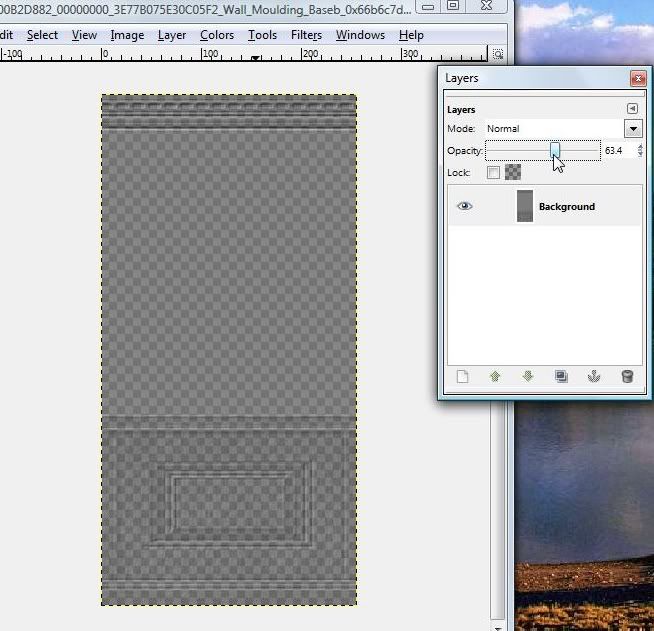
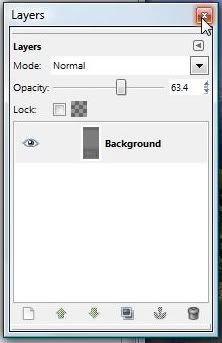
Now you need to set the layer opacity lower. To do this go to windows/dockable dialogs/layers. In the pop up screen use the slider to bring down the layer opacity a little over halfway. Something around 60% generally looks good. When you are done, you can close out the layers pop up without doing anything.


Now you can save this over your exported Bump Map from s3pe. As always select BC3/DXT5 under compression, and make sure generate mip maps is slected. You should also save this over the transparent looking file (it looks like a bunch of grey squares). But make sure that when you save over the transparent looking one you bring your opacity down
very low.


Now you are ready to make your wall in s3pe. Go back in
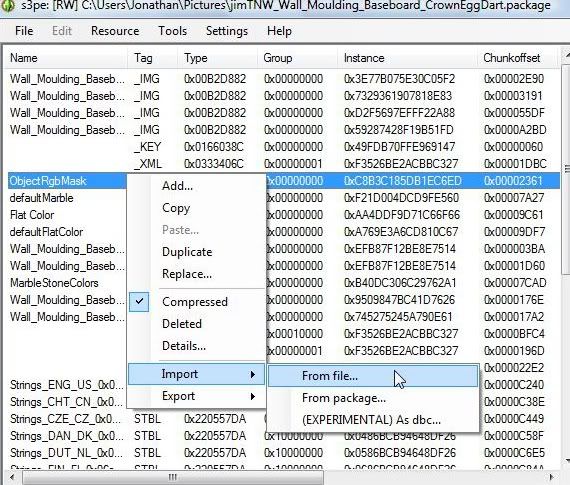
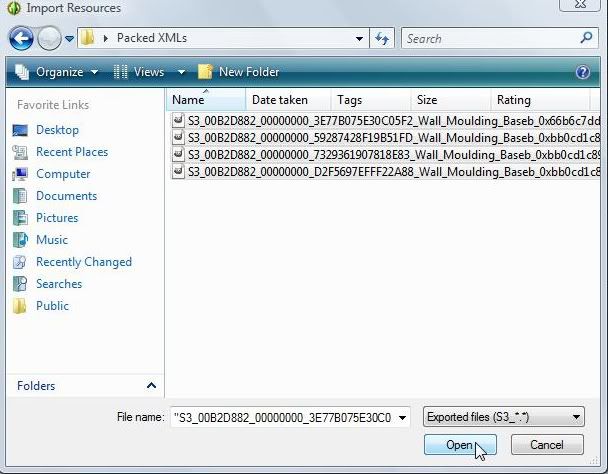
S3PE and in the space with all the text right click and select import/from file. Select all of your exported, newly written over IMGs and then in the next screen select import.


Now you can change the price. You can also do this in
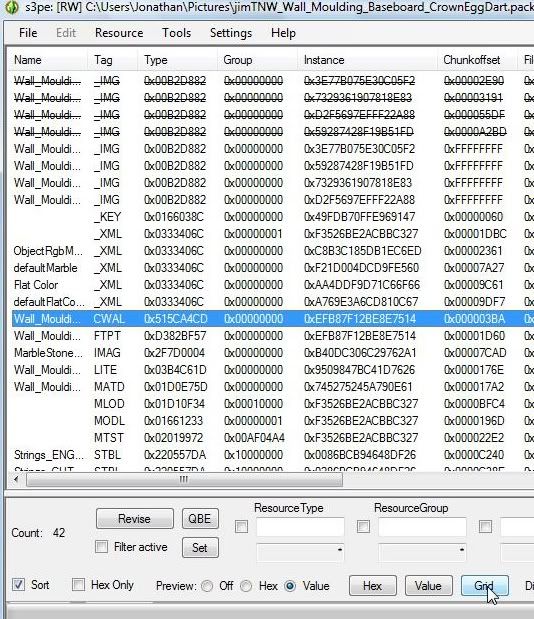
S3OC if you like, but I prefer to just do it in s3pe. Click on CWAL and then click on grid. Expand common blocks, there you can change the price to what you want. click ok, then commit.


Now you can change the catalog description. You can also do this step in
S3OC if you like, I just prefer to do it in
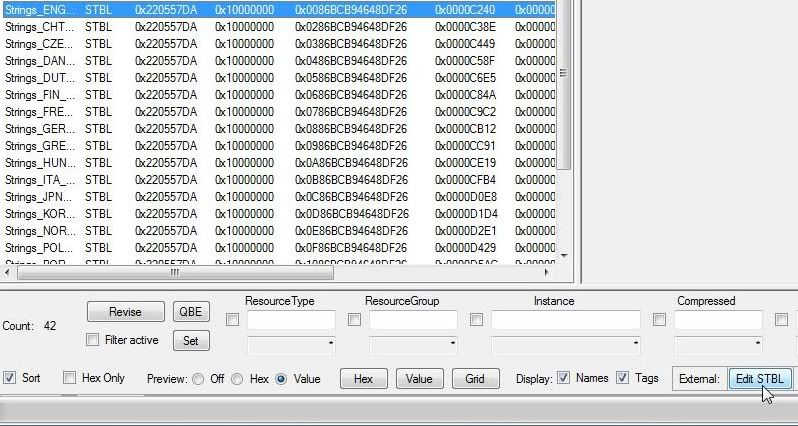
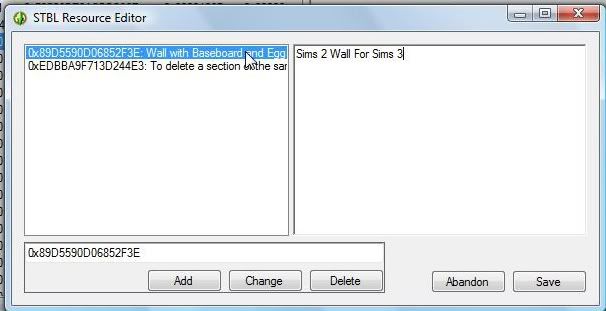
S3PE to save time. Select STBL and your own language. So if your language is English slect Strings_Eng STBL and then edit STBL. In the next pop up rename to what you want your wall to be then click once the old string to the left to activate, then click save.


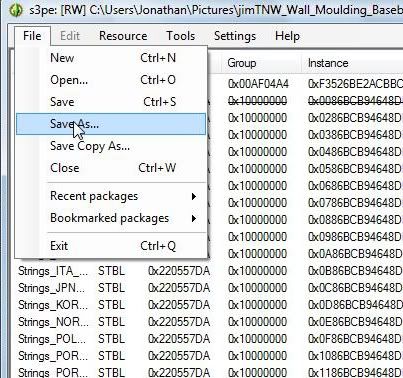
Now you can save your .package, and you are done. Go to File/Save as at the top and save it with a filename describing your wall, your creator initals if you like, e.c.t. this saves it as a .package ready to be installed into The Sims 3.

One thing you should know. Walls are a bit different from objects, If you are trying to go back and make changes after you have already installed it to your game, it will not overwrite the existing .package. You will have to go in, make your changes in s3pe, then open the .package in
S3OC and then do clone or fix and make sure that renumber/rename internally is selected.
 *New Information!
There is a way to move your walls to another area of the wall catalog. You will have to clone a wall in
S3OC that is the category you want. Open that newly cloned wall for the category you want in s3pe. Click on CWAL then click grid. Click the 3 dots by Materials (Collection) copy the unknown 4 number by selecting the whole number and right clicking and selecting copy. Then go to the same area in your wall you want to change and paste that number. Click ok, then commit. Thanks so much to cmomoney at mts for providing this information.
For better quality walls, you can use paint.net to create a .dds of 256x768, gimp can't produce a .dds that size though, but paint.net is another free program you can use, and the dds plugins for that are included.Thanks to Inge Jones for providing this information.
Also, I've found a way to have less default patterns so you won't have tons of walls or floors in your catalog. Using this method will also save on loading times, and will decrease the overall size of your .package. This is what you do for that:
Click on CWAL and click grid. Click on the three dots by Materials (Collection..). You will see them numbered from 0 upward. Click delete on all of them except for 0. Click ok, then commit. Your walls only have one pattern choice now.
I've also found a good way to disable channels if you need to. This is how you do that:
Click on the empty xml file. This is the one that just xml as a description. Click on notepad. You will see an area when you scroll down a bit that says Pattern A enabled, linked, Pattern B enabled, linked, Pattern C enabled, linked. There you can change the value to enabled false on the channels you want to disable. Now you need to go to the CWAL click grid, and click materials collection, then click material type, then click type codes. Scroll down the list til you see control code 0x35. Change 0x01 to 0x00. Pattern choice C is now disabled. Now if you want only one channel, scroll down to control code 0x34, and change 0x01 to 0x00, Pattern choice B is now disabled.
Packaging Walls as Sims3Packs:
Thanks to the people at thesimsresource, we now know that we can package walls as Sims3Pack format. It's a little different than creating walls with s3pe, as you will be mainly creating your wall in game. To package a wall as a sims3pack, you will need one or more custom patterns. Go in game and apply your patterns to the areas of an EA wall you think looks nice. Then in the catalog screen to your upper left hand corner, you will see an area with icons. Click on the folder icon (save) then click on the star icon (share). You will get a message saying that your file has been successfully saved and is ready to be shared. Remember to take pics of your new wall to be packaged as Sims3Pack, and then exit your game. You will find your Sims3Packs in User/Documents/Electronic Arts/The Sims 3/Exports.
*
 14th Apr 2010 at 5:13 AM
Last edited by leefish : 13th Dec 2013 at 11:08 AM.
 14th Apr 2010 at 11:33 PM
 15th Apr 2010 at 11:35 AM
 18th Apr 2010 at 9:36 PM
 18th Apr 2010 at 11:47 PM
Last edited by Winterhart : 19th Apr 2010 at 12:37 AM.
Reason: Found the answer to 1 question
 5th May 2010 at 12:23 AM
 14th Jun 2010 at 4:46 PM
 1st Mar 2011 at 5:31 PM
 13th May 2011 at 2:37 AM
 1st Jun 2011 at 1:45 PM
 2nd Jun 2011 at 9:32 PM
 2nd Jun 2011 at 10:20 PM
 29th Jul 2011 at 11:07 PM
 1st Aug 2011 at 12:26 AM
 14th Aug 2011 at 7:21 PM
 23rd Aug 2011 at 10:59 PM
 24th Aug 2011 at 11:20 AM
 17th Dec 2011 at 8:50 AM
 13th Feb 2012 at 11:36 AM
 31st May 2012 at 7:01 PM
 31st May 2012 at 9:13 PM
 31st May 2012 at 10:01 PM
 4th Jun 2012 at 12:49 PM
 1st Aug 2012 at 7:01 AM
 12th Aug 2012 at 7:49 AM

 Sign in to Mod The Sims