| Tutorials by Category | |
|---|---|
|
Body Shop: Recolouring | Meshing | Modding | Sims Objects: Object Creation | Recolouring Building: Building | Landscaping | Walls & Floors | Other: Careers & Majors | Hacks and Game Mods |

|
This article is written for The Sims 2. For the equivalent Sims 3 article, click here. |
|---|
This tutorial will explain how to make custom face sliders for use in Bodyshop and CAS. The sliders created with this tutorial create inheritable facial features, and can be used on uploaded sims without downloaders needing to download the slider in order for the sim to display properly.
This method was developed by Nopke, who also provided invaluable help in writing this tutorial, and created the template resources. Thankyou!
This tutorial is divided into two parts. The first part covers the basic process of making a simple, working slider: follow this part! The second part contains additional instructions on adding more advanced features to your slider, such as having different settings for different ages and genders. If you feel a bit out of your depth, you may want to ignore the advanced section until you feel more comfortable with the basic process. Otherwise, by all means, dive in and break things!
Contents |
You Will Need
- SimPE
- A 3D editor which you are comfortable using (this tutorial uses Milkshape)
- A graphics editor such as Photoshop or GIMP
- Nopke's slider template set
The Basics
Creating a Slider Mesh
In this section you're going to modify a default face mesh, to create the features that you want your slider to give a sim when the slider is pulled all the way to the left (down). When the slider is pulled to the right (up), the game will automatically mirror all the changes you've made to your mesh.
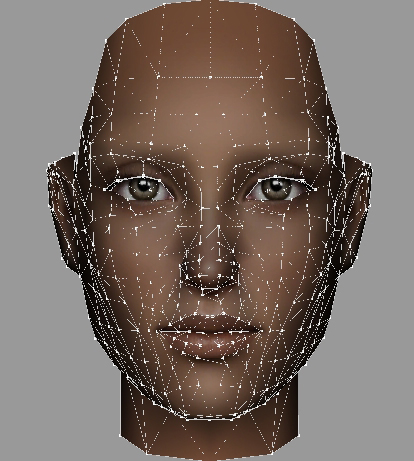
In nopke's slider templates, you'll find the default adult female face mesh, as either an OBJ or an MS3D file. Luckily for us, TS2 only needs one mesh for a slider - the changes you make to the adult female face will be automatically adjusted, by the game, to work on sims of other ages and genders.
Although the adult female mesh is a good base to use, it's not mandatory - if you want to use a different one, see #Using a Different Compare Mesh in the advanced section. Make sure to use the mesh from the slider templates; you may have other copies of the mesh lying around, but they do not necessarily have the right vertex numbering, and using them can cause problems with your slider.
There are no explicit instructions for this section, since you can whatever you like to the mesh. Do remember that you can only move vertices around. Don't delete or create any vertices or faces, as this will cause your sim's head to explode (literally).
Understanding Morph Mirroring
The mesh you are creating represents the sim's face when your slider is pulled left (down): but since the right (up) effect is also based on your mesh, you need to think about that when you're working on the mesh.
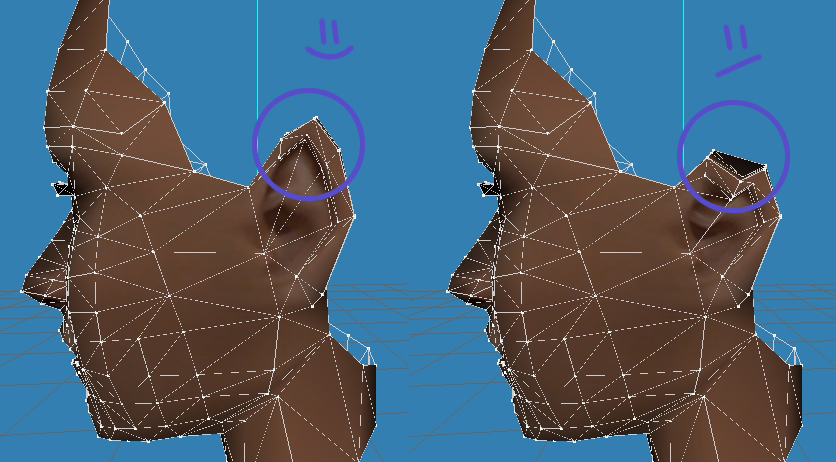
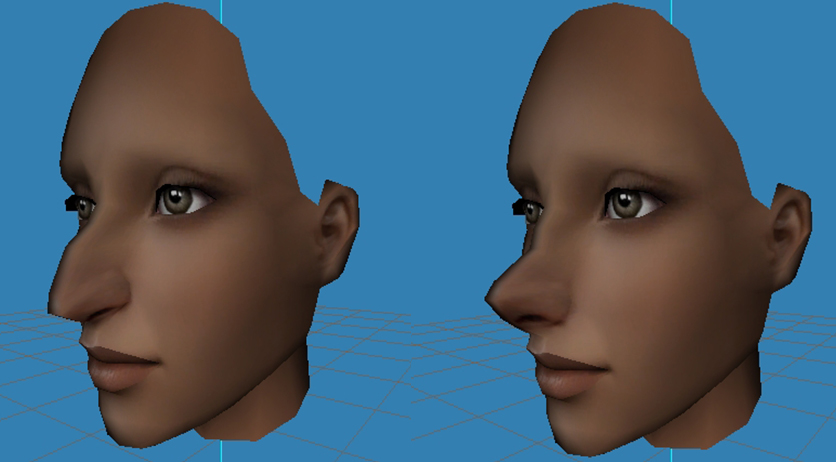
Every change that you make to the mesh will be done in reverse when your slider is pulled right (up). If you've moved the tops of the sim's ears up in the mesh, they'll be moved down when the slider is pulled right. If you've moved the sim's nose right and forward in the mesh, it will be moved left and backwards when the slider is pulled right. Here are some examples:
As you can see, this kind of mirroring can cause some unexpected effects. An elf ears slider will make the sim's ears pointy when pulled left, but will make them dented when pulled right. My broken nose mesh worked fine if you look at it from the front, but from the side you can see that, if the mesh puts a big lump in the sim's nose, that lump will also turn into a dent when the slider is pulled right. It's a good idea to consider how your slider will look mirrored while you're meshing, to avoid nasty surprises when you try it out on a sim.
Finishing the Mesh
When working on your mesh, you should aim to create the effect you want when your slider is all the way over (100%). That said, you can tweak how extreme the slider's effect is later, so you don't need to spend loads of time tweaking your mesh, unless you're truly a perfectionist.
Once you've finished creating your mesh, export it using the UniMesh Exporter (or the equivalent plugin for your chosen mesh editor).
Creating the Package File
This section is the easy bit - assembling a working slider file and inserting your mesh into it.
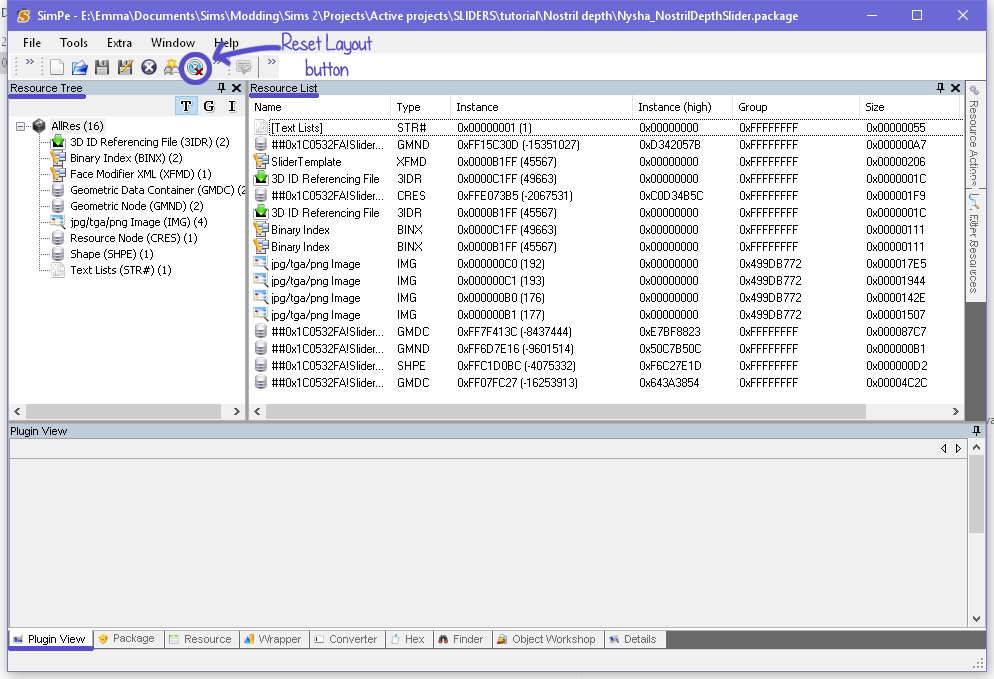
Make a copy of sliderTemplate.package (from nopke's slider template set), and rename it to whatever you want. Open the file up in SimPE. You should see three panels in the SimPE window - the Resource Tree in the top left, the Resource List in the top right, and a panel with a plugin view tab at the bottom. If that's not what you see, click the blue Reset Layout button.
Setting Up the XFMD
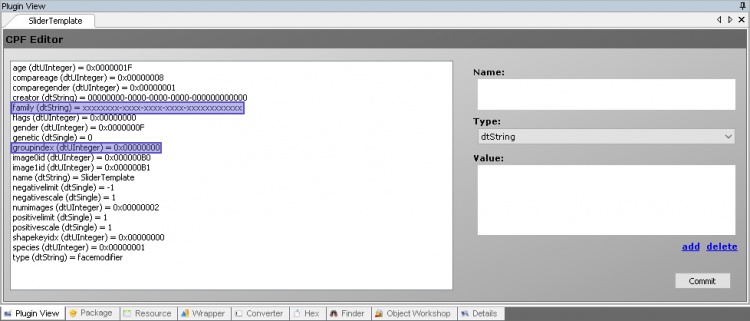
The Face Modifier XML, or XFMD, defines the slider. If you've made other bodyshop content before, the XFMD will be familiar - it's similar to the GZPS. Find the XFMD in the Resource List, click it, and then click Plugin View.
There are lots of properties in the XFMD, but you'll normally only need to use a handful of them. If you'd like to know what the rest do, take a look at #Advanced Options.
Family
This value is what makes the slider unique, and prevents it from overwriting any other sliders. You need to create a new family for each slider you make.
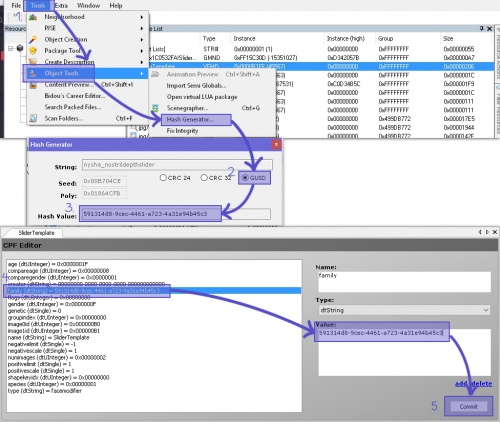
- Open the Tools menu and select Object Tools -> Hash Generator
- In the Hash Generator window, select GUID
- Copy the text in the Hash Value box and close the Hash Generator
- Select the family line in your XFMD, and paste the hash value you just copied into the Value box.
- Press Commit
Your slider is now unique! If you put it ingame to test now, it would show up as a separate slider, with a placeholder thumbnail and a slider mesh that doesn't do anything. Let's make it functional, shall we?
Groupindex
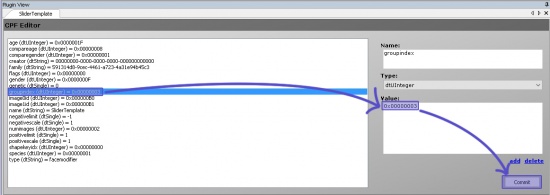
The next line you'll want to look at is the groupindex line. This determines which face section the slider will show up in, in Bodyshop or CAS. The default is 0x00000000, which will make the slider show up in the general tab. You can change this by changing the value to:
- 0x00000001 for forehead
- 0x00000002 for eyes
- 0x00000003 for nose
- 0x00000004 for mouth
- 0x00000005 for jaw
Press Commit. You don't need to do anything else with the XFMD for now, although we will come back to it later on.
Importing the GMDC
The next step is to import the GMDC you've made for your slider. It's pretty straightforward:
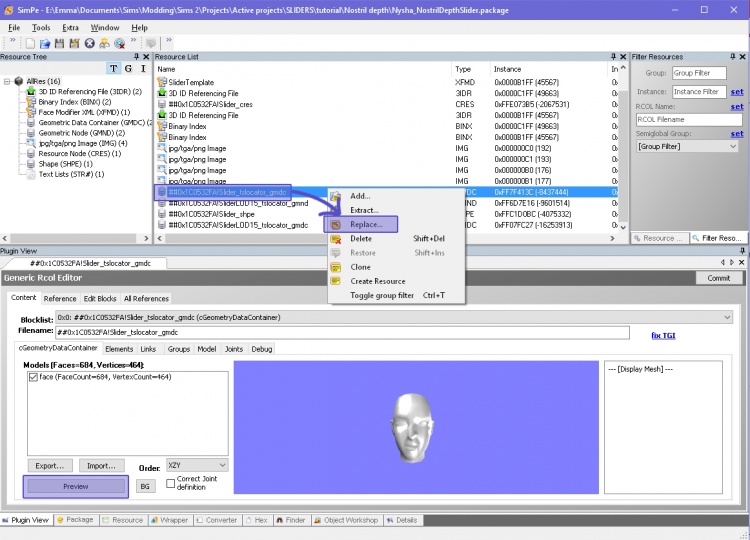
- Find the Resource called ##0x1C0532FA!Slider_tslocator_gmdc and click to open it.
- Optionally, you can press the Preview button to see the default face
- Right-click the resource in the Resource List panel, and click Replace
- Find the mesh you exported from Milkshape earlier and open it
- Click Preview and check that everything looks right
- Click Commit
Done!
If you want to keep things tidy, you can change the mesh's resource name to something descriptive at this point - but you don't have to!
Testing
Now that you have a basically working slider, it's a good time to test. Put the slider in your Downloads folder and open Bodyshop, make a sim, and try using the slider on sims of different ages and genders. The slider won't show up in CAS yet.
If your slider is horribly broken, take a look at #Common Problems to work out why.
If your slider is working, hooray! Take note of a few things:
- Are you happy with how extreme the slider's effect is? Would you like it to be more extreme, or more subtle, than it is?
- Look at the sim from all angles. Check for unexpected deformities, which you'll need to fix in your mesh. :)
- Is the slider showing up in the right face editing section?
- Does it work well for all ages and genders, or are there some you'd like to alter?
Finishing Up
Hopefully, you're pretty happy with how your slider is working at this point. If so, or if you're generally happy but want to make the slider's effects a bit more extreme/subtle, then read on - just a few more steps to go!
Tweaking the Limits
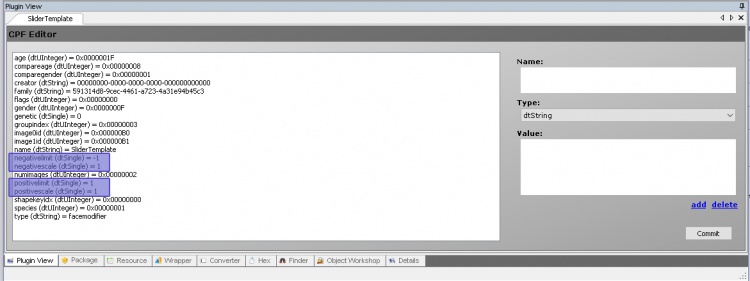
Go back into the XFMD: you'll see four lines near the bottom called negativelimit, negativescale, positivelimit, and positivescale. You can use these lines to change how extreme the changes your slider makes are.
Scales and limits are very complex: see #Understanding Scales and Limits (the blind leading the blind) for a full explanation of how they work.
You can usually ignore the complicated stuff, though. Let's imagine that you've tested your slider in-game, and while it looks fine going down (left), when you pull the slider up (right), the changes you've made are too extreme: you want to tone them down. You can do that by changing the mesh; but you can also do it by changing the slider limit.
Imagine that your slider is part of a scale. At 0 on the scale is the default EA face, with no changes at all. At -1 on the scale is the mesh you made, and at 1 on the scale is the mirrored version that's automatically created by the game:
If you want to make the slider less extreme, you can change the limit of the slider, so it will only go halfway to the mirrored version, by changing the positivelimit to 0.5. The scale now looks like this:
The faded parts are gone now - even if you pull your slider all the way over to the right, it will only go up to the 0.5 mark. Much less dodgy-looking!
So far, so good! But you can also increase the limit, so that the slider goes further than your mesh. This will take the changes you made to your mesh and exaggerate them further. So, for example, if you set the negativelimit to -2, you'll get this:
...maybe not, eh?
Theoretically, there's no limit to how far out you can set the limits. If you want to make a slider which immediately makes your sim's ears the size of a small car, you can - though I'm not sure anyone will want to download it. ;)
You will probably need to use trial and error to get the limits where you want them; just keep tweaking them, and then testing in Bodyshop, until you're happy.
Creating the CAS Version
Once you're happy with how your slider is working in Bodyshop, it's time to enable the slider for use in CAS. Enabling the slider for CAS involves making a copy of the XFMD, so it makes sense not to do this until you've got the XFMD set up how you want it. If you want to try any of the #Advanced Options, do that before you continue with this section.
- Find the XFMD in the Resource List, right-click it, and click Clone
- Select the cloned resource (its name will be in italics), and open the Resource tab at the bottom of the SimPE window.
- Change the value in the Instance box from 0x0000B1FF to 0x0000C1FF
- Click Commit
You should now be able to see your slider in CAS as well as Bodyshop.
Icons
Creating the Icons
One of the trickiest bit of the process of making sliders is creating icons. You need to create four images:
- Bodyshop +: These are the icons for the + (right) side of the slider in Bodyshop
- Bodyshop -: These are the icons for the - (left) side of the slider in Bodyshop
- CAS +: These are the icons for the + (right) side of the slider in CAS
- CAS -: These are the icons for the - (left) side of the slider in CAS
For example, these are the icons for nopke's eyebrow slider: ---IMAGE--- The icons in these boxes need to line up perfectly - otherwise they'll jump around when you click the slider buttons. In the slider template set, you'll find a set of images you can use to construct your images.
Bear in mind that the CAS icons are bigger than the Bodyshop icons - so you'll want to make a larger version first, and then shrink it down for the smaller version (enlarging a smaller icon will cause blurriness).
If you want to make your icons match the EA ones, the simplest way is to to make a dimensions image, with a line drawing of the relevant area of the sim's face in #xxxxxx and the changes highlighted in #xxxxxx. You can download some of the EA icons here, in case you want to use parts of them for your own image. --EXAMPLE IMAGE-- Once you've made your icons - one for the right side, one for the left side - you'll need to slot them into the templates in the slider templates archive. There are lots of methods you can use to get the icons lined up correctly, and if you have your own then you can skip ahead to #Importing the Icons. If you're not sure how to align the icons properly, you can use the following method. The images show the method in Photoshop, but you can follow the same process in any image editor that supports layers:
- Once you've made your icons, create a new layer and draw a red cross through the middle of the icon, using a 1px pencil tool. --IMAGE--
- Open up filename - you'll see that there are matching red crosshairs in the top layer of the image. Go back to your icon, select all the layers, and duplicate them into the template image. --IMAGE--
- Drag the crosshairs layer up the layers panel so it's at the top of the image. --IMAGE--
- Carefully line your icon up so that the cross you drew is in exactly the same place as the template's crosshair. --IMAGE--
Do this for every section of the template image - you can ignore the first box in the template image, as it doesn't need an icon - and then do it again for the Bodyshop template... and do it all again for your other (positive or negative) icon. Phew! Make sure you save your images as PNGs, with descriptive filenames so you don't get mixed up when importing them back into SimPE.
Importing the Icons
Go back to SimPE, and select jpg/tga/png Image (IMG) from the Resource Tree. You'll see four images; take a look at their Instances: ---IMAGE: thumbnail instances--- The first letter of the instance tells you which icon set you're looking at: B for Bodyshop, C for CAS. The number tells you which icon is which within the set: 0 is right (+) and 1 is left (-). So, for example, the thumbnail with the Instance B1 is the left-hand icon set for Bodyshop.
Right-click the first resource in the list and click Replace, pick your matching image, and hit OK. Keep going until you've replaced all the icons. --IMAGE--
At this point your icons should work, but if you have more than one slider installed then the icons will conflict with your other sliders, and some sliders will have the wrong icons. To fix this, you need to give your icons unique instances - much like GUIDs used in creating objects. Bit about database goes here
Once you have your instances:
- Open the image with instance B0, and click the Resource tab at the bottom of the SimPE window --IMAGE--
- Paste the first new instance into the Instance box, and click commit --IMAGE--
- Select Face Modifier XML (XFMD) from the Resource Tree and open the XFMD with the Instance 0x0000B1FF --IMAGE--
- Open the Plugin View tab --IMAGE--
- Find the image0id line - it should contain the instance 0x000000B0, the one you just changed. Paste your new instance into that line and click Commit. --IMAGE--
Repeat this process for all four images, pasting the instance for image B1 into XFMD B1FF, and the instances for images C0 and C1 into XFMD C1FF.
Your icons should now be properly linked, and shouldn't conflict with anything else.
Tooltip
The last step in creating a basic slider is to update the tooltip. Select Text Lists (STR#) from the Resource Tree and open the only resource in the Resource List. Select the text in the String box, and replace it with whatever you like. Click Commit. ---IMAGE---
Testing again
Your slider is finished! Test it again, in both CAS and Bodyshop - make sure to check that your icons are the right way round and that they don't jump around when you click on them. Test the slider thoroughly in CAS, if you haven't already done that since duplicating the XFMD. If all is well, you're done!
If you hit any problems, take a look at #Common Problems or post link.
Advanced Options
LOD15
Separating XFMDs by Age and Gender
Making a One-Way Slider
Using a Different Compare Mesh
Understanding Scales and Limits (the blind leading the blind)
---IMAGE--- (your mesh) (default) (100% mirror) ________________________________________________
negativelimit middle positivelimit
Imagine a scale: the scale is infinite, and in the middle is the default EA face mesh. Some distance down the scale from the middle is your mesh: this is at -1 (or -100% if that's easier for you). Some distance up the scale is the mirrored version of your mesh that the game creates: this is at 1 (or 100%).
When you use your slider in game, by default, the slider will cut off at -1 and 1. You won't be able to move the slider lower than -1, or higher than 1: these are the positive and negative limits. For nopke's eyebrow slider, this is what your sim will look like at 1 and -1: ---IMAGE---
You can change these limits to whatever you like. If you change the negative limit to -0.5, the slider will stop halfway to looking like your mesh. If you change it to -2, the slider will keep going, and the sim's features will be exaggerated: they'll have changed twice as much as in your mesh.
You change the positive and negative limits separately. So for example, if you were editing nopke's eyebrow slider and you set the limits to -2 and 2, this is what the scale would look like: ---IMAGE---
If you set the positive limit to 2 and the negative to -0.5, it will look like this: ---IMAGE---
So that's what limits do, but what about scale? You can imagine the scale as being the speed at which the slider goes along the scale. If you leave the limits at -1 and 1, but set the positive scale to 0.5 and the negative scale to -2, you'll get this: ---IMAGE--- When going down the scale, the slider has gone further than usual-this whole explanation is wrong goddamnit.
Pet Sliders?
Common Problems
Questions & Comments
To-Do
- Add sort index stuff

 Sign in to Mod The Sims