 [TESTING] Custom Traits Manager
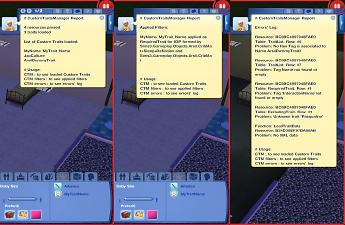
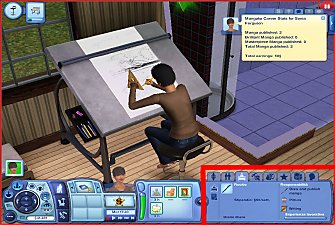
CTM_Preview.jpg - width=862 height=688
CTM_Reports.jpg - width=1054 height=688
DISCLAIMER WARNING README
This mod has savegame-screwing potential, use at your own risk.
The problem is the usual one related to custom traits and skills: if you uninstall the mod
(and in this case could be the Manager itself or a third party mod using the Manager)
that adds them to the game, then you may not be able to keep playing the savegame where
the traits or skills have been "used" because it can gets corrupted (unplayable).
I RECOMMEND TRYING THIS ON A NEW, DISPOSABLE GAME, NOT ON ONE YOU CARE ABOUT.
I feel like I should specify something to clear the air from any misunderstandings:
if a savegame gets corrupted as a result of removing a custom trait (or skill), then
simply don't save it, but instead completely quit from the game, put the mod(s) back,
restart the game, reload that savegame, try to uninstall it again using the suggested
steps (see the Final Notes below), save, quit and restart again to see how did it go.
The problem is that noticing the corruption may not be that easy or immediate.
And things get more complicated if - inside that same savegame - you visited
other worlds (University, Vacations, Future and maybe also regular ones).
There are 2 types of corruption that I witnessed:
- No Sims selectable, the game is completely unplayable (when the active Sim or maybe simply a selectable Sim had the trait/skill).
- Sims continually getting reset (one or more unselectable Sims or maybe simply not the active Sim had the trait/skill). I don't remember if there's a way to fix this.
Before making this mod, I was convinced that the corruption was caused only by saving the game
while a Sim was executing an interaction using a custom CommodityKind (related to a custom
trait or skill), but it seems like it is also caused by Sims still having custom traits (possibly also
skills) after removing the mod that added them.
Mod Info
Developed and tested on game version 1.67.
Mod Description
As a concept, this is similar to NRaas Careers and CCLoader.
It will help third party creators to make custom traits for the game.
Now, I want you to focus and read this carefully: this is not a magic mod, the traits created
will have very limited functionality, i.e. act as filters for specified game interactions.
Coded interactions, not the social ones defined only by xml data. What does that mean?
As you could do with an ITUN (Interaction TUNing) mod, you can specify a trait required
to use the interaction or a trait that's banned from using it. Why not use directly an ITUN
mod then? Because the parser of the ITUN resources only "recognizes" official traits
(this is a simplified and shortened explanation, but AFAIK it's the fundamental reason).
Another thing you should know is that this is not a user friendly mod. Well, it is for final
users, I meant that it's not easy to create a custom trait, but I'll try to show how to do it.
- _S3PE_
- Know your way with STBL resources for the localization of strings
- A basic understanding of how ITUN resources work
- A graphic editor and minimal image editing skills (for the thumbnails of the trait)
- Having this mod installed
If you associated an external text editor to S3PE, then you can skip the following procedure.
- Go to the directory where you have installed S3PE
- Go to the Helpers subfolder
- Open the file Notepad.helper with a text editor, Notepad itself it's ok
- The first line in there is a comment, the second one is a long list of resources types
associated with Notepad - Add this string at the end of the list: 0x15970002 (make sure to keep a space
between it and the previous entry) - You should have something like this as end result (your mileage may vary):
Code:// Text/(pure) XML files ResourceType: 0x024A0E52 0x025C90A6 [CUT FOR BREVITY] 0xF0FF5598 0x15970002 Label: Notepad // Windows notepad is in the standard Windows PATH, so you don't need to say where it is: Command: notepad Arguments: "{}" Desc: Edit a Text file with Notepad
You see what I did there, right? It's not that [CUT FOR BREVITY] is really written there. Good. - Save the file and quit
Update: In the first comment, I've uploaded a skeleton package that already contains all the resources needed,
you just have to rename them all using unique names and using those names to re-hash the InstanceID
of the resources
- Start S3PE
- From the menu, select File and click New
- From the menu, select Resource and click Add
- The Resource Details dialog window opens
- In the field Type, put 0x15970002
- In the field Group, put 0 (it will automatically be turned into 0x00000000)
- Tick the Use resource name checkbox
- In the field Name, put something like <Username>_TutorialTrait,
where <username> is your username (on MTS or on your PC or whatever).
I'll literally use Username_TutorialTrait
Note: the name chosen here has nothing to do with how the trait will be displayed in game.
I can't stress this enough, in order to share not conflicting mods, it's important
to use unique keys to generate hashing values used as identifier for the resources.
There might be billions of billions of combinations, but if 2 users living on the opposite
side of the world both put "Trait1" or "Cool" or "Gamer", you can see that blah blah blah.
Not to mention the risk to override existing game assets. - Click the FVN64 button and 2 things will happen: the Ok button becomes clickable
and the Instance input-field has been filled with a hex number (this is the hash generated
using the text in the Name field as hashing key).
For reference purposes, using Username_TutorialTrait will generate the hash 0x12DC32B0C3D9A022 - Click the Ok button. The dialog window will close and we are back to S3PE's main window
- You'll notice that 2 resources have been added to our package: the one with the tag _KEY
has been created automatically to keep track of the name we assigned to the resource;
the one with the tag UNKN (for UNKNown) will contain the xml data of the custom trait - Now is a good time to ask yourself "What the hell am I doing?"
If you don't want to get distracted or if you trust old Arsil with your life (bad idea), you can go ahead to
the next part of the tutorial, otherwise you can check what, luckily for me, I've already explained HERE.
Update: If you are using the skeleton, you already have the document ready, so you can skip a few of the steps
- Right click on the UNKN resource and from the popup menu select Notepad (or Text Editor, if you defined one)
- The text editor of your choice will open with a blank document
- Now, this is going to be an XML document, so we need the right structure/skeleton
(I'm not an expert and I don't really known the right terminology, so bear with me).
Copy the text from this box and paste it to your document
Code:<?xml version="1.0"?> <CustomTraitsManager> <!-- ############### TRAITS DEFINITIONS ############## --> <!-- This is not here just for reference, it's needed for a successful parsing --> <TraitList> <!-- row #0 --> <Name></Name> <Description></Description> <Hex></Hex> <CodeVersion></CodeVersion> <AgeSpeciesVisible></AgeSpeciesVisible> <SetNumbers></SetNumbers> <Points>0</Points> <RandomWeight>0</RandomWeight> <Category></Category> <CommodityName></CommodityName> <FacialIdle></FacialIdle> <AutonomousDesiredCommodity></AutonomousDesiredCommodity> <AutonomousAvoidedCommodity></AutonomousAvoidedCommodity> <IncreasedEffectiveness></IncreasedEffectiveness> <ReducedEffectiveness></ReducedEffectiveness> <xMin></xMin> <DesireMin></DesireMin> <xMax></xMax> <DesireMax></DesireMax> <Decay></Decay> <Predicate></Predicate> <CanBeLearnedRandomly>TRUE</CanBeLearnedRandomly> <IntimacyLevel>10</IntimacyLevel> <ActiveTopic></ActiveTopic> <PreferredBookGenre></PreferredBookGenre> <ThumbFilename></ThumbFilename> <ThumbPieMenu></ThumbPieMenu> <ThumbDislikePieMenu></ThumbDislikePieMenu> <ThumbPose></ThumbPose> <AddListenerFunction></AddListenerFunction> <TraitTipDescription></TraitTipDescription> <TraitTipIndex></TraitTipIndex> <TraitToolTipText0></TraitToolTipText0> <TraitToolTipText1></TraitToolTipText1> <TraitToolTipText2></TraitToolTipText2> <TraitToolTipText3></TraitToolTipText3> <CanBeLearnedThroughConversation>True</CanBeLearnedThroughConversation> <LifetimeRewardCategory>Other</LifetimeRewardCategory> <ReinforcableAxis></ReinforcableAxis> <ReinforcableThreshold></ReinforcableThreshold> <ReinforcableOppositeTrait></ReinforcableOppositeTrait> <OccultsTypesValidForTrait>All</OccultsTypesValidForTrait> <Version>1.0</Version> </TraitList> <!-- From here on, we can define our custom trait or traits (it's fine to define more than one) --> </CustomTraitsManager>
Note: everything between <!-- and --> is commented (not relevant for the parsing of the xml,
it's used to keep notes). A text editor with syntax highlighting would help you to see at a quick
glance the difference between commented text and regular text. - In the line below the comment "From here on..." let's add a blank line and then this text:
Code:<TraitList> <!-- row #1 --> </TraitList>
- Now, let me introduce some terminology that will come in handy later.
Again, I'm not sure if this is the right jargon, so don't quote me on this.
We need to understand what is a table and what is a row.
In this document, so far, there is 1 table: the TraitList table. The TraitList table is the set
of blocks enclosed by the opening tag <TraitList> and the closing tag </TraitList>.
Now, a row is a single and specific block of a table, like the row #1 that we just added
to the TraitList table. So the TraitList table now includes 2 rows. I hope that makes sense.
- A quick recap on how our document looks like now, to make sure we're on the same page:
Code:<?xml version="1.0"?> <CustomTraitsManager> <!-- ############### TRAITS DEFINITIONS ############## --> <!-- This is not here just for reference, it's needed for a successful parsing --> <TraitList> <!-- row #0 --> [LOTS OF STUFF HERE] </TraitList> <!-- From here on, we can define our custom trait or traits (it's fine to define more than one) --> <TraitList> <!-- row #1 --> </TraitList> </CustomTraitsManager>
- From now on, let's focus on our row #1
- Let's give a name to our trait. Note: this is the internal name of the trait,
the behind the scenes name of the trait, not the name we'll see in game.
Code:<TraitList> <!-- row #1 --> <Name>UserName_TutorialTrait</Name> </TraitList>
- Note: the fact that I've used the same name that I previously given to the resource is just
a coincidence. I mean that it doesn't have to be the same in order to work. - Again, to avoid conflicts, this must be a unique name, that could be hardly picked randomly
by someone else, that's why the convention is to put your username as prefix. - Now we need a numerical value to associate to the name of the trait. To keep the tutorial flowing
and explanations as simple as possible I'll save you the details, but those interested can read the
comments on the xml file of the example trait that I've uploaded in the first comment of this download.
This value is defined with a tag called Hex:
Code:<TraitList> <!-- row #1 --> <Name>UserName_TutorialTrait</Name> <Hex>UserName_TutorialTrait=0x12DC32B0C3D9A022</Hex> </TraitList>
- Notice the format of that string, X=Y, it is of utmost importance:
X must be the same string used in the tag Name, but where did that Y came from?
That's a big ass number in hexadecimal format. Should you use that same number too?
Nope! Unless you are also literally using UserName_TutorialTrait. But even if you are,
check the next steps to see what's the procedure to get it. - Copy into the clipboard the name of your trait (in my case UserName_TutorialTrait)
- Save your text document and close it
- Before you can get back to the main S3PE's window, there's a dialog window that asks
you if you want to commit the changes you have made to the resource.
You most certainly do, so click Yes. - Now, from the menu, select Tools and then FNV Hash...
- The FNV Hash window will open.
- In the Text to hash input-field paste the name of your trait then press Return or click on the Calculate button
- What just happened? The string we put in the field on the top has been translated (hashed) using various hashing algorithms
- We need the FNV64 hashing of the name of our trait, so copy to the clipboard that number and close the FNV Hash window
- Open our UNKN resource (right click on it and select Notepad or Text Editor)
- Paste that value in the Hex field, after the "=" sign
Yawn.
I'm sorry but it's late and I'm falling asleep.
Zzzz...
[Several hours later]
CTM, the mod with a cliffhanger.
Hahaha... haha... ha...
* notices icy stares from cross armed Simmers.
Shall we get back to the tutorial?
- The order of the tags doesn't matter, but I like to group them based on their function
so the document is easier to read as a whole. - Let's swap the tag Name with Hex, putting Hex on top, and leaving a blank line between them:
Code:<TraitList> <!-- row #1 --> <Hex>UserName_TutorialTrait=0x12DC32B0C3D9A022</Hex> <Name>UserName_TutorialTrait</Name> </TraitList>
- The tag Name, in addition to being the internal name of the trait, will also be used
as suffix to generate the localization key for the "on stage" name of the trait, the name
that will be seen in game. But let's add the other tags first - Code:
<TraitList>  <!-- row #1 -->
  <Hex>UserName_TutorialTrait=0x12DC32B0C3D9A022</Hex>

  <Name>UserName_TutorialTrait</Name>
  <Description>UserName_TutorialTrait_desc</Description>
  <Predicate>UserName_TutorialTrait_pre</Predicate>
  <TraitToolTipText0>UserName_TutorialTrait_ttt0</TraitToolTipText0>
  <TraitToolTipText1>UserName_TutorialTrait_ttt1</TraitToolTipText1>
  <TraitToolTipText2></TraitToolTipText2>
  <TraitToolTipText3></TraitToolTipText3>
</TraitList>
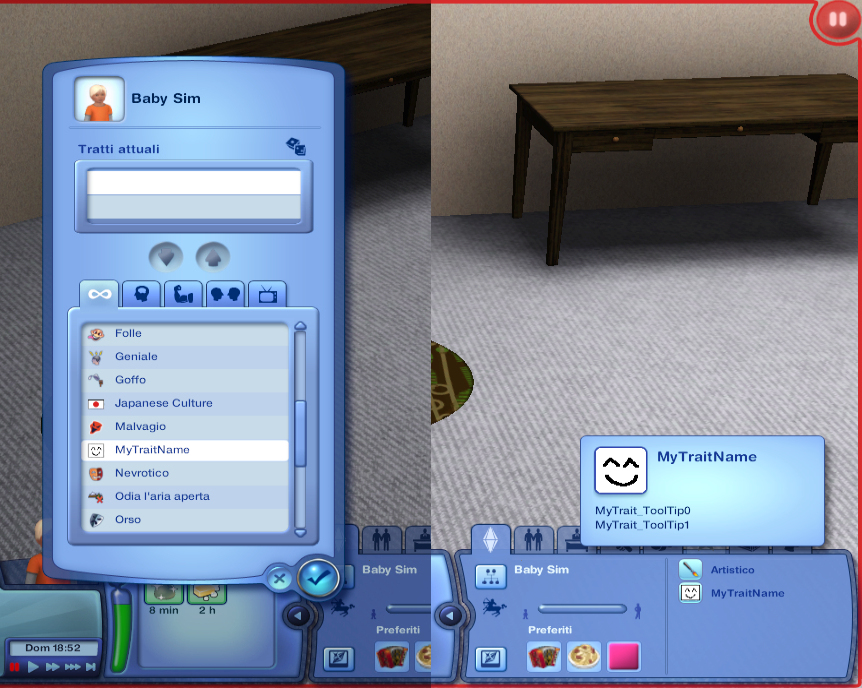
- Description is the description of the trait (I didn't capture that on the screenshot)
- Predicate is used when Sims learn that a Sim has this specific trait. More on that in a bit.
- TraitToolTipText[0..3] are the bullet points you see in the right part of the first screenshot.
You can have a max of 4, I'll just use 2 in this example (the empty tags can be removed) - So, the string you put in these tags is the suffix to create the localization key, the prefix is
Gameplay/Excel/traits/TraitList:
So, the 5 localization keys for our example trait are:
Gameplay/Excel/traits/TraitList:UserName_TutorialTrait
Gameplay/Excel/traits/TraitList:UserName_TutorialTrait_desc
Gameplay/Excel/traits/TraitList:UserName_TutorialTrait_pre
Gameplay/Excel/traits/TraitList:UserName_TutorialTrait_ttt0
Gameplay/Excel/traits/TraitList:UserName_TutorialTrait_ttt1
Should I explain how to create an STBL resource, add entries and clone it to create
the ones for all the other languages? Maybe later, but there are already tutorials for that.
Predicate: this should be a brief phrase that will be inserted in a bigger phrase.
It should be something like this:
Bob discovers that [PREDICATE].
Note: the period is outside the predicate.
So you have to localize the predicate with something like:
{0.SimFirstName} is tutorialTrait
So the final phrase will be: Bob discovers that Nancy is tutorialTrait.
If the name of your trait is an adjective, you just use it as it (you may need to add an "a" or "an")
If the name of your trait is a noun you have to put an adjective that describes the noun, so the phrase
makes sense.
Example: for the neat trait, the English translation of the predicate is
{0.SimFirstName} is neat
I can't think of a trait uses a noun.
Note: some translations may require a female and male form,I don't remember, so you create two different keys, one as described above and
how to do that
another with the added suffix _female
Example for a predicate:
Gameplay/Excel/traits/TraitList:UserName_TutorialTrait_pre
Gameplay/Excel/traits/TraitList:UserName_TutorialTrait_pre_female
Note: if you are creating a hidden trait pretty much only the Name tag will
be ever needed, but I'd say is a good convention to translate all other tags
anyway, you never know, may you'll change your mind about making it hidden.
- A quick recap of how our document looks like at this point:
Code:<TraitList> <!-- row #1 --> <Hex>UserName_TutorialTrait=0x12DC32B0C3D9A022</Hex> <Name>UserName_TutorialTrait</Name> <Description>UserName_TutorialTrait_desc</Description> <Predicate>UserName_TutorialTrait_pre</Predicate> <TraitToolTipText0>UserName_TutorialTrait_ttt0</TraitToolTipText0> <TraitToolTipText1>UserName_TutorialTrait_ttt1</TraitToolTipText1> <TraitToolTipText2></TraitToolTipText2> <TraitToolTipText3></TraitToolTipText3> </TraitList>
- Let's add the 3 tags needed for the thumbnails:
Code:<TraitList> <!-- row #1 --> <Hex>UserName_TutorialTrait=0x12DC32B0C3D9A022</Hex> <Name>UserName_TutorialTrait</Name> <Description>UserName_TutorialTrait_desc</Description> <Predicate>UserName_TutorialTrait_pre</Predicate> <TraitToolTipText0>UserName_TutorialTrait_ttt0</TraitToolTipText0> <TraitToolTipText1>UserName_TutorialTrait_ttt1</TraitToolTipText1> <TraitToolTipText2></TraitToolTipText2> <TraitToolTipText3></TraitToolTipText3> <ThumbFilename>UserName_TutorialTrait</ThumbFilename> <ThumbPieMenu>UserName_TutorialTrait_pie</ThumbPieMenu> <ThumbDislikePieMenu>UserName_TutorialTrait_dislike</ThumbDislikePieMenu> </TraitList>
- The value you put for the tag is the FNV64 hashing key to get the InstanceIDs of the
IMAG resources for the thumbnails - So, let's save the document, close it, commit changes and go back to the main S3PE window.
- Go to menu, Resources and select Add. The Resource Details window opens
- For the type, press I and select IMAG 0x2F7D0004
- For the group, as usual, 0 (0x00000000)
- Tick the checkbox "Use resource name" if it isn't already ticked
- In the Name input-field, put the string you used in the ThumbFilename tag,
click on the FNV64 button, the Ok button will become usable and the Instance field
has been filled with the hash.
Using my example, putting Username_TutorialTrait as Name, not surprisingly, you get
the usual 0x12DC32B0C3D9A022.
Note: there's no risk of conflict because this is a different type of resource. - Now do the same thing for the other 2 thumbnails. For the record:
UserName_TutorialTrait_pie : 0x92A6EEDB74DBC7ED
UserName_TutorialTrait_dislike : 0x4B0EBCF73B85C9BA - Now it's time to create the images. In the first comment I've uploaded 3 vanilla icons.
The images have to be in .png format and you have to keep their original size. - Once you have the 3 images, from S3PE you have to right click on a IMAG resource
and select Replace: you now have to select a file, select the right image for that thumbnail.
Later I'll probably upload in the first comment a skeleton .package file already containing the
resources needed to make this easier, so you'll just have to change the name/Instance of the
resources instead of creating them from scratch. [UPLOADED]
As usual, use unique and meaningful names (you have to know at first glance what thumbnail
that IMAG resource represents) to generate the Instance identifiers of the resources.
Note to self: next time you decide to write a tutorial, think again, this is effing exhausting.
Note: for some reason, from now on this is displayed with interline spacing (even if I'm using the "code" tag written lowercase, Go figure!
- Let's go back to editing our UNKN resource, that now looks like this:
Code:<TraitList> <!-- row #1 -->
<Hex>UserName_TutorialTrait=0x12DC32B0C3D9A022</Hex>
<Name>UserName_TutorialTrait</Name>
<Description>UserName_TutorialTrait_desc</Description>
<Predicate>UserName_TutorialTrait_pre</Predicate>
<TraitToolTipText0>UserName_TutorialTrait_ttt0</TraitToolTipText0>
<TraitToolTipText1>UserName_TutorialTrait_ttt1</TraitToolTipText1>
<TraitToolTipText2></TraitToolTipText2>
<TraitToolTipText3></TraitToolTipText3>
<ThumbFilename>UserName_TutorialTrait</ThumbFilename>
<ThumbPieMenu>UserName_TutorialTrait_pie</ThumbPieMenu>
<ThumbDislikePieMenu>UserName_TutorialTrait_dislike</ThumbDislikePieMenu>
</TraitList> - Let's add a few more traits:
Code:<TraitList> <!-- row #1 -->
<Hex>UserName_TutorialTrait=0x12DC32B0C3D9A022</Hex>
<CodeVersion>BaseGame</CodeVersion>
<Category>LifeStyle</Category>
<AgeSpeciesVisible>B,P,C,T,Y,A,E</AgeSpeciesVisible>
<Name>UserName_TutorialTrait</Name>
<Description>UserName_TutorialTrait_desc</Description>
<Predicate>UserName_TutorialTrait_pre</Predicate>
<TraitToolTipText0>UserName_TutorialTrait_ttt0</TraitToolTipText0>
<TraitToolTipText1>UserName_TutorialTrait_ttt1</TraitToolTipText1>
<TraitToolTipText2></TraitToolTipText2>
<TraitToolTipText3></TraitToolTipText3>
<ThumbFilename>UserName_TutorialTrait</ThumbFilename>
<ThumbPieMenu>UserName_TutorialTrait_pie</ThumbPieMenu>
<ThumbDislikePieMenu>UserName_TutorialTrait_dislike</ThumbDislikePieMenu>
</TraitList> - CodeVersion should always be BaseGame, unless maybe you are making a trait
for a Pet, but even in that case I'd probably keep BaseGame for simplicity sake.
Note: if you DO use a different version then be aware that you'll have to use the related GroupId for the IMAG resources. - Category, aka casGroup, define what kind of trait this is: Values are:
None for hidden traits
Reward* for reward traits (see the comments on the xml of the example trait in the first comment)
Intellect, Social, Lifestyle, Physical (see left side of first screenshot) - AgeSpeciesVisible defines for what ages and species the trait is available:
B baby, P toddler, C children, T teen, Y young adult, A adult, E elder
For Pets and other weird Sims check the list of references at the bottom of the description
- This is a good time to save the document, close, commit changes and save the package.
Put it into a sub-folder of Mods/Packages, possibly where you keep new stuff
or stuff you still have to try, so you can more easily keep an eye on it.
Start the game. If something went wrong you should get one or more warnings when
you get to the Main Menu. Not getting warnings is a good sign.
Note: the warnings you may get at this point are mainly about the trait definition,
so the report system that I've devised won't be of much help, if not in telling you in
what resource the problem is, in case you have more than one, and in which row
(now those comments row #0, row #1 make sense, don't they?) if you have
defined more than one trait.
Start a new game or load a game you don't care too much about (not your 9th generation dynasty!).
Like I said at the top, the problem should only be if you uninstall the mod (the Manager itself or
one of its modules, like the one we are making in this tutorial), but better be safe than sorry.
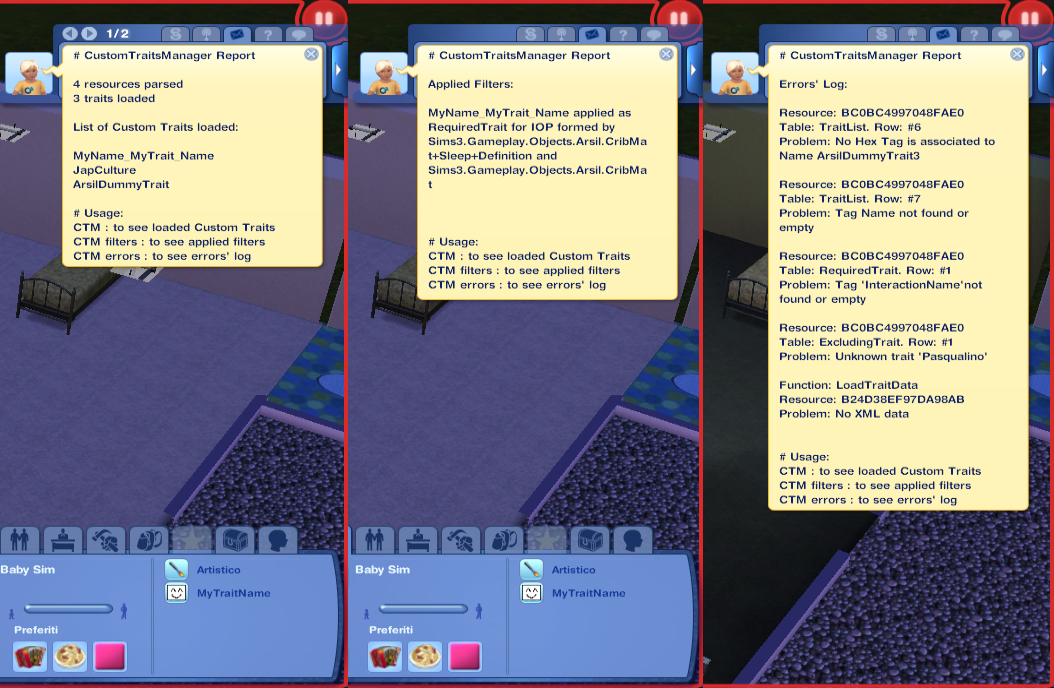
Now, you can use the console command CTM to get a report.
Use CTM log (or CTM errors or just use the first letter, "l" or "e") to see if there is
any error (if you didn't get any warnings before, the errors' log should be empty)
Now try using cheats (shift+click on the active sim) or a mod to add a trait to someone
and see if your custom trait is there.
Is it? Congratulations, you added a custom trait to the game. It is utterly worthless,
but hey, it looks cool nonetheless, especially with that little cute icon you made just for it.
It's not there? Then something went wrong, start the tutorial again.
This is getting way too long, so for more information check the example trait and
read the comments on the xml (UNKN resource).
There you can learn how to make good, neutral and bad traits.
How to make traits conflict (good vs evil, neat vs slob, etc).
Don't ask me what the other tags mean, if I haven't put comments on them in that
document it means that I don't know.
But I still have to explain how to make the custom trait a little more than useless.
Sigh.
- Let's open again our UNKN resource containing the trait definition xml data.
If it's not already there (maybe you are using the skeleton I've uploaded in the first comment),
after the closing tag of our trait, let's add this:
Code:
</TraitList> <!-- row 1 -->

  [OUT TRAIT DATA, CUT TO SAVE SPACE]

</TraitList>


<!-- ############### FILTERS DEFINITIONS ############## -->


<!-- This is not here just for reference, it's needed for a successful parsing -->

<RequiredTrait> <!-- row #0 -->

  <Name></Name>

  <InteractionName></InteractionName>

  <ObjectName></ObjectName>

</RequiredTrait>


<!-- This is not here just for reference, it's needed for a successful parsing -->

<ExcludingTrait> <!-- row #0 -->

  <Name></Name>

  <InteractionName></InteractionName>

  <ObjectName></ObjectName>

</ExcludingTrait>


</CustomTraitsManager>
Our xml document just gained 2 more tables: RequiredTrait and ExcludingTrait.
So, let's say that we want Sims with our custom trait to be unable to use a certain interaction.
We have to add a new row to the ExcludingTrait table. - Code:
<!-- This is not here just for reference, it's needed for a successful parsing -->

<ExcludingTrait> <!-- row #0 -->

  <Name></Name>

  <InteractionName></InteractionName>

  <ObjectName></ObjectName>

</ExcludingTrait>


<ExcludingTrait> <!-- row #1 -->

  <Name>Username_TutorialTrait</Name>

  <InteractionName></InteractionName>

  <ObjectName></ObjectName>

</ExcludingTrait>
We put the internal name (based on the Name tag used on TraitList) of our trait. - Now we have to chose an interaction that Sims with our custom trait won't be able to use.
The syntax is the same you find at the top of the ITUN resources.
Now, I'm sleep deprived, in a bad mood and can't really think clearly, so I'm sure
I'll use a great example... let's see... got it! Clean the toilet! So, I check the ITUN for
that interaction, which is conveniently called Clean_Toilet and is in GameplayData,
so I can copy/paste the name of the interaction and the name of the object.
Code:<ExcludingTrait> <!-- row #1 -->
<Name>Username_TutorialTrait</Name>
<InteractionName>Sims3.Gameplay.Objects.Plumbing.Toilet+Clean+Definition</InteractionName>
<ObjectName>Sims3.Gameplay.Objects.Plumbing.Toilet</ObjectName>
</ExcludingTrait>
- Now Sims with this trait won't be able to clean toilets. Isn't that useful?
Save and check in game if it works. Warnings should tell you if there something wrong
and where (oh, by the way, if you absolutely don't want the warnings you can turn them
off from the xml of the CTM package, you can still see the errors using the console command.
Of course this way you'll have to wait for the game to load to see if there are errors).
Once in game, you can use CTM filters (or simply CTM f) for a list of all filters defined.
Unfortunately the notification window can only contain a small number of them, so if you have a lot
you won't be able to see them.
Note: I'm aware that this is a pain in the ass as far as interfaces go, but this is the best I
could come up with. An interface usable directly in game (like NRaas Retuner) would be
much easier to use for something like this rather than xml-defining the filters.
Final notes
Depending on what kind of trait you make, the trait may be assigned randomly to newly
created Sims or age transitioning Sims. Keep that in mind knowing the difficulties
with uninstalling the mod (the whole mod or a single custom trait).
I guess something like a uninstall console command might be useful in assisting
in safely uninstalling mods like this, to automatically remove traits/skills and interrupt
interactions using a custom CommodityKind.
My best advice to uninstall mods like these is written in the Uninstallation paragraph
at the bottom of the description of my Programming Skill mod.
Useful references
_XML Traits resource in GameplayData (contains the xml definition of existing traits)
All ITUN resources in GameplayData (to copy the interaction and object name to define filters)
Code: TraitManager.ParseTraitData function (the parser of the traits data)
SimsMx's Hypochondriasis mod : might not work well with 1.67 or even earlier versions (custom trait, custom motive-type CommodityKind, and much more)
My Japanese Culture Trait mod (custom trait, custom motive-type CommodityKind)
My Programming Skill mod (for custom skill-type CommodityKind)
Additional Credits
All respective authors and contributors of the tools and tutorials for modding TS3.
MTS and all modders who made the game much more enjoyable.
SimsMx for his/her inspiring code.
|
Arsil_CustomTraitsManager.package.zip
Download
Uploaded: 16th Apr 2017, 8.3 KB.
33,754 downloads.
|
||||||||
| For a detailed look at individual files, see the Information tab. | ||||||||
Install Instructions
Loading comments, please wait...
Uploaded: 15th Apr 2017 at 11:38 PM
Updated: 13th May 2017 at 9:36 AM - Description's Review
#trait, #traits, #custom traits
-
by Buzzler 5th Jul 2010 at 2:16am
 227
185.3k
426
-
by Buzzler 10th Sep 2010 at 6:26pm
 94
109.2k
183
-
by mikey 4th Jun 2014 at 6:26am
 426
529.8k
1.3k
-
by mmsbludhound 8th Oct 2015 at 1:33pm
 23
79.3k
308
-
by YolkSims updated 8th Jul 2022 at 7:28am
 29
64.4k
113
-
by phantom99 updated 10th Oct 2025 at 2:20pm
 44
59.6k
168
-
by echoweaver updated 20th Aug 2023 at 5:03pm
 +1 packs
23 27.6k 124
 Ambitions
-
by echoweaver updated 27th Aug 2023 at 3:36pm
 18
21.3k
76
-
by fantuanss12 updated 28th Jun 2025 at 10:10am
 +1 packs
13 31.6k 105
 Ambitions
-
by Glimmer 13th Jan 2026 at 9:12pm
 10
3.3k
15
-
Throw a Great Party Dreams Fix
by Arsil 29th Jul 2015 at 10:50am
A fix for fulfilling Throw a Great Party Dreams if UL is installed more...
 +1 packs
25 33.9k 148
 University Life

 Sign in to Mod The Sims
 [TESTING] Custom Traits Manager
