 Sign in to Mod The Sims
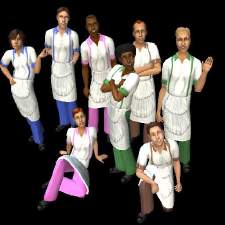
 Testers Wanted - New Career Uniform Outfit Templates
 Testers Wanted - New Career Uniform Outfit Templates
CustomUniform001.package contains all the data needed to define a career outfit for teen/adult/elder career.
CustomUniform002.package contains all the data needed to define a career outfit for adult/elder career.
It is suggested at this time that you refrain from adding, removing, or combining components within these packages. Provided you read through these instructions and understand how these files work you may edit them, copy them, and share them accordingly.
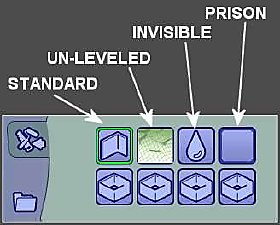
Outfits selected in the 3D ID file must be enabled as full body Everyday, and for the age/gender of the previous outfit. The process used to add additional items such as hats is a tad buggy and should be left to those who understand what they're doing and don't mind causing errors.
Should the Outfit selection in the 3D ID file become ambiguous due to not having the file in question, please refer to the included "Age Data" file. These two files are linked by instance number so check the corrisponding Age Data instance to check age/gender.
At this time Custom Uniform GUIDs are not supported by SimPE so you will have to enter the values in manually. To do this refer to the Object Data file and locate the Guid.
GUID: 0x0019C600
Record this value somewhere for now, and open up the career package. Then select "Behavior Constant: Outfit GUIDs". Listed there are several pairs for values, 1 pair for unemployed status, and 1 pair for each level of the career.
it should look something like;
0x0 0x0000
0x1 0x0000
0x2 0xAAAA
0x3 0xBBBB
0x4 0xAAAA
0x5 0xBBBB
With the A's and B's as part of whichever GUID the career was previously pointing to for that level. For our purposes and using 0x0019C600 as the GUID of the outfit we wish to use you seperate it as follows.
0xC600 replaces 0xAAAA
0x0019 replaces 0xBBBB
This would make the career use the custom GUID for levels 1 and 2 of the edited career. Once everything is set as you want it, you should save and test to make sure everything is working.
Now for the important part... Uploading your career complete with custom uniforms. I've included 2 GUIDs, however since only 1 copy of each GUID can be used at a time it will conflict with another career using the same GUID. Because of this the included GUIDs are suggested to be for TESTING ONLY. In order to unload your own one you may get your very own GUID so that it doesn't conflict with anyone else. Just be sure that after doing so that you change "Behavior Constant: Outfit GUIDs" to point to YOUR GUID and NOT MINE.
You can make as many copies of the Custom Uniform package as needed, and save/rename/edit them as needed, just be sure that each copy has it's own GUID.
When everything is set, make sure that you include in the zip/rar;
Career package
Custom uniform packages
Clothing packages used
Mesh packages used
If using someone elses clothing/mesh it is strongly suggested that you get their permission before uploading.
As usual, the author of this file takes no responsibility for any damage caused by these files, and any modification should be used at your own risk.
|
CustomUniforms.rar
Download
Uploaded: 7th Jan 2006, 3.5 KB.
4,448 downloads.
|
||||||||
| For a detailed look at individual files, see the Information tab. | ||||||||
Install Instructions
1. Download: Click the download link to save the .rar or .zip file(s) to your computer.
2. Extract the zip, rar, or 7z file.
3. Place in Downloads Folder: Cut and paste the .package file(s) into your Downloads folder:
- Origin (Ultimate Collection): Users\(Current User Account)\Documents\EA Games\The Sims™ 2 Ultimate Collection\Downloads\
- Non-Origin, Windows Vista/7/8/10: Users\(Current User Account)\Documents\EA Games\The Sims 2\Downloads\
- Non-Origin, Windows XP: Documents and Settings\(Current User Account)\My Documents\EA Games\The Sims 2\Downloads\
- Mac: Users\(Current User Account)\Documents\EA Games\The Sims 2\Downloads
- Mac x64: /Library/Containers/com.aspyr.sims2.appstore/Data/Library/Application Support/Aspyr/The Sims 2/Downloads
- For a full, complete guide to downloading complete with pictures and more information, see: Game Help: Downloading for Fracking Idiots.
- Custom content not showing up in the game? See: Game Help: Getting Custom Content to Show Up.
- If you don't have a Downloads folder, just make one. See instructions at: Game Help: No Downloads Folder.
Loading comments, please wait...
Uploaded: 7th Jan 2006 at 4:23 AM
Updated: 31st Dec 2012 at 7:44 AM by Phaenoh
-
-
-

by windkeeper 1st Jun 2006 at 7:55pm
 16
33.9k
30
16
33.9k
30
-
by windkeeper 1st Jun 2006 at 9:23pm
120
263.8k
285
-
by windkeeper 17th Jun 2006 at 1:18am
+1 packs
13 25.5k 22 University
-
by HystericalParoxysm 17th Jul 2007 at 3:02am
90
146.8k
231
-

-

-
by Lenna9 25th Dec 2022 at 11:32am
2.9k
4


-
-


Testers Wanted - All Family Patch
by Vagrant 8th Aug 2005 at 6:38am
Since I made the reverse available earlier, I figured I would make this available as well. more...
87
76k
8
-
Testers Wanted - OFB Closer Family Patch
by Vagrant 27th Mar 2006 at 11:14pm
*This mod is not being updated or supported by its author, if anyone wishes to take over the project to more...
+1 packs
107 199.5k 64 Open for Business
-

