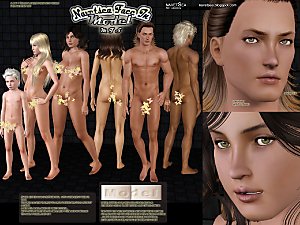
 Keratin Face v1.1

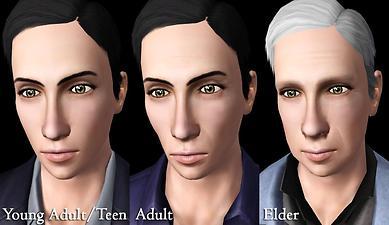
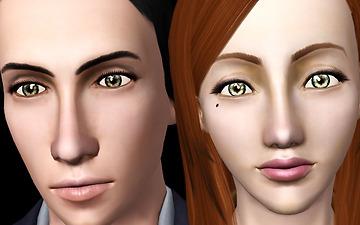
Keratin_001.jpg - width=1280 height=723
Male (Near)

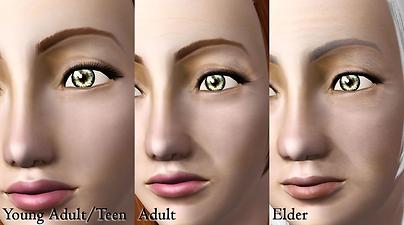
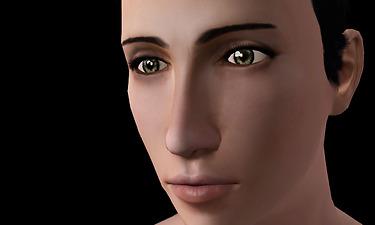
Keratin_002.jpg - width=1280 height=740
Male (Far)

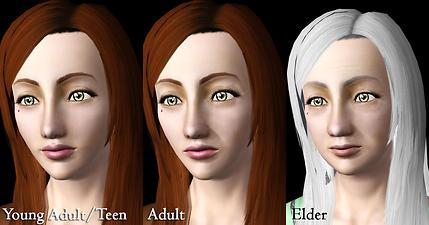
Keratin_003.jpg - width=1280 height=712
Female (Near)

Keratin_004.jpg - width=1280 height=671
Female (Far)

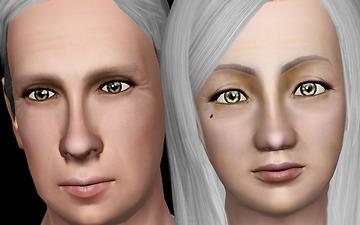
Keratin13.jpg - width=1280 height=800
Elder

Keratin14.jpg - width=1280 height=800
Young Adult

YRR_M_111.jpg - width=1280 height=768
V1.1 Revised Face
Wait for MTS upload open again.
*2013/1/10 v1.1 updated (Due to file size limitation, I only upload 1024 texture size here)
--Keratin strength changed in v1.1
--More detailed keratin texture in v1.1
--Become one part of a new "You Are Real" project (will be released recently)
--Project name changed to "You Are Real"
--Remember to delete v1.0 before using v1.1
--Get 2048 texture size one from my blog.
I proposed the Keratin Project in July last year, but didn't get it realized because of my technique.
So I just laid it untouched for a half year.
But you know...people always get something resolved after rest for some time...
Also for me....
Now I can share my achievement here with you~~~
This project is made with Normal Map which adds fake 3D effects on a surface.
And the keratin will look a different in depth and direction according to your light direction and intensity.
It's totally different from how other skin do.
(And actually this is not a skintone, but replaces the normal map of the skin.)
Pictures lightened from right-forward to intensify the keratin effects
Skin: Navetsea Model


Lightened from three direction
You can see some difference from the pictures above.


All pictures are taken in HQ.
However, by some tests, there are almost no difference in HQ and non-HQ.
Also, Teens share the same normal map with young adult.
And remember, you can only see the keratin clearly at very close distance.
You can't see your keratin at a far distance, can you. lol
But it still can affect the light effects on face so the face will become much more realistic.
Keratin Strength Settings: (Higher is stronger, v1.0)
Young Male: 13, Adult Male: 20, Elder Male: 28
Young Female: 8, Adult Female: 16, Elder Female: 25
(Changed in v1.1)
This is a default replacement.
Since almost no other skintone included normal map,
you can see the keratin effects on all skin.
However, old skin that do not support muscle definition should not show keratin effects either.
(Or it still shows normal map but not the muscle definition...Whatever)
Use Cmar's newest Skininator to repack it.
(Tutorial not provided)
This mod replaces the following textures...
_IMG ymFace_n_0x598325880b644f6f
_IMG amFace_n_0x6f853f0e35157e27
_IMG emFace_n_0x7edd5d417bc66683
_IMG yfFace_n_0x66f8047c00c00cb8
_IMG afFace_n_0x40e5744b0dbfc320
_IMG efFace_n_0x503c527e546e8c5c
Texture Size: 2048x2048 for revealing detailed keratin texture (V1.0)
A8L8 format is what EA used for normal map format.
Get 2048 texture size one of v1.1 from my blog.
Additional Credits:
Navetsea, s3pe, Blender 2.63, Cmomoney's geom add-on for Blender
|
Buhudain_DR_YouAreRealV1.1_Male_KeratinFace_1024.package.7z
| Keratin Face Normal Map DR V1.1 Male
Download
Uploaded: 10th Jan 2013, 3.26 MB.
4,551 downloads.
|
||||||||
|
Buhudain_DR_YouAreRealV1.1_Female_KertinFace_1024.package.7z
| Keratin Face Normal Map DR V1.1 Female
Download
Uploaded: 10th Jan 2013, 3.14 MB.
4,726 downloads.
|
||||||||
|
Buhudain_DR_Keratin_V1_release.7z
| Keratin Face Normal Map DR
Download
Uploaded: 7th Jan 2013, 9.65 MB.
5,985 downloads.
|
||||||||
| For a detailed look at individual files, see the Information tab. | ||||||||
Install Instructions
1. Click the file listed on the Files tab to download the file to your computer.
2. Extract the zip, rar, or 7z file. Now you will have either a .package or a .sims3pack file.
For Package files:
1. Cut and paste the file into your Documents\Electronic Arts\The Sims 3\Mods\Packages folder. If you do not already have this folder, you should read the full guide to Package files first: Sims 3:Installing Package Fileswiki, so you can make sure your game is fully patched and you have the correct Resource.cfg file.
2. Run the game, and find your content where the creator said it would be (build mode, buy mode, Create-a-Sim, etc.).
For Sims3Pack files:
1. Cut and paste it into your Documents\Electronic Arts\The Sims 3\Downloads folder. If you do not have this folder yet, it is recommended that you open the game and then close it again so that this folder will be automatically created. Then you can place the .sims3pack into your Downloads folder.
2. Load the game's Launcher, and click on the Downloads tab. Find the item in the list and tick the box beside it. Then press the Install button below the list.
3. Wait for the installer to load, and it will install the content to the game. You will get a message letting you know when it's done.
4. Run the game, and find your content where the creator said it would be (build mode, buy mode, Create-a-Sim, etc.).
Extracting from RAR, ZIP, or 7z: You will need a special program for this. For Windows, we recommend 7-Zip and for Mac OSX, we recommend Keka. Both are free and safe to use.
Need more help?
If you need more info, see:
- For package files: Sims 3:Installing Package Fileswiki
- For Sims3pack files: Game Help:Installing TS3 Packswiki
Loading comments, please wait...
Updated: 11th Feb 2013 at 3:22 AM - V1.1 update
-
Moonlight Skin - All Ages included
by kanno updated 12th Sep 2009 at 5:49pm
-
Children's face skin remake by subaxi
by subaxi 11th Sep 2009 at 4:52pm
-
by robokitty 15th Oct 2009 at 12:43am
-
by lastrie updated 13th Apr 2010 at 12:11am
-
Matt Default Replacement Skintone + Face Overlay UPDATED
by -Shady- updated 19th Nov 2010 at 4:10pm
-
Silk & Velvet - Female Face Skins
by LadyFrontbum 29th Jun 2010 at 12:10am
-
by Strappys updated 4th Dec 2014 at 2:28pm
-
by Navetsea 29th Dec 2012 at 7:44am
-
Environment Lighting Tweaks v4.0 & v5.6.55 GOLD
by mahamudo updated 25th Jun 2013 at 5:52am
Default replacement of the environment lighting with bright, sunny and realistic settings. more...
 95
228.9k
681
-
Seasons Sunrise ans Sunset Time Offset Tweaks
by mahamudo 31st Dec 2012 at 2:21am
Change EA's default settings of offset of sunrise and sunset time. more...
 18
24.4k
57
-
Invisible Spotlight with Angles (DEBUG floor light)
by mahamudo updated 31st May 2024 at 1:51am
 1
2.7k
7

 Sign in to Mod The Sims
 Keratin Face v1.1
