 Sign in to Mod The Sims
 Blueprint Maker (Updated 08/17/2013)
 Blueprint Maker (Updated 08/17/2013)


blueprint_maker_tool.png - width=555 height=423
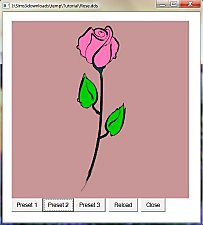
The Blueprint Maker Tool
blueprint_direction.jpg - width=763 height=773
Which side of a room will face up in the blueprint
blueprint_helper.jpg - width=1024 height=621
In-game Blueprint Helper
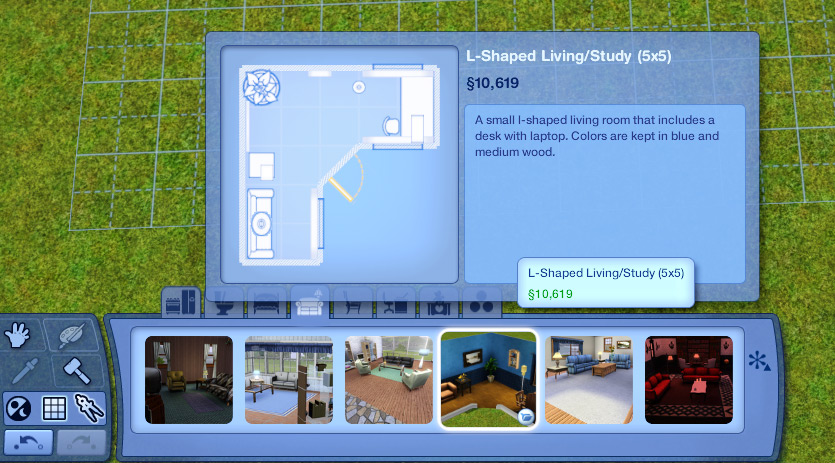
created_blueprint.jpg - width=835 height=463
Created Blueprint
07/30/2013: Updated to v1.0.2: Modified logging in helper to address errors in the log (especially for languages with non-English characters). This only changes the blueprint helper package file. If you get the error message "Blueprint log too long for buffer. Will use old way." or still have errors when creating your blueprint package, please let me know and upload the script error log file if possible.
06/01/2013: Updated to v1.0.1: Fixed issues with rooms that weren't on ground level. Fixed issues with clicking on a floor with carpet. Fixed issues with sinks and toilets on diagonal walls.
The blueprint helper and the blueprint maker tool will allow you to create your own custom blueprints, such as this:
Requirements: The blueprint maker tool requires .NET 4 and runs on Windows. I cannot give support for any other platforms and it will likely not run on those.
It was my goal to make this process as simple as possible, but there are still a few easy steps. Please make sure to read the complete instructions. They cover the two main parts of the blueprint maker, the helper mod and the tool.
Basic Instructions
- Install velocitygrass_blueprinthelper.package in the zip as you would any package mod
- Start the game and go into live mode to the room you want to create a blueprint of
- Make sure that you're in cheats mode (type Ctrl+Shift+C to open the console and enter "testingcheatsenabled on", then return)
- Click on the floor in the room and select "Velocitygrass..." -> "Create Blueprint Template" with or without outer walls. (See FAQ at the end for the difference)
- The mod will work for a moment and write an error log in your The Sims 3 folder. Don't worry if flickering occurs or if it takes a while (especially for very large rooms).
- Make a nice screenshot of your room, so that the relevant stuff is at the center (this will be cropped to a square)
- Unzip the BlueprintMaker folder in the zip file to your hard drive
- Start the Blueprint Maker tool by double-clicking the BluePrintMaker.exe
- Enter the path to the error log the mod created and the screenshot you created
- Enter the other data, particularly a unique name (for better uniqueness include your username)
- Save the package, install it like any other package mod, and test your blueprint
 Blueprints created with this tool should be suitable for sharing with others. Just make sure that you list the required EPs/SPs/custom content in the description of the blueprint and that you use a really unique name in the tool (see details below). If a blueprint is used that includes content the user doesn't have installed, these objects will be missing from the realized room. They will not be replaced with base game items. Please also carefully read the limitations section further down for objects which you should remove before creating the blueprint.
Details about the blueprint maker tool:
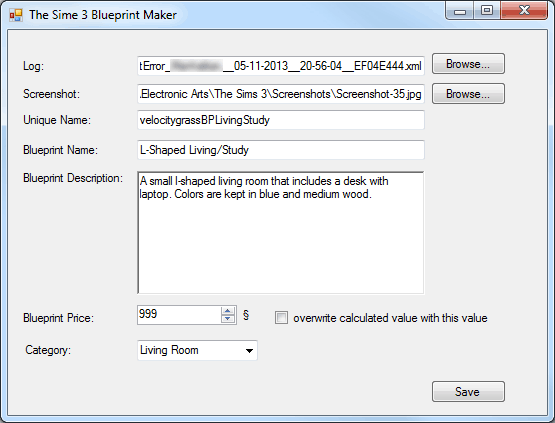
- Log: This is the log that the blueprint helper mod created. It should be located directly in the Sims 3 folder in Documents, e.g. C:\Users\[Username]\Documents\Electronic Arts\The Sims 3.
- Screenshot: This can be either a screenshot you took or any other image you created to be used as preview image for the blueprint. Please be aware that the blueprint preview will be squared, so borders of a wider image will be removed. If you want to have full control, it's best to create a square image as a preview.
- Unique Name: This will be used to generate IDs for relevant resources, so it's important that this is a unique name for every single package that you create. I would recommend that you use your username as part of the name, e.g. velocitygrassBPBlueKitchen or something like that. Make sure that you never reuse the name. The package name will by default be the same as this unique name, so if you don't change the package name when saving, it should be easy to compare if a name has already been used. E.g. if I created a second blue kitchen blueprint I would use velocitygrassBPBlueKitchen2 or something else.
- Blueprint Name: This is simply the name as it appears in build/buy mode when you select the blueprint. Please note that the size of the blueprint room will automatically be added behind the name, so you don't need to take care of that.
- Blueprint Description: This is an additional description that you can add. It will appear below the name and price of the blueprint in build/buy mode. It might be useful to list the necessary EPs/SPs/custom content of the blueprint here, so that users have easy access to that information when using your blueprint.
- Blueprint Price: When you start the tool, this will say 999 Simoleons by default. When you create the blueprint from the logfile, this price will be replaced with the actual price of the furniture, walls, wallpaper, floors that the blueprint helper wrote to the log in a line beginning with "Value". If you do not want to use the actual price, but rather would like your blueprint to be a little cheaper (or more expensive), you can check the checkbox next to the price and instead of taking the real price, it will take whatever is given as price (either the default 999 Simoleons or whatever you entered).
- Category: Here you can select in which category the blueprint should appear.
Tip: To make browsing for the log and screenshots easier, I've created the ability to place a settings.txt file in the same folder as the tool. The tool will read the first four lines and use them as default folder for the following:- The folder for the log files
- The folder for the screenshots
- The folder in which to write the blueprint package file
- The beginning of the unique name, e.g. your username. (But make sure to append it for each new package in the tool!)
Known Limitations
The blueprint functionality in the game has some limitations. Additionally there are some limitations of the blueprint maker tool.
- Of build mode only walls, wallpapers, floors, doors, windows, arches, columns, and fireplaces are supported.
- Cheats/operations on objects will not be applied when placing with the blueprint. E.g. fog emitter effects or music stations or cfe cheats on walls.
- The blueprint tool works on a single room (as the engine defines it). This means an area that is completely surrounded by walls OR halfwalls. If you have halfwalls between a living area and kitchen, that should be fine, since you'll have an opening for the sim to walk through.
- I am unable to get both sides of the wallpaper for half-walls for reasons that I don't understand (the function to get them just doesn't work correctly in that case), so both sides will have the front/left wallpaper. (You can fix this by editing the error log the tool uses.)
- The blueprint tool will not work or work unexpectedly for objects that are created as part of game play. This includes food, paintings, photographs the sims took, plants the sims planted. It is highly recommended that you remove such objects before creating a blueprint.
- Bunk beds are added, but not with their correct CASting. I'll have to see if I can fix it or if it's a limitation of blueprints.
- The error log will occasionally have missing characters, which can result in faulty blueprint packages or cause issues with the blueprint maker tool. Just try creating the log again if something comes out unexpected.
- Sometimes some objects of the blueprint will not be placed. This appears to be an issue with non-custom blueprints as well and not related to the tool.
- There is a two width window that doesn't have its own diagonal version in the game files. This window will not be placed in a blueprint if it's on a diagonal wall. I do not know why and how to fix this. It's likely that the same issue exists with CC windows that don't have a separate resource for placement on diagonal walls.
Wish List
There are things that could still be added to the tool. I'll keep a list of them here.
- Support for fences (this should be technically possible, but I didn't get around to it)
- Collect info about used EPs/SPs/custom content in the log and allow users to easily copy this info to the description
Other questions:
What is the top of the blueprint? The direction of the blueprint is based on the lot direction. I've added a screenshot to illustrate this. If the lot is already placed, you cannot change this, but you can create a blueprint, place it on a new lot in the direction you want and then recreate it.
What's the difference between creating a blueprint with or without outer walls (the two options in the blueprint helper)? When you create a blueprint from a room in an existing house, it's very likely that that the room is surrounded by different other rooms. This would result in a weird mix of wallpaper on the outside of the blueprint room, so I added the option without outer wall. This option simply ignores the wallpaper on the outside of the room and leaves it blank (the default gray).
Additional Credits:
Inge and Peter Jones for s3pi and s3pe. Twallan for this modding suite. All other modders who taught me something new. Armiel for Builder's Island and jonha for Any Game Starter; without them loading times would likely have prevented me from ever bringing this mod and tool to this stage. Sims MX, matrix54, Kimia no Tama,
tutticuti13, Elven_Ranger, Srikandi, and deathoflight for reporting bugs in the pre-release. Thank you!
|
BlueprintMaker.zip
| Blueprint Helper and Tool (source included)
Download
Uploaded: 25th May 2013, 233.3 KB.
23,392 downloads.
|
||||||||
| For a detailed look at individual files, see the Information tab. | ||||||||
Install Instructions
1. Click the file listed on the Files tab to download the file to your computer.
2. Extract the zip, rar, or 7z file. Now you will have either a .package or a .sims3pack file.
For Package files:
1. Cut and paste the file into your Documents\Electronic Arts\The Sims 3\Mods\Packages folder. If you do not already have this folder, you should read the full guide to Package files first: Sims 3:Installing Package Fileswiki, so you can make sure your game is fully patched and you have the correct Resource.cfg file.
2. Run the game, and find your content where the creator said it would be (build mode, buy mode, Create-a-Sim, etc.).
For Sims3Pack files:
1. Cut and paste it into your Documents\Electronic Arts\The Sims 3\Downloads folder. If you do not have this folder yet, it is recommended that you open the game and then close it again so that this folder will be automatically created. Then you can place the .sims3pack into your Downloads folder.
2. Load the game's Launcher, and click on the Downloads tab. Find the item in the list and tick the box beside it. Then press the Install button below the list.
3. Wait for the installer to load, and it will install the content to the game. You will get a message letting you know when it's done.
4. Run the game, and find your content where the creator said it would be (build mode, buy mode, Create-a-Sim, etc.).
Extracting from RAR, ZIP, or 7z: You will need a special program for this. For Windows, we recommend 7-Zip and for Mac OSX, we recommend Keka. Both are free and safe to use.
Need more help?
If you need more info, see:
- For package files: Sims 3:Installing Package Fileswiki
- For Sims3pack files: Game Help:Installing TS3 Packswiki
Loading comments, please wait...
Uploaded: 25th May 2013 at 7:20 AM
Updated: 27th Nov 2013 at 3:41 PM by Nysha
-
Delphy's Acronym Bending Original Output Barber Shp (aka DABOOBS) v1.1 updated 6th August 3009
by Tashiketh 26th Jul 2009 at 2:48am
 137
323.2k
105
137
323.2k
105
-
The Sims 3 - Assembly Generator - 1.4.2.13213 (+support Island Paradise or Earlier)
by Digitalchaos updated 24th Jun 2010 at 11:23pm
65
56.2k
6
-
Sims 3 - STBL Duplicator (updated to 1.2.0.13213)
by Digitalchaos updated 24th Jun 2010 at 11:25pm
27
52.4k
12
-
by Digitalchaos updated 24th Jun 2010 at 11:55pm
96
83k
23
-
Skininator - a tool to make non-default and default custom skins - new version 1/10/2013
by CmarNYC updated 10th Dec 2013 at 4:30pm
311
309.6k
292
-
by Tashiketh updated 12th Sep 2010 at 10:52am
555
622.2k
604
-
Tattooinator, a tool for creation of custom tattoos - update 8/28/13
by CmarNYC updated 28th Aug 2013 at 3:46pm
193
240.2k
403
-

Tool to Package Custom Body Hair - update 9/8/12
by CmarNYC updated 11th Jun 2011 at 8:36pm
32
121k
69
-
Create your own no effects mod tool (updated 07/02/2013)
by velocitygrass 21st Jun 2011 at 5:36pm
230
222.1k
324
-


-

Remove stencils/overlays from build/buy/CAS objects in game (edited 01/16/2014)
by velocitygrass updated 28th Jun 2012 at 4:12pm
Script mod to allow removal of stencils/overlays from build/buy objects via an object interaction more...
238
385.3k
1.2k
-

by velocitygrass 10th Mar 2012 at 1:28pm
Makes the Simport Rewards available in Build mode/CAS. more...
+1 packs
243 285.9k 789 Showtime
-

Create your own no effects mod tool (updated 07/02/2013)
by velocitygrass 21st Jun 2011 at 5:36pm
This tool lets you create your own customized mod that switches off effects in the game you don't want to see. more...
230
222.1k
324
-

Add Any Lot Size (edited 01/16/2014)
by velocitygrass updated 7th Jul 2013 at 8:18am
Allows you to add variable lot sizes via the cheat console more...
608
729.8k
2.3k
-
No (or fewer) automatic memories (with custom tool to make your own mod) Edited 01/16/2014
by velocitygrass updated 2nd Mar 2012 at 11:10am
Stops memory spamming in two ready-made flavors and a tool to make your own. more...
623
710.5k
1.3k
-
No Mosaic Patch 1.22 to 1.67 edited 01/16/2014
by velocitygrass updated 17th Oct 2013 at 11:48pm
Removes the censor effect for patch 1.22 while preserving all other effects. more...


About Me
If you have a problem with/question about one (or more) of my mods, please post in the appropriate comment section of the download and don't PM me. Thank you.