 Sign in to Mod The Sims
 Face Preset Editor
 Face Preset Editor


Face Preset Editor Icon3.png - width=256 height=256
program.png - width=658 height=655
presetexport console.png - width=508 height=94
preset exported.png - width=385 height=156

 Overview
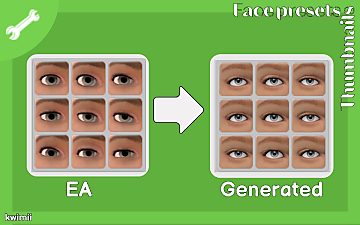
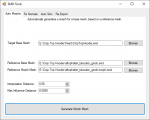
Face Preset Editor is a tool that allows you to create and edit CAS Sim face presets.
Installation InstructionsExtract the FacePresetEditor zip anywhere you wish.
You will notice that it comes with a "Mod" folder, inside is the accompanying Script Mod you must put into your Sims 3 Mods folder.
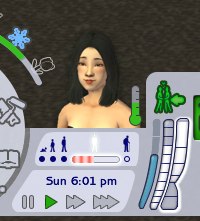
Creating a Face Preset - The Easy Way2. Open the CAS panel of the region you wish to create a preset for. Say, if you want to create a mouth preset, head to the mouth panel:
3. Open the console with Ctrl+Shift+C and type "presetexport (Name of your preset, without spaces)" like so:
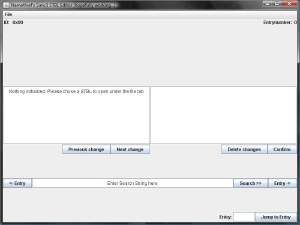
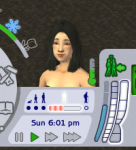
4. Hit enter and you should get a pop-up notifying you of the category of the new preset and where it was stored:
5. You can now continue creating as many presets as you want by repeating the previous steps. When you're done, close the game.
6. Open the FacePresetEditor tool, head to Tools -> Batch Convert XMLs and locate the presets you exported from inside the game. They should be in your Documents/Electronic Arts/The Sims 3 folder.
You can select multiple presets at once. This is why I recommend you create as many as you want at once while you're in-game.
7. You will be asked if you want to format the filenames in a way that you can easily import them into a S3PE package:
I recommend you choose Yes, in order to make the S3PE importing step easier.
8. You will now have new .compblend files in the same location as your exported XML files:
9. Open S3PE and create a new package by going into File -> New
10. Now you can right click on the blank Resources area -> Import -> From file... and select all of your compblend files at once:
11. Save the package into your Mods folder and quit S3PE. If you did everything right, your new presets should show up in-game!
Extra options1. Optionally, you can add a 1 after the name of your preset in the presetexport cheat. Like so:
This will force the preset to generate as a Head and Ears preset, and will include every single slider that affects the Sim, not just the ones pertinent to the head region.
2. You can go to File -> Open and load a game exported XML face preset file into FacePresetEditor, then modify it and File -> Export it into an usable .compblend. Do this if you wish to make manual adjustments to an exported preset, add sliders, etc.
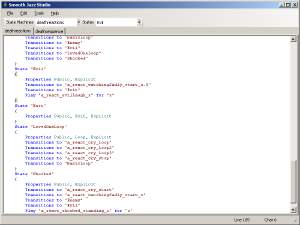
Creating a Face Preset - The Manual WayHere you can type in a name for your preset and the type of preset it is. This determines in what panel it will show up in CAS in-game.
Included is an "ExamplePreset.facepreset" file that you can open by going into File -> Open and locating it. This is an example Mouth preset I made, if you don't want to make one from scratch for your first one or if you just want to inspect it.
Clicking on the "Add" button will add an empty Slider with its value set to 0
Notice the Instance ID is set to 0x0... This is where S3PE comes into play. Inside of your Base Game Installation Folder/GameData/Shared/Packages folder, the FullBuild0.package and DeltaBuild0.package contain resources with the FACE Tag, by opening these packages with S3PE you can filter by this Tag. These are the slider resources you can use in your custom preset. You can also use custom sliders by opening their packages and locating their FACE resources.
Right click the one you want, click on "Details" then copy the Instance field and paste it into the Instance field of the Face Preset Editor, with your newly added slider selected.
Also give it a proper name in the Face Preset Editor, so you know what the slider does.
You can now use the controls below "Slider Amount:" to tweak the slider value.
With the Multiply field you can change the limit of the slider, so you can go out of bounds and make crazy presets. With the "Set NRaas Numeric Value" you can utilize the slider values that the MasterController displays in CAS, which range from -256 to 256.
Most sliders aren't meant to go below 0, most Bi-Directional sliders have two FACE files that take positive values. For example, Nose Scale is composed of NoseScaleUp and NoseScaleDown, so if you want to set Nose Scale to -0.5 you'd want to add the NoseScaleDown resource set to 0.5. There are exceptions to this however, such as the NoseNostrilScale slider, which despite being bi-directional only has one FACE resource. In this case, it can take a negative value for the left side.
When you're done adding and tweaking your sliders, you can go to File -> Save and choose an appropriate name and location for the project file. This is not the file format the game utilizes, but it has the ability to store the names you gave to the sliders which is useful. After this, you can go to File -> Export, which will generate a file the game can read, but if you import this file into the software slider names will be gone.
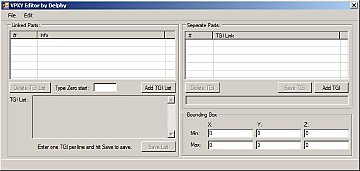
To see your Face Preset in-game, open S3PE, create a new empty package and import the file you exported with the software into it. Give it the CBLN Type
Then give it the same name you gave to it in the Face Preset Editor and click on FNV64 to generate an Instance ID
That should be it! Save the package, put it into your Mods folder and the new preset should show up In-Game.
If you wish to modify an existing EA preset, these can be found in your Base Game Installation Folder/GameData/Shared/Packages/FullBuild0.package. Open this package with S3PE and filter by the "CBLN" tag. You can extract these files and with the Face Preset Editor, go to File -> Import and locate them to modify them.
Easier way to find slidersTo find the FACE resources, you can also look for the FBLN resources, this might be easier. S3PE will display the TGI of the FACE resource associated with the slider on the preview on the right. If the slider is bi-directional, it will likely have two resources, if so the top one is the FACE resource for the right side (1 to 256) and the bottom one is the resource for the left side (-1 to -256)
Source Code
|
ld_FacePresetEditor.zip
Download
Uploaded: 22nd Feb 2022, 58.0 KB.
3,368 downloads.
|
||||||||
| For a detailed look at individual files, see the Information tab. | ||||||||
Install Instructions
1. Click the download button, or the filename, to download the file to your computer.
2. Extract the zip, rar, or 7z file. Now you will have either a .package or a .sims3pack file.
For Package files:
1. Cut and paste the file into your Documents\Electronic Arts\The Sims 3\Mods\Packages folder. If you do not already have this folder, you should read the full guide to Package files first: Sims 3:Installing Package Fileswiki, so you can make sure your game is fully patched and you have the correct Resource.cfg file.
2. Run the game, and find your content where the creator said it would be (build mode, buy mode, Create-a-Sim, etc.).
For Sims3Pack files:
1. Cut and paste it into your Documents\Electronic Arts\The Sims 3\Downloads folder. If you do not have this folder yet, it is recommended that you open the game and then close it again so that this folder will be automatically created. Then you can place the .sims3pack into your Downloads folder.
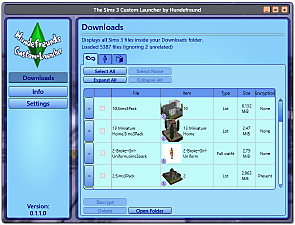
2. Load the game's Launcher, and click on the Downloads tab. Find the item in the list and tick the box beside it. Then press the Install button below the list.
3. Wait for the installer to load, and it will install the content to the game. You will get a message letting you know when it's done.
4. Run the game, and find your content where the creator said it would be (build mode, buy mode, Create-a-Sim, etc.).
Extracting from RAR, ZIP, or 7z: You will need a special program for this. For Windows, we recommend 7-Zip and for Mac OSX, we recommend Keka. Both are free and safe to use.
Need more help?
If you need more info, see:
- For package files: Sims 3:Installing Package Fileswiki
- For Sims3pack files: Game Help:Installing TS3 Packswiki
Loading comments, please wait...
Uploaded: 28th Jan 2022 at 11:18 AM
Updated: 22nd Feb 2022 at 8:20 PM
#tool, #editor, #creator, #face, #face preset, #face template, #preset, #template
-
-
-
by Tashiketh updated 9th Nov 2009 at 11:33pm
 66
120.6k
49
66
120.6k
49
-

Tool to Package Custom Body Hair - update 9/8/12
by CmarNYC updated 11th Jun 2011 at 7:36pm
32
121.5k
70
-
-
-

-
-

by Destrospean updated 15th Jun 2026 at 3:18am
91
16.5k
25
-


-


by LazyDuchess 5th May 2023 at 10:19pm
Overview This mod disables all Social Group Influence gain and removes any existing Influence from all Sims. This is a Script Mod, more...
+1 packs
18 28.8k 96 University Life
-
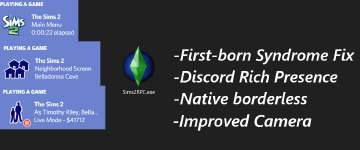

Sims2RPC - Modded Sims 2 Launcher for Mansion and Garden
by LazyDuchess updated 2nd Oct 2021 at 12:39am
Custom launcher with neat features for Sims 2 M&G more...
 +1 packs
329 313.2k 652
+1 packs
329 313.2k 652 Mansion and Garden
-
Smooth Patch 2.1 (Unsupported)
by LazyDuchess updated 5th Nov 2024 at 6:19am
This mod alters the speed at which the game's processing threads run, which improves the overall performance of the game more...
647
1.6m
1.7k
-


by LazyDuchess 30th May 2022 at 11:31pm
Overview This tool is a very simple patch that attempts to workaround the crash on boot issues present on The Sims more...
66
326.8k
119
-
Fridge Leftovers Reworked (Updated 12/14/20)
by LazyDuchess updated 14th Dec 2020 at 6:48pm
Reworked leftovers mechanic to be more in line with modern ones. more...
+1 packs
22 21.7k 59 Seasons
-

by LazyDuchess updated 22nd Apr 2023 at 8:14pm
Overview Here's a small fix/improvement mod I've had for my own personal use for a bit - mainly it attempts to more...
50
207.9k
400
-
by LazyDuchess 30th Jun 2021 at 9:23pm
This mod fixes CAS parts that were made without Bump Map support looking glowy in CAS, or nearly everything being more...
+1 packs
37 36.2k 191 Seasons
-
-
.gif?cbt=1661176413)
.gif)
by LazyDuchess 29th Mar 2022 at 10:29pm
Overview This mod introduces a TS3 version of the SetHour cheat originally from TS2. more...
27
31.5k
109
-
by LazyDuchess 22nd Feb 2021 at 2:28am
Fixes stuck Aging and Aspiration Decay, among other things. more...
6
30.6k
88


.gif?cbt=1661176413)

About Me
Some further elaboration on my TOU:
Please direct to my original uploads as much as possible if you want to redistribute my mods, ideally link directly to the original upload so that people can stay up to date and get them directly from me.
I’ve made updates for or transformative works out of old resources (tools, mods, etc.) myself. I’ve made them with the intention to help preserve and maintain resources that are still useful to the community today, but whose creators have moved on.